Shipping API Integration in PHP with Australia Post Example
In an eCommerce website, we use the shipping API to calculate shipping costs. We calculate based on the items added to the shopping cart.
Integrating Shipping API with an eCommerce website will optimize the logistics cost. It takes care of the shipping needs in an effective way.
Shipping API integration helps eCommerce websites by charging the right amount for shipping. Imagine when we add a random fixed cost to each checkout. What will happen is that we will either overcharge the customer or end up with a direct loss.
In this article, we will see how to integrate the Australia Post shipping API into a PHP application. You can use this code on a shopping cart checkout page to calculate shipping rates.
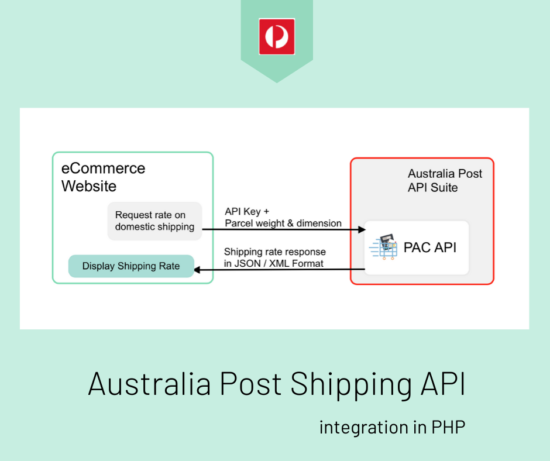
I have created a code to request the Australia Post API to calculate the shipping rates. This rate is for the products on domestic shipping.
What is inside?
- What is Shipping API?
- Utilities of third-party shipping API
- Existing shipping API available
- About Australia Post API
- About this example
- File Structure
- Australia Post shipping API integration steps
- Web interface to get data to calculate shipping rates
- PHP code with Australia Post shipping API request-response handlers
- Australia Post shipping API integration output
What is Shipping API?
Shipping API – a digital intermediate like other APIs. It resolves eCommerce website shipping needs.
Integratable extern responds to the queries generated by the application.
With the available services and capabilities, it helps build the eCommerce website’s shipping needs.
This ready-made solution will smoothen the customer’s buying experience with your online store.
Capabilities of Shipping APIs
For each eCommerce website, the motive to integrate Shipping API differs. This variation depends on the utilities required by the shopping cart.
In general, the capabilities of Shipping APIs are,
- Verifying shipping zone
- Multi-carrier support
- Tracking the order traces during shipment.
With these capability limit, the Shipping APIs provides ultimate services. And, they are huge in number. For example,
- Ensuring the shipping destination and thereby calculating the success probability of the delivery.
- Request a quote for the carrier or shipment.
- Receiving notifications about tracking updates.
The Australia Post shipping API provides services like,
- Postage assessment calculation
- Postal code search
- SecurePay online payments and more.
Existing shipping API available
Postal carrier APIs like DHL, USPS, and Australia Post provide services for the eCommerce website. It offers services like calculating shipping rates, tracking shipped parcels and more.
There are numerous third-party shipping APIs available. For examples Postmen, EasyPost, Shippo and more.
The third-party shipping API has a RESTful interface that connects postal service APIs. It creates a channel to read the API to access its functionalities.
About Australia Post API
Australia Post API suite has the following list of APIs. All these APIs help to fulfill the transactional needs of your eCommerce website.
- Postage assessment calculator – To get the cost for shipping a document or parcel.
- Shipping and tracking – To get service on product dispatch and tracking.
- SecurePay online payments – Payment solutions for an eCommerce website via SecurePay integration.
- Delivery choices API – gives the delivery choices to the user to choose location, speed, day, date, and time.
For accessing the API, it requires the corresponding API key. As per the Australia Post API access requirements it asks to register with the API to get the key.
Australia Post provides an interface to explore the APIs. You may generate live API requests via this explorer to see how it works.
About this example
In this example, it uses the Postage assessment calculator API or PAC of the Australia Post API suite.
This API provides services to calculate the shipping cost. This cost varies based on the parcel weight, dimension, and more parameters.
This API includes various endpoints returning resource data based on the access requests.
I am creating a request for calculating the shipping cost for a domestic parcel. This request needs the corresponding API key. In the next section, we will see how to get the API key for accessing the PAC API.
For this calculation, the API requires the parcel dimension, height, and width. And also, it needs the shipping zone’s origin and destination postal codes. These are all common considering any eCommerce website.
I get the parameters from the user via an HTML form and send it with the API request.
This example uses PHP CURL to access the Australia Post Postage assessment calculator API.
File Structure
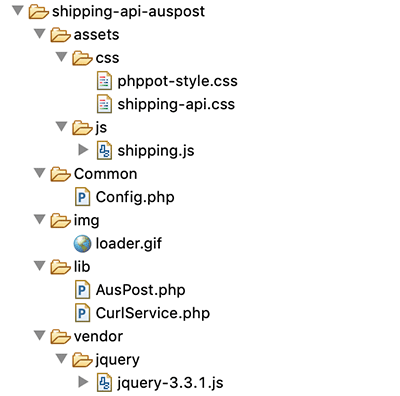
The below screenshot shows the Australia Post shipping rate calculation example files.
Australia Post shipping API integration steps
The steps to integrate Australia Post into an eCommerce website are,
- Choose API from the Australia Post API suite.
- Create a new account to get the API key.
- Choose the postage service and set the endpoint.
- Set the API key as the HTTP header AUTH-KEY.
- Generate the PAC API request with the header set in step 4.
How to get the Australia Post PAC API key
There are many APIs provided by the Australia Post in the API suite. The first step is to choose the API based on the need of your eCommerce website.
As discussed in the last section, I choose PAC API for calculating the shipping cost.
The PAC API access requirements state that it needs the API key. This key is for authenticating the service request generated from the application.
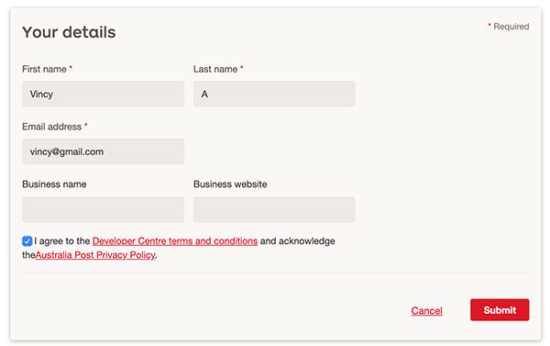
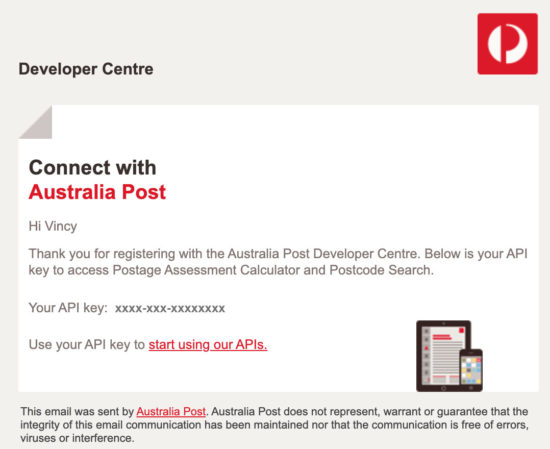
On submitting valid information, it will send the API key to the registered email address. You can use this API then, to access the PAC API services.
Web interface to enter details to calculate shipping rates
This is the code to show a form to collect the product and shipping details.
It has the fields to collect the width, height, weight, and length of the parcel. The form will show the units of these parameters to the user.
Also, it collects the shipping address. This is the shipping destination address. The zip code is a mandatory field among the shipping address fields.
The shipping origin and destination postal codes are mandatory to calculate the rates.
In this example, the postal code of the shipping origin is configurable. You can also move it to the HTML form to let the user enter the data.
index.php
<HTML>
<HEAD>
<TITLE>Shipping API</TITLE>
<link href="./assets/css/phppot-style.css" type="text/css"
	rel="stylesheet" />
<link href="./assets/css/shipping-api.css" type="text/css"
	rel="stylesheet" />
<script src="./vendor/jquery/jquery-3.3.1.js" type="text/javascript"></script>
</HEAD>
<BODY>
	<div class="phppot-container">
		<div class="australian-api">
			<div class="page-heading">Australian Shipping API</div>
			<form name="australian-api" id="australian-api" action=""
				method="post" onsubmit="return formValidation()">
				<div class="sub-heading">Product Details</div>
				<div class="row">
					<div class="inline-block">
						<div class="form-label">
							Length<span class="units-style">(cm)</span><span
								class="required error" id="length-info"></span>
						</div>
						<input class="input-box-110" type="text" name="length" id="length"
							value="<?php if(! empty($_POST["length"])){ echo $_POST["length"];}?>">
					</div>
					<div class="inline-block input-right-margin">
						<div class="form-label">
							Width<span class="units-style">(cm)</span><span
								class="required error" id="width-info"></span>
						</div>
						<input class="input-box-110" type="text" name="width" id="width"
							value="<?php if(! empty($_POST["width"])){ echo $_POST["width"];}?>">
					</div>
					<div class="inline-block">
						<div class="form-label">
							Height<span class="units-style">(cm)</span><span
								class="required error" id="height-info"></span>
						</div>
						<input class="input-box-110" type="text" name="height" id="height"
							value="<?php if(! empty($_POST["height"])){ echo $_POST["height"];}?>">
					</div>
					<div class="inline-block input-right-margin">
						<div class="form-label">
							Weight<span class="units-style">(kg)</span><span
								class="required error" id="weight-info"></span>
						</div>
						<input class="input-box-110" type="text" name="weight" id="weight"
							value="<?php if(! empty($_POST["weight"])){ echo $_POST["weight"];}?>">
					</div>
				</div>
				<div class="row">
					<div class="inline-block">
						<div class="form-label">
							Quantity<span class="required error" id="quantity-info"></span>
						</div>
						<input class="input-box-110" type="number" name="quantity"
							id="quantity"
							value="<?php if(! empty($_POST["quantity"])){ echo $_POST["quantity"];}else{echo 1;}?>">
					</div>
				</div>
				<div class="sub-heading">Shipping Address</div>
				<div class="row">
					<div class="inline-block input-right-margin">
						<div class="form-label">Address1</div>
						<input class="input-box-330" type="text" name="address1"
							id="address1"
							value="<?php if(! empty($_POST["address1"])){ echo $_POST["address1"];}?>">
					</div>
					<div class="inline-block">
						<div class="form-label">Address2</div>
						<input class="input-box-330" type="text" name="address2"
							id="address2"
							value="<?php if(! empty($_POST["address2"])){ echo $_POST["address2"];}?>">
					</div>
				</div>
				<div class="row">
					<div class="inline-block input-right-margin">
						<div class="form-label">Country</div>
						<input class="input-box-330" type="text" name="country"
							id="country"
							value="<?php if(! empty($_POST["country"])){ echo $_POST["country"];}?>">
					</div>
					<div class="inline-block">
						<div class="form-label">State</div>
						<input class="input-box-330" type="text" name="state" id="state"
							value="<?php if(! empty($_POST["state"])){ echo $_POST["state"];}?>">
					</div>
				</div>
				<div class="row">
					<div class="inline-block input-right-margin">
						<div class="form-label">City</div>
						<input class="input-box-330" type="text" name="city" id="city"
							value="<?php if(! empty($_POST["city"])){ echo $_POST["city"];}?>">
					</div>
					<div class="inline-block">
						<div class="form-label">
							Zip Code<span class="required error" id="to-postcode-info"></span>
						</div>
						<input class="input-box-330" type="text" name="to-postcode"
							id="to-postcode"
							value="<?php if(! empty($_POST["to-postcode"])){ echo $_POST["to-postcode"];}?>">
					</div>
				</div>
				<div class="row">
					<div id="inline-block">
						<input type="submit" class="submit-button" name="submit-btn"
							id="submit-btn" value="Get Quote"><span><img src="img/loader.gif"
							class="loader-ic" id="loader-icon"></span>
					</div>
				</div>
			</form>
			<?php
if (! empty($shippingPrice)) {
    ?><div>
				<div class="sub-heading">Shipping Details</div>
				<div class="row">
					<label class="shipping-result">Address1:</label> <?php echo $address1;?></div>
				<div class="row">
					<label class="shipping-result">Address2:</label> <?php echo $address2;?></div>
				<div class="row">
					<label class="shipping-result">Country:</label> <?php echo $country;?></div>
				<div class="row">
					<label class="shipping-result">State:</label> <?php echo $state;?></div>
				<div class="row">
					<label class="shipping-result">City:</label> <?php echo $city;?></div>
				<div class="row">
					<label class="shipping-result">Quantity:</label> <?php echo $quantity;?></div>
				<div class="row">
					<label class="shipping-result">Shipping price:</label> $<?php echo $quantity * $shippingPrice;?></div>
			</div>
<?php }else if(!empty($errorMsg)){?>
			<div class="error-message"><?php echo $errorMsg;?></div>
			<?php }?>
		</div>
	</div>
	<script src="./assets/js/shipping.js"></script>
</BODY>
</HTML>
CSS created to present the payment form
This CSS includes basic styles to show the shipping form to the user. It has exclusive styles related to this example.
Apart from that, this example contains a generic CSS phppot-styles.css. It contains common template styles with a list of selectors. You can find this generic CSS in the downloadable source.
assets/css/shipping-api.css
.australian-api {
	background: #fff;
	border-radius: 4px;
	padding: 10px;
	width: 85%;
	margin: 20px 40px;
}

.page-heading {
	font-size: 2em;
	font-weight: bold;
}

.sub-heading {
	font-size: 1.2em;
	font-weight: bold;
	margin: 20px 0px;
}

.inline-block {
	display: inline-block;
}

.row {
	margin: 15px 0px;
}

.form-label {
	margin-bottom: 5px;
	text-align: left;
}

input.input-box-330 {
	width: 250px;
}

input.input-box-110 {
	width: 120px;
	margin-right: 5px;
}

.australian-api .error {
	color: #ee0000;
	padding: 0px;
	background: none;
	border: #ee0000;
}

.australian-api .error-field {
	border: 1px solid #d96557;
}

.australian-api .error:before {
	content: '*';
	padding: 0 3px;
	color: #D8000C;
}

input.submit-button {
	background-color: #ffb932;
	border-color: #ffc87a #e2a348 #da9d0a;
	text-align: center;
	cursor: pointer;
	color: #000;
	width: 100px;
}

.input-right-margin {
	margin-right: 30px;
}

.shipping-result {
	font-weight: bold;
	color: #737171;
	padding: 15px 0px;
}

.error-message {
	color: #D8000C;
}

.units-style {
	font-size: 0.8em;
	color: #666;
	margin-left: 2px;
}

.loader-ic {
	display: none;
}
jQuery script to validate the shipping details
The shipping.js file contains the form validation function. It validates the mandatory fields and makes sure that they are not empty.
It returns a boolean based on which the form-post is carried forward to PHP. While returning false, it highlights what’s wrong with the entered data.
After successful validation, PHP will validate the shipping attributes sent via the form.
assets/js/shipping.js
function formValidation() {
	var valid = true;
	$("#length").removeClass("error-field");
	$("#width").removeClass("error-field");
	$("#height").removeClass("error-field");
	$("#weight").removeClass("error-field");
	$("#quantity").removeClass("error-field");
	$("#to-postcode").removeClass("error-field");

	var Length = $("#length").val();
	var Width = $("#width").val();
	var Height = $("#height").val();
	var Weight = $("#weight").val();
	var Quantity = $("#quantity").val();
	var toPostcode = $("#to-postcode").val();

	if (Length.trim() == "") {
		$("#length-info").html("").css("color", "#ee0000").show();
		$("#length").addClass("error-field");
		valid = false;
	}
	if (Width.trim() == "") {
		$("#width-info").css("color", "#ee0000").show();
		$("#width").addClass("error-field");
		valid = false;
	}
	if (Height.trim() == "") {
		$("#height-info").css("color", "#ee0000").show();
		$("#height").addClass("error-field");
		valid = false;
	}
	if (Weight.trim() == "") {
		$("#weight-info").css("color", "#ee0000").show();
		$("#weight").addClass("error-field");
		valid = false;
	}
	if (Quantity.trim() == "" || Quantity < 1) {
		$("#quantity-info").css("color", "#ee0000").show();
		$("#quantity").addClass("error-field");
		valid = false;
	}
	if (toPostcode.trim() == "") {
		$("#to-postcode-info").css("color", "#ee0000").show();
		$("#to-postcode").addClass("error-field");
		valid = false;
	}
	if (valid == false) {
		$('.error-field').first().focus();
		valid = false;
	}
	if (valid == true) {
		$("#submit-btn").hide();
		$("#loader-icon").show();
	}
	return valid;
}
PHP code with Australia Post shipping API request-response handlers
This is the configuration file of this example code. It has the constants defined for keeping the API key and shipping origin.
Common/Config.php
<?php
namespace Phppot;

class Config
{

    const AUSTRALIAN_POST_API_KEY = 'REPLACE_WITH_THE_API_KEY';

    const SHIPPING_ORIGION = '1000';
}
?>
This is an exclusive service class for executing curl script. The execute() function is receiving URL, and API KEY as its parameters.
It initiates the curl object and set the URL. It sets the header with the API key to call the Australia Post live URL.
The rawBody will receive the API response in JSON format. You can use this as a sample to build an eCommerce website backed by a shopping cart with shipping API integration.
lib/CurlService.php
<?php
namespace Phppot;

class CurlService
{

    public function execute($url, $apiKey, $ch = null)
    {
        if (is_null($ch)) {
            $ch = curl_init();
        }
        curl_setopt($ch, CURLOPT_URL, $url);
        curl_setopt($ch, CURLOPT_RETURNTRANSFER, 1);
        curl_setopt($ch, CURLOPT_SSL_VERIFYHOST, 0);
        curl_setopt($ch, CURLOPT_SSL_VERIFYPEER, false);
        curl_setopt($ch, CURLOPT_HTTPHEADER, array(
            'AUTH-KEY: ' . $apiKey
        ));

        return $rawBody = curl_exec($ch);
    }
}
?>
The AusPost.php PHP class handles the operation for preparing the API request.
The getShipmentPrice() function set the API key and forms data to the PHP variables. It prepares the query parameters with these variables.
The class constructor instantiates the curlService created for this example.
Using the curl instance, it hits the Australia Post live PAC API URL. The API will validate the shipping criteria passed with the query parameters.
The request and response can be of either JSON or XML.
lib/AusPost.php
<?php
namespace Phppot;

class AusPost
{

    private $curlService;

    private $api_url = 'https://digitalapi.auspost.com.au/postage/parcel/domestic/calculate?';

    public function __construct()
    {
        require_once __DIR__ . '/CurlService.php';
        $this->curlService = new CurlService();
    }

    public function getShipmentPrice()
    {
        require_once __DIR__ . '/../Common/Config.php';
        $con = new Config();
        $apiKey = $con::AUSTRALIAN_POST_API_KEY;

        $fromPostcode = $con::SHIPPING_ORIGION;
        $toPostcode = $_POST["to-postcode"];
        $length = $_POST["length"];
        $width = $_POST["width"];
        $height = $_POST["height"];
        $weight = $_POST["weight"];

        $queryParams = array(
            "from_postcode" => $fromPostcode,
            "to_postcode" => $toPostcode,
            "length" => $length,
            "width" => $width,
            "height" => $height,
            "weight" => $weight,
            "service_code" => "AUS_PARCEL_REGULAR"
        );

        // here use $curlService and execute
        $url = $this->api_url . http_build_query($queryParams);
        $result = $this->curlService->execute($url, $apiKey);
        $shippingResult = json_decode($result);
        return $shippingResult;
    }
}
?>
index.php (PHP Code)
<?php
namespace Phppot;

if (! empty($_POST["submit-btn"])) {
    require_once __DIR__ . '/lib/AusPost.php';
    $shippingApi = new AusPost();
    $result = $shippingApi->getShipmentPrice();
    if (isset($result->postage_result)) {
        $shippingPrice = $result->postage_result->total_cost;
    } else {
        $errorMsg = $result->error->errorMessage;
    }
    $quantity = $_POST["quantity"];
    $address1 = $_POST["address1"];
    $address2 = $_POST["address2"];
    $state = $_POST["state"];
    $country = $_POST["country"];
    $city = $_POST["city"];
}
?>
Australia Post shipping API integration output
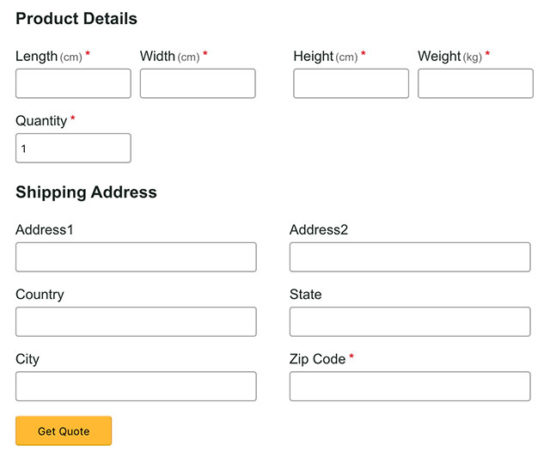
The output screenshot below shows the payment and shipping form. It is to get the shipping details from the user.
It also has the fields to collect parameters like height, width and the dimension of the products.
You can also integrate this form into your shopping cart checkout page to calculate rates. For a shopping cart, it requires only the shipping address.
Because, the height, width, and height will be a part of a product entity. And the quantity can be read from the cart session or database. The below form is generic and with little customization can be used for any eCommerce website.

Hi!!!, ma’am is this code will send messages to the mobile phone or email address after sending?
This code will get shipping rate via the Australian shipping API.
Hi there,
May i please know where to past these code for my Shopify website?
Hi Yash,
To use this PHP script on Shopify, first you need to convert this to be a plugin compatible with Shopify.
I love your site sister. I even used many of your code to teach myself.
Thanks A LOT
Welcome Abdurrahman.
Hoping you may be able to help!
First time user, I’m so confused as this is not my area of expertise!
What API code do I put in Shippo on Shopify when adding in Australia Post. Thanks in advance.
Hi Amelia,
For Shippo on Shopify, you should consult their API documentation.