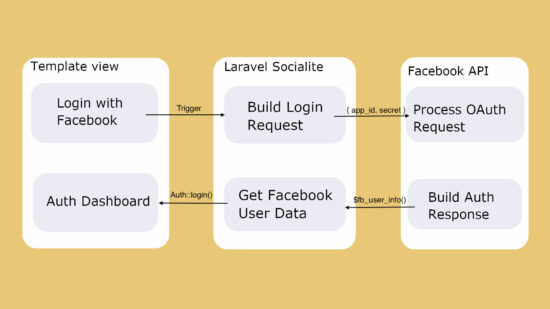
This is the second article in the sequence on learning Laravel social login. Before, we saw how to enable Google OAuth login in a Laravel login form.
This tutorial gives guidelines on integrating Facebook login with Laravel Socialite.
Apart from the Socialite package, this article further needs Laravel/ui to get an authentication module. Various Laravel packages can bring the authentication scaffolding into the application. Examples are Jetstream, Breeze, and more.
If you are new to Laravel, see how to create a project and set up authentication in this linked Google social login article.
Steps to create Facebook OAuth credentials
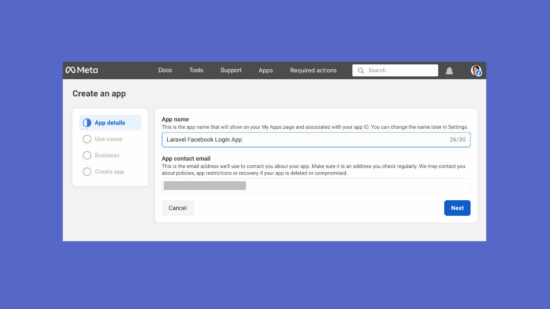
Once the Laravel Facebook login project is created, then the next step is to get and configure the Facebook OAuth credentials. The Facebook OAuth API request needs the App ID and App Secret for authorizing the client request.
- Log in to the FaceBook developer portal.
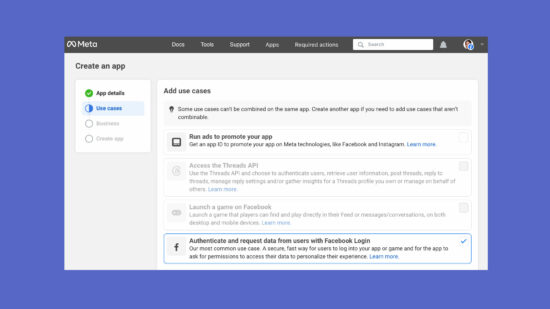
- Go to My Apps page and click the Create App button
- Choose the Usecases menu and select options to get permission to access user data.
- Send for app review to publish the app. This is mandatory before going to production.
- Go to App Settings -> Basic and get the App ID and App Secret
- Choose Facebook Login and set up a domain and Valid OAuth Redirect URI.
Add HTTPS URL
Facebook needs an HTTPS URL to register a Valid OAuth Redirect URI as a callback.
There are many ways to get a HTTPS URL for your local dev environment. Example: The tunneling tool like ngrok gives HTTPS URL mapping for the local dev server URL.
Add App Roles
Before going to production, the Facebook authentication should be tested. In development mode, the API will allow only the users to be part of the app.
Go to App Roles and add Developers or Testers to allow your team to test Laravel Facebook login.
Configure Facebook App ID in Laravel App
From this section, it involves changes to the Laravel app config, model, view, and controllers.
The first step is to configure the Database and the Facebook configurations into the .env file. Since we have seen the Database configuration and other basics in the beginners’ tutorial, the below code shows only the Facebook app config.
.env
FACEBOOK_APP_ID="APP ID HERE"
FACEBOOK_APP_SECRET="APP SECRET HERE"
Add Laravel .env constants for having the Facebook OAuth login credentials. This constant has to be added to the services.php
config/services.php
<?php

return [

    ...
    ...

    'facebook' => [
        'client_id' => env('FACEBOOK_APP_ID'),
        'client_secret' => env('FACEBOOK_APP_SECRET'),
        'redirect' => env('http://127.0.0.1:8000/facebook/login/callback'),
    ],

];
?>
Add ‘Sign in with Facebook’ to the login template
Once installing Laravel authentication package, the UI files will be brought to the application.
The below code is to add the ‘Sign in with Facebook’ option to the Laravel login template.
It is linked to a redirect for sending OAuth login requests to the FaceBook API.
App\Http\Controllers\login.blade.php
<div class="row mb-0">
    <div class="col-md-12 text-center">
        <a href="{{ route('facebook_login_redirect') }}">
            <button type="button" class="btn px-4 py-2 w-50 btn-fb">
                <img src="images/facebook.svg" width="24" class="mx-1 fb-logo-icon" /> Facebook
            </button>
        </a>
    </div>
</div>
Load CSS and JS
In the parent layout template, it imports the CSS and JS assets using the vite directive.
resources/views/layouts/app.blade.php
<!-- Scripts -->
@vite(['resources/sass/app.scss', 'resources/js/app.js', 'resources/css/app.css'])
To import assets via this directive, we have to manage the CSS and JS resource in an array with the vite.config.js
vite.config.js
import { defineConfig } from 'vite';
import laravel from 'laravel-vite-plugin';
import vue from '@vitejs/plugin-vue';

export default defineConfig({
    plugins: [
        laravel({
            input: [
                'resources/sass/app.scss',
                'resources/js/app.js',
                'resources/css/app.css'
            ],
            refresh: true,
        }),
    ]
}];
Laravel Facebook login web routes
There are two routes to handle Facebook login. One for API call and the other for capture callback from the API. We have already seen such a pair of URLs when learning Laravel Google OAuth login.
routes\web.php
Route::get('/facebook/login/redirect', [App\Http\Controllers\FacebookAuthLoginController::class, 'handleFacebookLogin'])->name('facebook_login_redirect');
Route::get('/facebook/login/callback', [App\Http\Controllers\FacebookAuthLoginController::class, 'handleFacebookAuthAPICallback'])->name('facebook_login_callback');
These rules map the controller handle to process the OAuth login actions.
Create a controller to handle Facebook login
Create a controller class by running php artisan make:controller FacebookAuthLoginController. This class should have the login handlers to build and capture the request and response, respectively.
The below code shows those functions to learn how to send requests to the API via Laravel Socialite.
app\Http\Controllers\FacebookAuthLoginController.php
<?php
namespace App\Http\Controllers;
use App\Models\User;
use Laravel\Socialite\Facades\Socialite;
use Illuminate\Support\Facades\Auth;
class FacebookAuthLoginController extends Controller
{
    public function handleFacebookLogin()
    {
        return Socialite::driver('facebook')->redirect();
    }
    public function handleFacebookAuthAPICallback()
    {
        $facebookUser = Socialite::driver('facebook')->stateless()->user();
        $user = User::where('provider_id', $facebookUser->id)->first();
        $facebookAccountEmail = $facebookUser->email ?: $facebookUser->id . '@facebook.local';
        if (!$user) {
            $user = User::create(['name' => $facebookUser->name, 'email' => $facebookAccountEmail, 'password' => \Hash::make(rand(100000, 999999))]);
        }
        Auth::login($user);
        return redirect()->route("home");
    }
}
Add fillables[] to store OAuth provider
The user’s database table will have only basic fields like email, and password in the users table. We have to add more fields to store the OAuth login information like a unique id from Facebook API.
This ID is returned by the API with a callback to uniquely identify the Facebook OAuth user logged in.
I have added two columns provider and provider_id. The provider column will have ‘Facebook’ and the provider_id is a unique id returned by the API.
app\Models\Users.php
protected $fillable = [
'name',
'email',
'password',
'provider',
'provider_id',
];