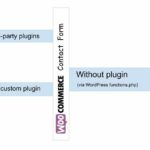
In the last article I wrote about setting up a WooCommerce product enquiry form using existing third-party plugins. There are many WordPress plugins for having an enquiry form on a WordPress site.
As a developer we can build a WooCommerce product enquiry form custom plugin easily. It will be lightweight, good for enhancement and maintenance, above all fun too.
The 3-party plugins give a massive package with voluminous functionalities and features. They have form builders, email template builders and all.
For having an enquiry form with a few fields, it can be customized simply without third party bundles. It helps to have a tiny and self-manageable code which is best.
If you want to know how to create a WooCommerce contact form with 3-party plugins, see my last article linked.
Steps to create a WooCommerce product enquiry form plugin
- Create a contact form plugin directory and file.
- Design a WooCommerce product enquiry form template.
- Create the CSS and JavaScript assets of a plugin.
- Load the form templates into the page content.
- Enqueue the WordPress plugin assets.
- Send product enquiry via WordPress AJAX on form submit.
- Hook wp_ajax to send product enquiry mail.
Create a contact form plugin directory and file
Create a directory named “woocommerce-contact-form” in the WordPress plugin directory.
<wordpress-application-root>/wp-content/plugins/
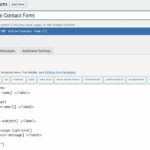
Then, create a file woocommerce-contact-form.php into it with the following plugin header. The header must have the plugin name, URI, author and more details.
/*
 Plugin Name:  WooCommerce Contact Form
 Plugin URI:   https://phppot.com
 Description:  A simple custom enquiry form plugin to a WooCommerce site. It has name, email and message fields to collect data from the customers.
 Version:      1.0
 Author:       Vincy
 Author URI:   https://phppot.com
 */
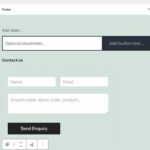
Design WooCommerce product enquiry form
Create a template file inside the plugin directory as <woocommerce-contact-form>/templates/contact-form.php.
Put this HTML into the file to display a contact form with Name, Email and Message fields.
This template file is loaded into the product page using a WordPress filter hook via this plugin.
<h3>Product enquiry</h3>
<div id="woocommerce-contact-form">
	<form method="post" id="frmContactForm" action="">
		<div class="display-flex">
			<input name="customer_name" id="customer_name" placeholder="Name" /><input
				name="customer_email" id="customer_email" placeholder="Email" />
		</div>
		<div>
			<textarea name="customer_message" id="customer_message"
				placeholder="Enquire seller about order, product.."></textarea>
		</div>
		<div>
			<input type="submit" name="send_mail" class="btn-send" value="Send Enquiry" />
		</div>
		<div id="response"></div>
	</form>
</div>
Create plugin assets
This plugin uses simple CSS and JavaScript assets. The CSS provides minimal styles to make the enquiry form suit any shop theme.
If you want to change this WooCommerce product enquiry form theme, this CSS file will be useful.
#woocommerce-contact-form {
	width: 500px;
	border: #CCC 1px solid;
	padding: 25px 5px 25px 25px;
	border-radius: 3px;
}

#woocommerce-contact-form input {
	border: #CCC 1px solid;
	width: 50%;
	padding: 10px;
	margin: 15px 20px 15px 0px;
	border-radius: 3px;
}

#woocommerce-contact-form textarea {
	border: #CCC 1px solid;
	width: 96%;
	border-radius: 3px;
	box-sizing: border-box;
	padding: 10px;
	margin: 15px 20px 15px 0px;
}

.display-flex {
	display: flex;
}

#woocommerce-contact-form input.btn-send {
	color: #FFF;
	background: #232323;
	border-radius: 3px;
	border: #000 1px solid;
}

#response {
	display: none;
}
JavaScript enquiry form validation and submission via AJAX
This script uses jQuery to handle form validation and submit the posted data via AJAX.
All the fields are required to be entered to send the product enquiry from the WooCommerce page.
Once the conditions return true, then the jQuery AJAX will serialize the form data and post it to the server.
All client-side and server-side responses are sent to UI using jQuery .text().
$(document).ready(function(e) {
	// WooCommerce product enquiry form submit event handler
	$("#frmContactForm").on('submit',  function(e) {
		e.preventDefault();
		var name = $('#customer_name').val();
		var email = $('#customer_email').val();
		var message = $('#customer_message').val();
		// Validate all fields in client side
		if (email  ==  "" || message  == "" || name == "") {
			$("#response").show();
			$("#response").text("All fields are required.");
		} else {
			$("#response").hide();
			$('.btn-send').hide();
			$('#loader-icon').show();

			// Post form via wp-ajax
			$.ajax({
				url: "/wordpress/send-contact-email/",
				type: "POST",
				data: $("#frmContactForm").serialize(),
				success: function(response) {
					$("#response").show();
					$('#loader-icon').hide();
					if (!response) {
						$('.btn-send').show();
						$("#response").html("Problem occurred.");
					} else {
						$('.btn-send').hide();
						$("#response").html("Thank you for your message.")
					};
				},
				error: function() { }
			});
		}
	});
});
The AJAX script points to a URL that is mapped with the wp_ajax endpoint via .htaccess.
The send_contact_email action param hooks the wp_ajax action filter in the plugin file.
# BEGIN Shop
<IfModule mod_rewrite.c>
RewriteRule send-contact-email/ /wordpress/wp-admin/admin-ajax.php?action=send_contact_email [L,QSA]
</IfModule>
# END Shop
WooCommerce product enquiry form plugin file
This is the main file that hooks the required action and filter callback of WordPress. These callbacks are to do the following by activating this plugin.
- Load the contact form template using ‘the_content’ filter hook.
- Enqueue the form.css and form.js files created for this WooCommerce product enquiry form. (Also enqueued the jQuery CDN path).
- Hook the
wp_ajax_nopriv_*to execute thesend_contact_emailcallback by listening the AJAX request.
The load_contact_form function reads the template content by using PHP file_get_contents() function. It appends the content to the page content on a condition basic.
Before adding the WooCommerce product enquiry form it checks if it is a product page. If so, is_product() returns boolean true.
<?php

function load_contact_form($contactHTML) {

    // Load the contact form on a single product page
    if ( is_product() ){
        $template_path = plugin_dir_path( __FILE__ ) . 'templates/contact-form.php';
        $contactHTML .= file_get_contents( $template_path);

    }
    return $contactHTML;

}
// add filter to hook 'the_content' with a plugin functions.
add_filter('the_content', 'load_contact_form');

/**
 * Enqueues scripts and styles for front end.
 *
 * @return void
 */
function woocommerce_contact_form_styles()
{
    if (is_product()) {
        wp_enqueue_style('contact-form-style', plugin_dir_url( __FILE__ ) . 'assets/form.css', array(), null);
        wp_enqueue_script('contact-form-jquery', 'https://code.jquery.com/jquery-3.6.0.min.js', array(), null);
        wp_enqueue_script('contact-form-script', plugin_dir_url( __FILE__ ) . 'assets/form.js', array(), null);
    }
}
add_action('wp_enqueue_scripts', 'woocommerce_contact_form_styles');
Hook wp_ajax action with the contact email sending callback
The below code is part of the woocommerce_contact_form.php plugin file. It defines a callback send_contact_email().
The WooComerce product enquiry form plugin has the action and filter callbacks. It is called when it receives the wp_ajax request from the following URL.
/wordpress/wp-admin/admin-ajax.php?action=send_contact_email.
It builds the wp_mail() parameters to send the product enquiry to the shop admin or seller. The $to holds the recipient’s address.
It builds the mail body with the data posted via the WooCommerce product enquiry form.
Using wp_mail() is a simple way of sending email via WordPress. It is as similar to PHP mail as it has a one-line code for sending emails. You may configure SMTP to send email via WordPress.
function send_contact_email()
{
    $customerName = filter_var($_POST["customer_name"], FILTER_SANITIZE_STRING);
    $customerEmail = filter_var($_POST["customer_email"], FILTER_SANITIZE_STRING);
    $customerMessage = filter_var($_POST["customer_message"], FILTER_SANITIZE_STRING);

    $to = 'RECIPIETNT EMAIL HERE';
    $subject = 'Product enquiry';
    $body = 'The customer details: <br/><br/>';

    if(!empty($customerName)) {
        $body = 'Customer Name:' . $customerName . '<br/>';
        $body .= 'Customer Email:' . $customerEmail . '<br/>';
        $body .= 'Customer Message:' . '<br/>';
        $body .= $customerMessage . '<br/>';
    }

    $headers = array('Content-Type: text/html; charset=UTF-8');

    $emailSent = wp_mail( $to, $subject, $body, $headers );

    print $emailSent;
    exit;
}
add_action("wp_ajax_nopriv_send_contact_email", "send_contact_email");
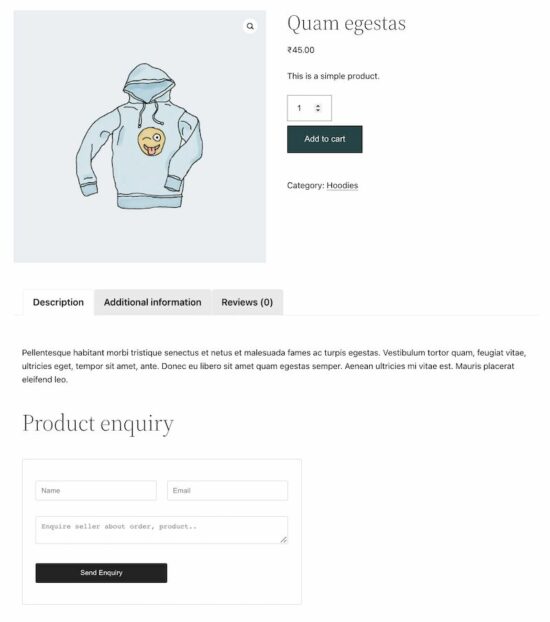
WooCommence product page with contact form
With all prerequisites and complete coding of the custom plugin, it’s time to enable it.
Go to WordPress admin and navigate via Plugins->Installed Plugins using the left menu.
You may see the ‘WooCommerce Contact Form’ plugin in the installed list. Activate the plugin and visit the product page of the shop.
See the screenshot shown at the beginning of the article. It displays the WooCommerce product enquiry form on a product page.
Conclusion
Thus, we have created a plugin for a WooCommerce product enquiry form with simple code. If you want any customization with this plugin, please let me know in the comments section.
Let us see the other methods of displaying a contact form on a WooCommerce site in the upcoming article.