This React example is a very good start of building a React shopping cart. It combines two major parts of an eCommerce UI. Those are 1) a product gallery and 2) a client-side shopping cart with a checkout option.
After reading this tutorial, you will know how to code the following in a React App.
- How to fetch and display products in an eCommerce gallery.
- How to process “add-to-cart”.
- How to manage cart items with localStorage using React state.
- How to handle cart checkout to move the purchased items into an order list.
A lightweight front-end eCommerce code built in React
This lightweight shopping cart supports add, delete and quantity update including increment and decrement features.
The products and cart are managed on the client-side, whereas the checkout includes database intervention. Once checkout the order is placed by moving the selected item to a database entry.
The database is linked with the checkout process. This is to give a lead to move everything based on a database-driven management, if you want.
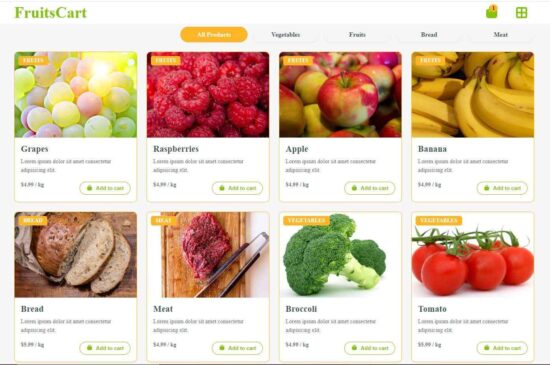
Modern UI – Product gallery, Cart interface using React components
Product gallery with category navbar
The product gallery includes a navbar header to show the category menu. It classifies the available products by grouping them into categories.
This example includes 4 sample categories. The selected category is set using the React useState to load classified product cards.
The Products.jsx file sets the product data array and the required React useState. It returns the product cards markup by iterating the data array.
Each product card has a button HTML with a custom hook addToCart().
src/components/Products.jsx
import React, { useState, useEffect } from "react";
import "./Product.css";
const productData = [
  { id: 1, name: "Grapes", category: "Fruits", price: 4.99, image: "img/fruite-item-5.jpg" },
  { id: 2, name: "Raspberries", category: "Fruits", price: 4.99, image: "img/fruite-item-2.jpg" },
  { id: 3, name: "Apple", category: "Fruits", price: 4.99, image: "img/fruite-item-6.jpg" },
  { id: 4, name: "Banana", category: "Fruits", price: 4.99, image: "img/fruite-item-3.jpg" },
  { id: 5, name: "Bread", category: "Bread", price: 5.99, image: "img/bread-item.jpg" },
  { id: 6, name: "Meat", category: "Meat", price: 4.99, image: "img/meat-item.jpg" },
  { id: 7, name: "Broccoli", category: "Vegetables", price: 4.99, image: "img/vegetable-item-2.jpg" },
  { id: 8, name: "Tomato", category: "Vegetables", price: 5.99, image: "img/vegetable-item-1.jpg" }
];
const Product = () => {
  const [loadingId, setLoadingId] = useState(null);
  const [addedId, setAddedId] = useState(null);
  const [selectedCategory, setSelectedCategory] = useState("All");
  useEffect(() => {
    document.title = "React Shopping Cart";
  }, []);
  const filteredProducts =
    selectedCategory === "All"
      ? productData
      : productData.filter((p) => p.category === selectedCategory);
  return (
    <section className="product-section">
      <div className="product-container">
        <div className="product-grid">
          {filteredProducts.map((product) => (
            <div className="product-card" key={product.id}>
              <div className="product-image-container">
                <img src={product.image} alt={product.name} className="product-image" />
                <div className="product-category-tag">{product.category}</div>
              </div>
              <div className="product-details">
                <h4>{product.name}</h4>
                <p>Lorem ipsum dolor sit amet consectetur adipisicing elit.</p>
                <div className="product-info-row">
                  <p className="product-price">${product.price.toFixed(2)} / kg</p>
                  <button
                    className="add-to-cart-btn"
                    onClick={() => addToCart(product)}
                    disabled={addedId === product.id || loadingId === product.id}
                    style={{
                      backgroundColor: addedId === product.id ? "#81c408" : undefined,
                      color: addedId === product.id ? "#fff" : undefined,
                    }}
                  >
                    {loadingId === product.id ? (
                      <img
                        src="img/loader.svg"
                        alt="Loading..."
                        style={{ width: "20px", height: "20px" }}
                      />
                    ) : addedId === product.id ? (
                      "Added"
                    ) : (
                      <>
                        <i className="fa fa-shopping-bag cart-icon"></i> Add to cart
                      </>
                    )}
                  </button>
                </div>
              </div>
            </div>
          ))}
        </div>
      </div>
    </section>
  );
};
export default Product;
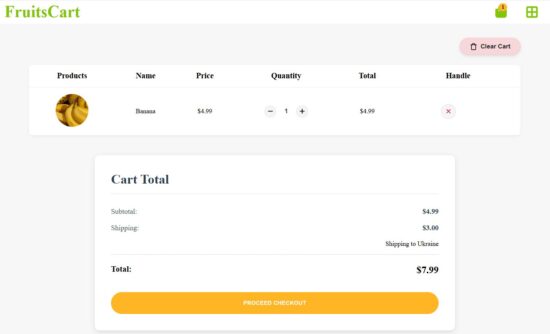
Shopping cart HTML with edit and delete feature
The React shopping cart JSX file manages cart items in the JavaScript localStorage. The React UseEffect reads the cart items from the localStorage on document mount.
The stored items are set into a state variable by using the setCart(). The setCart() updates the state on each add, delete action trigger.
The syncCart function is called on changing the cart item quantity. This will update the cart state and localStorage. It computes the total cart items and update the header badge with the latest cart item count.
src/components/CartPage.jsx
import React, { useEffect, useState } from "react";
import { useNavigate } from "react-router-dom";
import axios from "axios";

import "./CartPage.css";

const CartPage = () => {
  const [cart, setCart] = useState([]);
  const [loadingCheckout, setLoadingCheckout] = useState(false);

  const navigate = useNavigate();


  useEffect(() => {
    document.title = "React Shopping Cart - Checkout";
    const storedCart = JSON.parse(localStorage.getItem("cart")) || [];
    setCart(storedCart);
  }, []);

  const syncCart = (updatedCart) => {
    setCart(updatedCart);
    localStorage.setItem("cart", JSON.stringify(updatedCart));
    const totalItems = updatedCart.reduce((sum, item) => sum + item.quantity, 0);
    window.dispatchEvent(new CustomEvent("cartUpdated", { detail: totalItems }));
  };

  if (cart.length === 0) {
    return (
      <h1
        style={{
          color: "#81c408",
          textAlign: "center",
          marginTop: "110px",
          backgroundColor: "#f7f7f7",
          padding: "20px",
          borderRadius: "8px",
          height: "100%"
        }}
      >
        Your cart is empty!
      </h1>
    );
  }

  return (
    <div className="cart-page">
      <div className="cart-container">
        <div className="clear-cart-wrapper">
          <button className="clear-cart-btn" onClick={() => {
            localStorage.removeItem("cart");
            setCart([]);
            window.dispatchEvent(new CustomEvent("cartUpdated", { detail: 0 }));
          }}><img src="/img/trash.svg" className="img-trash" alt="trash" />
            Clear Cart
          </button>
        </div>
        {/* Cart Table */}
        <table className="cart-table">
          <thead>
            <tr>
              <th>Products</th>
              <th>Name</th>
              <th>Price</th>
              <th>Quantity</th>
              <th>Total</th>
              <th>Handle</th>
            </tr>
          </thead>
          <tbody>
            {cart.map((item) => (
              <tr key={item.id}>
                <td><img src={item.image} alt={item.name} /></td>
                <td>{item.name}</td>
                <td>${item.price.toFixed(2)}</td>
                <td>
                  <div className="quantity-control">
                    <button className="quantity-btn" onClick={() => updateQuantity(item.id, -1)}>
                      <i className="fa fa-minus"></i>
                    </button>
                    <input type="text" className="quantity-input" value={item.quantity} readOnly />
                    <button className="quantity-btn" onClick={() => updateQuantity(item.id, 1)}>
                      <i className="fa fa-plus"></i>
                    </button>
                  </div>
                </td>
                <td>${(item.price * item.quantity).toFixed(2)}</td>
                <td>
                  <button className="remove-btn" onClick={() => removeItem(item.id)}>
                    <i className="fa fa-times"></i>
                  </button>
                </td>
              </tr>
            ))}
          </tbody>
        </table>

        {/* Cart Summary */}
        <div className="cart-layout">

          <div className="cart-summary">
            <h2>Cart Total</h2>
            <div className="summary-row">
              <h5>Subtotal:</h5>
              <p>${subtotal.toFixed(2)}</p>
            </div>
            <div className="summary-row">
              <h5>Shipping:</h5>
              <p>${shipping.toFixed(2)}</p>
            </div>
            <p style={{ textAlign: "right", marginBottom: "1rem" }}>
              Shipping to Ukraine
            </p>
            <div className="summary-total">
              <h5>Total:</h5>
              <p>${total.toFixed(2)}</p>
            </div>
            <button
              className="checkout-btn"
              onClick={checkout}
              disabled={loadingCheckout}
              style={{
                display: "flex",
                alignItems: "center",
                justifyContent: "center",
                gap: "8px",
              }}
            >
              {loadingCheckout && (
                <img
                  src="img/loader.svg"
                  alt="Loading..."
                  style={{ width: "20px", height: "20px" }}
                />
              )}
              {loadingCheckout ? "Processing..." : "Proceed Checkout"}
            </button>


          </div>
        </div>
      </div>
    </div>
  );
};

export default CartPage;
Smooth product browsing and cart management
With the help of the product category menu, browsing the available products is very smooth and effortless.
The product.js script defines the addToCart() function. When adding a new product to the cart, this functions checks if it exists already.
For an existing cart product, this function just updates the quantity. This is to avoid the confusion of having multiple rows with duplicate product details.
When the cart’s useState is updated, a custom event “cartUpdated” is dispatched with the information of the latest cart item count. This event is listened to in the eCommerce header JSX to update the counter badge.
Part of product.js
const addToCart = (product) => {
    setLoadingId(product.id); // show spinner
    setTimeout(() => {
      // Add to localStorage
      let cart = JSON.parse(localStorage.getItem("cart")) || [];
      const existing = cart.find((item) => item.id === product.id);
      if (existing) {
        existing.quantity += 1;
      } else {
        cart.push({ ...product, quantity: 1 });
      }
      localStorage.setItem("cart", JSON.stringify(cart));
      // Update Navbar cart count
      const totalItems = cart.reduce((sum, item) => sum + item.quantity, 0);
      window.dispatchEvent(new CustomEvent("cartUpdated", { detail: totalItems }));
      setLoadingId(null);
      setAddedId(product.id);
    }, 1000);
  };
Part of CartPage.js
const updateQuantity = (id, delta) => {
    const updated = cart.map((item) =>
      item.id === id ? { ...item, quantity: Math.max(1, item.quantity + delta) } : item
    );
    syncCart(updated);
  };
  const removeItem = (id) => {
    const updated = cart.filter((item) => item.id !== id);
    syncCart(updated);
  };
Client-side shopping experience with persistent cart data
The script below shows the definition of the React shopping cart checkout process. In this function, I connected the PHP endpoint to show how to link with the backend when working with a front-end React app.
This project downloadable contains the bundle for the PHP backend service. This script targets the endpoint URL to raise a request to process the checkout.
I specify the steps to set up this example in your environment at the end of this tutorial. After completing the set up, replace the endpoint path as per your PHP root.
Once the checkout is done, the products are moved to the order database and the front-end cart state will be reset to empty.
Part of CartPage.js
const checkout = async () => {
  const cart = JSON.parse(localStorage.getItem("cart")) || [];
  if (cart.length === 0) return;
  setLoadingCheckout(true); // show spinner
  try {
    await new Promise((resolve) => setTimeout(resolve, 2000));
    const response = await axios.post("http://localhost/react-shopping-cart-api/cart-checkout-api.php", { cart });
    const data = response.data;
    if (data.success) {
      // Clear cart and navigate to Thank You page
      localStorage.removeItem("cart");
      window.dispatchEvent(new CustomEvent("cartUpdated", { detail: 0 }));
      setCart([]);
      navigate("/thankyou");
    }
  } catch (error) {
    console.error("Checkout error:", error);
  } finally {
    setLoadingCheckout(false);
  }
};
  const subtotal = cart.reduce((acc, item) => acc + item.price * item.quantity, 0);
  const shipping = cart.length > 0 ? 3.0 : 0;
  const total = subtotal + shipping;
Fast, flexible, and fully client-side shopping cart using LocalStorage
When the user clicks the “Proceed to checkout” button, the following processes will be taken place.
- It sends the cart data array to the backend services.
- The server processes insert-order action and responds to the client.
- Client-side script clears the cart localStorage.
- The React custom hook redirects to the eCommerce thank you page.
src/components/ThankYou.jsx
import React, { useEffect } from "react";
import "./ThankYou.css";
const ThankYou = () => {
 useEffect(() => {
    document.title = "React Shopping Cart - Thankyou";
  }, []);
return (
    <div className="thankyou-container">
      <div className="thankyou-box">
        <h1 style={{ color: "#81c408" }}>Thank you for shopping with us!</h1>
        <h2 style={{ color: "#333" }}>
          You have placed your order. Check your email to see the order receipt.
        </h2>
      </div>
    </div>
  );
};
export default ThankYou;
How to set up this React shopping cart example?
The below steps will save your time to make this example working in your environment.
- Download the below bundle and extract it into your React project repository.
- Find the PHP endpoint code
api/react-shopping-cart-api.zipand unzip it into the PHP root. - Create
db_react_shopping_cartand importsql/database.sqlfromreact-shopping-cart-api.zip - Replace the PHP server URL in the react-shopping-cart project.
- Go to
cd react-shopping-cartvia CMD or terminal and runnpm install. - Execute
npm run devto start the server. - Copy the Run the dev server URL to see the React shopping cart.
Conclusion
We have a very basic shopping cart example in React. It covered the major parts of a shopping cart application that is to have a seamless product browsing and purchase via a cart-checkout flow.
There is more space for improvements to enrich this to a full-fledged shopping cart. The category menu can be a type-ahead field to filter the available categories. The thank you page can be enriched with the “Continue Shopping” lead to hook your customers.
References