This project is the stepping stone for creating a real-time chat application in React. It uses the Socket.io library with the Express Node framework. It empowers the chat server to send and receive messages over a WebSocket.
This React example has a front-end chat app that creates client instances on start. Each client instance refers an user running on a unique port.
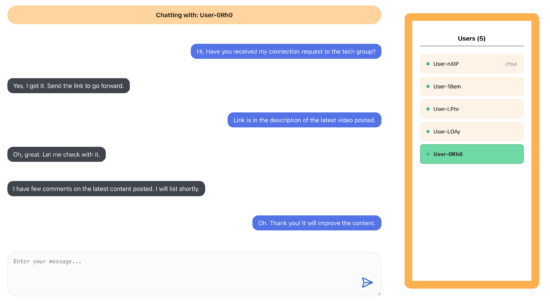
The express chat server listens the incoming users and messages to relay for the chat interface. All the connected users are listed in the front-end view as shown below.
Set up a WebSocket-powered chat server in Node.js
Install the socket.io and express library to set up a chat server with the below code. It creates a HTTP server and listen for the socket connection. When a user comes in to connect the socket, this chat server handles event-based callbacks.
On connecting and disconnecting, it updates the current user list to maintain the active users. When a user sends a message, the on(‘message’) callback pushes the message to the target user.
chat-server/chat-server.js
import { Server } from "socket.io";
import express from "express";

const app = express();
const PORT = process.env.PORT || 4000;

const httpServer = app.listen(PORT, () => {
  console.log(`Server listening on PORT ${PORT}`);
});

const io = new Server(httpServer, {
  cors: { origin: "*" },
});

let users = [];

io.on("connection", (socket) => {
  console.log(`User ${socket.id} connected`);

  // Add user to list
  users[socket.id] = { id: socket.id, username: `User-${socket.id.slice(0, 4)}` };

  // Update userlist on connection
  io.emit("userList", Object.values(users));
  console.log("Sent userList:", Object.values(users));

  // Handle socket message sending
  socket.on("message", ({ text, targetUser }) => {
  const msgData = {
    from: { id: socket.id, username: users[socket.id]?.username || "Unknown" },
    to: targetUser,
    text,
  };

  // send only to the target user
  io.to(targetUser.id).emit("message", msgData);
});

  // Handle disconnect socket
  socket.on("disconnect", () => {
    console.log(`User ${socket.id} disconnected`);
    delete users[socket.id];
    io.emit("userList", Object.values(users));
  });
});
Build a React front-end client for real-time messaging
I have created a single JSX for rendering the for the real-time chat messaging and active user listing. Here, I will split the two for clarity.
This section shows the state variables and JSX for rendering the chat message transcript as shown in the below image.
Part of the Chat.jsx file which contains the React state variables and handlers for the real-time messaging interface.
Part of Chat.jsx (React State and Handler definitions)
import { useState, useEffect } from "react";
import io from "socket.io-client";
const socket = io("ws://localhost:4000"); // Connect server

const Chat = () => {
  const [chats, setChats] = useState({});
  const [input, setInput] = useState("");
  const [selectedUser, setSelectedUser] = useState(null);

  useEffect(() => {
    // to set users

    // Listener for messages
    const handleMessage = (data) => {
      if (!data.from || !data.to) return;

      setChats((prev) => {
        const userId = data.from.id === socket.id ? data.to.id : data.from.id;
        const updated = { ...prev };
        if (!updated[userId]) updated[userId] = [];

        // Avoid duplicate messages
        if (!updated[userId].some(msg => msg.text === data.text && msg.from.id === data.from.id)) {
          updated[userId].push(data);
        }
        return updated;
      });


    };

    socket.on("message", handleMessage);

    return () => {
      socket.off("message", handleMessage);
    };
  }, []);

  const sendMessage = () => {
    if (!input.trim() || !selectedUser)
      return;

    socket.emit("message", {
      text: input,
      targetUser: { id: selectedUser.id, username: selectedUser.username },
    });

    // own message locally
    setChats((prev) => {
      const updated = { ...prev };
      if (!updated[selectedUser.id]) updated[selectedUser.id] = [];
      updated[selectedUser.id].push({
        from: { id: socket.id, username: "You" },
        to: selectedUser,
        text: input,
      });
      return updated;
    });

    setInput("");
  };

  const currentMessages = selectedUser ? chats[selectedUser.id] || [] : [];

  return (
    // Chat message UI JSX
  );
};

export default Chat;
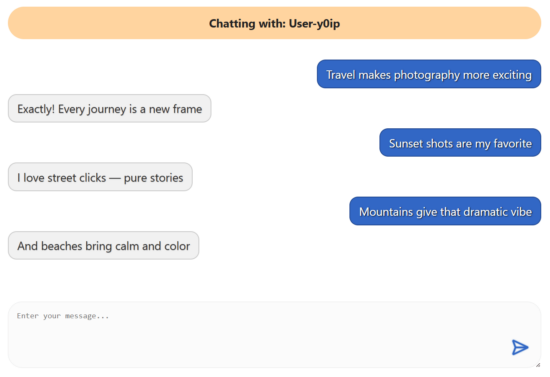
This is the JSX script to render the bidirectional messages between two users in a chat.
Part of Chat.jsx (Chat interface JSX)
<div className="chat-container">
{/* Chat area */}
<div className="chat-main">
   <div className="chat-header">
      {selectedUser? `Chatting with: ${selectedUser.username}`: "Select a user to start chatting"}
   </div>

   <div className="messages-container">
      <ul className="messages-list">
      {currentMessages.map((msg, i) => {
         const isOwn = msg.from?.id === socket.id;
         return (
            <li key={i} className={`message-item ${isOwn ? "message-own" : "message-other"}`}>
            {msg.text}
            </li>);
      })}
      </ul>
   </div>

   <div className="message-input-container">
      <textarea onChange={(e) => setInput(e.target.value)}
      placeholder= "Enter your message..."
      disabled={!selectedUser}
      className="message-input"
      value={input} rows="5"></textarea>
      <button
      onClick={sendMessage}
      disabled={!selectedUser}
      className="send-button"
      >
      <svg xmlns="http://www.w3.org/2000/svg" width="32" height="32" viewBox="0 0 24 24" fill="none" stroke="#3267c5" stroke-width="2" stroke-linecap="round" stroke-linejoin="round" class="lucide lucide-send-horizontal-icon lucide-send-horizontal"><path d="M3.714 3.048a.498.498 0 0 0-.683.627l2.843 7.627a2 2 0 0 1 0 1.396l-2.842 7.627a.498.498 0 0 0 .682.627l18-8.5a.5.5 0 0 0 0-.904z"/><path d="M6 12h16"/></svg>
      </button>
   </div>
</div>

{/* User list sidebar */}
</div>
Automatically list connected users when each client instance starts
The section shows the React code to list the connected users automatically. When running the React <Chat /> app each time, it connects the chat server over WebSocket.
On each connection, it generates a random identity for the users comes in. That user will be listed to the interface in a selectable list view.
The below screenshot shows the output of the user list who are active in the chat system. The selected users are highlighted in green to set the message target identity.
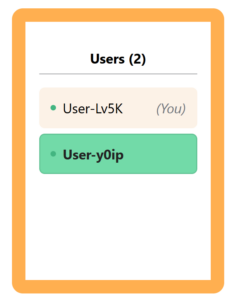
The handleUserList() callback triggered on socket on/off event to update the active users. This interface will show the count of the active users. Since, it gives random names for the users, current user is marked with (You) along the board.
import { useState, useEffect } from "react";
import io from "socket.io-client";
const socket = io("ws://localhost:4000"); // Connect server

const Chat = () => {
  const [users, setUsers] = useState([]);
  const [selectedUser, setSelectedUser] = useState(null);

  useEffect(() => {
    const handleUserList = (userList) => {
      setUsers(userList);
    };
    socket.on("userList", handleUserList);

    // Handler to listen messages

    return () => {
      socket.off("userList", handleUserList);
      socket.off("message", handleMessage);
    };
  }, []);

  return (
    <div className="chat-container">
      {/* Chat area */}

      <div className="user-sidebar">
        <h3 className="user-header">Users ({users.length})</h3>
        <ul className="user-list">
          {users.map((user) => (
            <li
              key={user.id}
              onClick={() => setSelectedUser(user)}
              className={`user-item ${
                selectedUser?.id === user.id ? "user-item-selected" : ""
              }`}
            >
              <div className="user-info">
                <div className="user-status"></div>
                <span
                  className={`user-name ${
                    selectedUser?.id === user.id ? "user-name-selected" : ""
                  }`}
                >
                  {user.username}
                </span>
              </div>
              {user.id === socket.id && <span className="user-you">(You)</span>}
            </li>
          ))}
        </ul>
      </div>
    </div>
  );
};

export default Chat;
How to setup the React Chat Project?
Create a React App with required dependancies for using the web socket. It requires socket.io-client library to build a chat communication feasibility to the sockcet-io server.
Then, install a Node server setup with web socket using express socket.io to handle communication request over a web socket.
Create Frontend React App
npx create-react-app@latest react-realtime-chat-app
npm install socket.io-client
Create Chat Server
mkdir chat-server
cd chat-server
npm init -y
npm install express socket.io cors
Copy the Chat component and the Node server script
After doing the above installs, copy the Chat.jsx component to the project and use <Chat /> in the React main App.js. Then, copy the chat-server js to the chat-server directory.
Start the node server and chat client
Go to the server directory and start the server to listen port :4000 by using the below command.
cd chat-server
Node chat-server.js
Open another terminal or command window to start the React app.
cd react-realtime-chat-app
npm start
Note: If you want to plugin the logged-in users into the chat or any of the above improvements on the code, let me know in the comment section.
Enhance your app with typing indicators, presence, and notifications
This React chat example is focused on the core functionality to enable communication with bidirectional messages. There are scope to enhance this React application to make it with a great user-experience. The following add-ons may enrich this app to a higher level.
- To show Typing… indicators on the chat area.
- To list all the users with (online) / (offline) status.
- To show a header bell notification about unread chat messages.
With enhanced features, this chat app can be integrated into a real-time application.
References: