A multi-step form is one of the best ways to replace a long form to make the customer feel easy. Example: a student enrolment form will usually be very long. If it is partitioned into multi-steps with section-wise sub forms, it encourages enduser to proceed forward. And importantly the merit is that it will increase your signup rate.
In this React tutorial, a registration form is partitioned into 4 steps. Those are to collect general, contact, personal, and authentication details from the users. Each step loads a sub-form with corresponding sections. Each subform is a separate component with proper structure and easy maintainability.

Rendering multi-step registration form
This RegisterForm is created as a parent React Form component. It loads all the sub-components created for rendering a multi-step form with validation and a progress bar.
It requires the following custom React component created for this example.
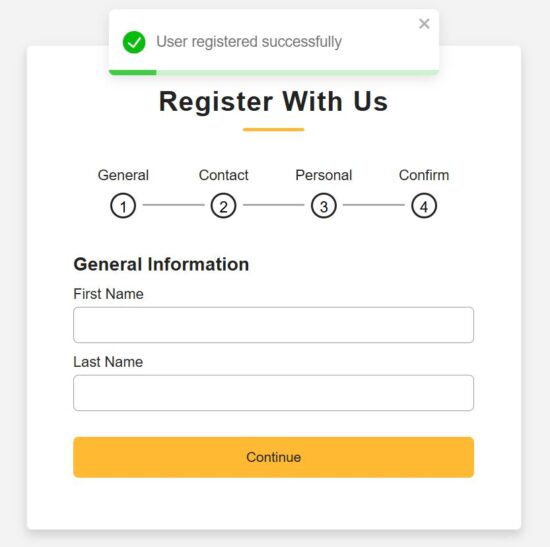
- GeneralInfo – to collect basic information, first and last names.
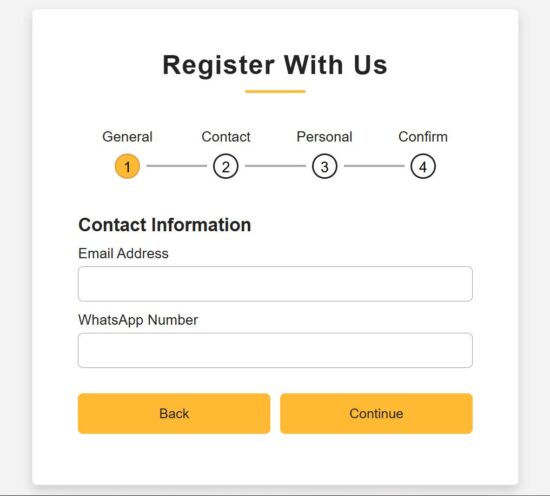
- ContactInfo – to collect phone or WhatsApp numbers.
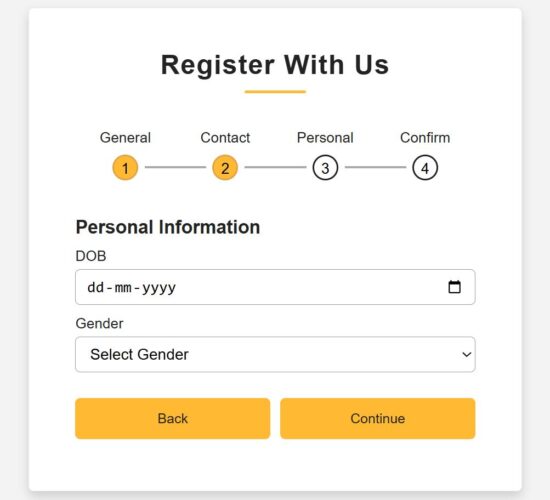
- PersonalInfo – to collect a person’s date of birth and gender.
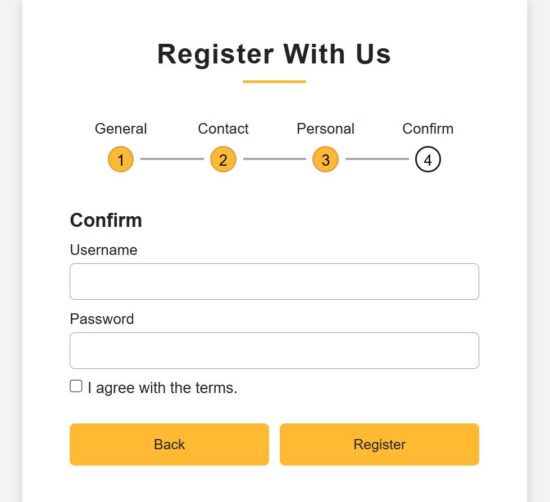
- ConfirmInfo – is a last step to register confidential information and confirm registration.
All information is stored in the formData by using the corresponding handleChange hook.
Additionally, this JSX has a Toast container to display success or error responses on the user-entered data.
There is a step navigation interface that helps to move along the registration steps. The step navigation helps to verify the data before clicking confirmation.
src/components/RegisterForm.jsx
import { useState } from "react";
import { ToastContainer } from "react-toastify";
import "react-toastify/dist/ReactToastify.css";
import ProgressBar from "./ProgressBar";
import GeneralInfo from "./FormSteps/GeneralInfo";
import ContactInfo from "./FormSteps/ContactInfo";
import PersonalInfo from "./FormSteps/PersonalInfo";
import Confirmation from "./FormSteps/Confirmation";
import "../../public/assests/css/RegisterForm.css";
const RegisterForm = () => {
  const [step, setStep] = useState(1);
  const [formData, setFormData] = useState({
    first_name: "",
    last_name: "",
    email: "",
    phone: "",
    dob: "",
    gender: "",
    username: "",
    password: "",
    terms: false,
  });
  const nextStep = () => setStep(prev => prev + 1);
  const prevStep = () => setStep(prev => prev - 1);
  const handleChange = (e) => {
    const { name, value, type, checked } = e.target;
    setFormData({
      ...formData,
      [name]: type === "checkbox" ? checked : value,
    });
  };
return (
<div className="container">
    <header>Register With Us</header>
    <ProgressBar step={step} />
    <div className="form-outer">
      {step === 1 && <GeneralInfo formData={formData} handleChange={handleChange} nextStep={nextStep} />}
      {step === 2 && <ContactInfo formData={formData} handleChange={handleChange} nextStep={nextStep} prevStep={prevStep} />}
      {step === 3 && <PersonalInfo formData={formData} handleChange={handleChange} nextStep={nextStep} prevStep={prevStep} />}
      {step === 4 && <Confirmation formData={formData} handleChange={handleChange} prevStep={prevStep} setFormData={setFormData} setStep={setStep} />}
    </div>
    <ToastContainer position="top-center" autoClose={3000} hideProgressBar={false} newestOnTop closeOnClick pauseOnHover/>
</div>
);
};
export default RegisterForm;
Form progress bar with numbered in-progress state of registration
When a multi-step form interface is used, the progress bar and prev-next navigation controls are very important usability.
This example provides both of these controls which will be useful to learn how to make this for other similar cases.
The progress bar contains circled, numbered nodes represent each step. This node is a container that denotes the title and the step number. It checks the useState for the current step and highlights the node accordingly.
The conditional statements load the CSS className ‘active’ dynamically when loading the progress bar to the UI.
All the completed steps are highlighted by a filled background and shows clarity on the current state.
src/components/ProgressBar.jsx
const ProgressBar = ({ step }) => {
return (
<div className="progress-bar">
    <div className={`step ${step >= 1 ? "active" : ""}`}>
    <p>General</p>
    <div className={`bullet ${step > 1 ? "active" : ""}`}>
        <span className="black-text">1</span>
    </div>
    </div>
    <div className={`step ${step >= 2 ? "active" : ""}`}>
    <p>Contact</p>
    <div className={`bullet ${step > 2 ? "active" : ""}`}>
       <span className="black-text">2</span>
    </div>
    </div>
    <div className={`step ${step >= 3 ? "active" : ""}`}>
    <p>Personal</p>
    <div className={`bullet ${step > 3 ? "active" : ""}`}>
        <span className="black-text">3</span>
    </div>
    </div>
    <div className={`step ${step >= 4 ? "active" : ""}`}>
    <p>Confirm</p>
    <div className="bullet">
       <span className="black-text">4</span>
    </div>
    </div>
</div>
);
};
export default ProgressBar;
React Form components collecting types of user information
We have seen all 4 sub-form components created for this React example. Those component purposes are described in the explanation of the parent React container.
Each form component accepts the formData, handleChange, nextStep references. The parent component has the scope of reading all the sub-form field data. It supplies the data with the corresponding handleChange hook to each step.
The main RegisterForm JSX contains conditional statements to check the current step. Then, it load the corresponding sub form components based on the in-progressing step managed in a React useState.
Step 1 – Collecting general information
src/components/FormSteps/GeneralInfo.jsx
import { useState } from "react";
const GeneralInfo = ({ formData, handleChange, nextStep }) => {
  const [errors, setErrors] = useState({});
  const validate = () => {
    const newErrors = {};
    if (!formData.first_name.trim()) newErrors.first_name = "First name is required";
    if (!formData.last_name.trim()) newErrors.last_name = "Last name is required";
    setErrors(newErrors);
    return Object.keys(newErrors).length === 0;
  };
  return (
    <div className="page slidepage">
      <div className="title">General Information</div>
      <div className="field">
        <div className="label">First Name</div>
        <input
          type="text"
          name="first_name"
          value={formData.first_name}
          onChange={handleChange}
          className={errors.first_name ? "is-invalid" : ""}
        />
        {errors.first_name && <div className="ribbon-alert">{errors.first_name}</div>}
      </div>
      <div className="field">
        <div className="label">Last Name</div>
        <input
          type="text"
          name="last_name"
          value={formData.last_name}
          onChange={handleChange}
          className={errors.last_name ? "is-invalid" : ""}
        />
        {errors.last_name && <div className="ribbon-alert">{errors.last_name}</div>}
      </div>
      <div className="field nextBtn">
        <button type="button" onClick={() => validate() && nextStep()}>
          Continue
        </button>
      </div>
    </div>
  );
};
export default GeneralInfo;
Step 2: Collecting contact information
src/components/FormSteps/ContactInfo.jsx
import { useState } from "react";
const ContactInfo = ({ formData, handleChange, nextStep, prevStep }) => {
  const [errors, setErrors] = useState({});
  const validate = () => {
    const newErrors = {};
    const emailRegex = /^[^\s@]+@[^\s@]+\.[^\s@]+$/;
    if (!formData.email.trim()) newErrors.email = "Email is required";
    else if (!emailRegex.test(formData.email)) newErrors.email = "Enter a valid email address";
    if (formData.phone.length < 10) newErrors.phone = "Phone number must be at least 10 digits";
    setErrors(newErrors);
    return Object.keys(newErrors).length === 0;
  };
  return (
    <div className="page">
      <div className="title">Contact Information</div>
      <div className="field">
        <div className="label">Email Address</div>
        <input
          type="text"
          name="email"
          value={formData.email}
          onChange={handleChange}
          className={errors.email ? "is-invalid" : ""}
        />
        {errors.email && <div className="ribbon-alert">{errors.email}</div>}
      </div>
      <div className="field">
        <div className="label">WhatsApp Number</div>
        <input
          type="number"
          name="phone"
          value={formData.phone}
          onChange={handleChange}
          className={errors.phone ? "is-invalid" : ""}
        />
        {errors.phone && <div className="ribbon-alert">{errors.phone}</div>}
      </div>
      <div className="field btns">
        <button type="button" onClick={prevStep}>Back</button>
        <button type="button" onClick={() => validate() && nextStep()}>Continue</button>
      </div>
    </div>
  );
};
export default ContactInfo;
Step3 – Collecting personal information
src/components/FormSteps/PersonalInfo.jsx
import { useState } from "react";
const PersonalInfo = ({ formData, handleChange, nextStep, prevStep }) => {
  const [errors, setErrors] = useState({});
  const validate = () => {
    const newErrors = {};
    if (!formData.dob) newErrors.dob = "Please select your date of birth";
    if (!formData.gender) newErrors.gender = "Please select your gender";
    setErrors(newErrors);
    return Object.keys(newErrors).length === 0;
  };
return (
  <div className="page">
    <div className="title">Personal Information</div>
    <div className="field">
      <div className="label">DOB</div>
      <input
        type="date"
        name="dob"
        value={formData.dob}
        onChange={handleChange}
        className={errors.dob ? "is-invalid" : ""}
      />
      {errors.dob && <div className="ribbon-alert">{errors.dob}</div>}
    </div>
    <div className="field">
      <div className="label">Gender</div>
      <select
        name="gender"
        value={formData.gender}
        onChange={handleChange}
        className={errors.gender ? "is-invalid" : ""}
      >
        <option value="">Select Gender</option>
        <option>Male</option>
        <option>Female</option>
        <option>Other</option>
      </select>
      {errors.gender && <div className="ribbon-alert">{errors.gender}</div>}
    </div>
    <div className="field btns">
      <button type="button" onClick={prevStep}>Back</button>
      <button type="button" onClick={() => validate() && nextStep()}>Continue</button>
    </div>
  </div>
);
};
export default PersonalInfo;
Step 4 – Collecting user consent and confidential information
src/components/FormSteps/Confirmation.jsx
import { useState } from "react";
import { toast } from "react-toastify";
import "react-toastify/dist/ReactToastify.css";
import axios from "axios";
import SERVER_SIDE_API_ROOT from "../../config";
const Confirmation = ({ formData, handleChange, prevStep, setFormData, setStep }) => {
  const [errors, setErrors] = useState({});
  const handleSubmit = async (e) => {
    e.preventDefault();
    const newErrors = {};
    if (!formData.username) newErrors.username = "Username is required";
    if (!formData.password) newErrors.password = "Password is required";
    else if (formData.password.length < 6) newErrors.password = "Password must be at least 6 characters";
    if (!formData.terms) newErrors.terms = "You must agree to the terms";
    setErrors(newErrors);
    if (Object.keys(newErrors).length > 0) return;
    try {
      const res = await axios.post(`${SERVER_SIDE_API_ROOT}/multi-step-form.php`, formData);
      if (res.data.success) {
        toast.success(res.data.message || "User registered successfully!");
        setFormData({
          first_name: "",
          last_name: "",
          email: "",
          phone: "",
          dob: "",
          gender: "",
          username: "",
          password: "",
          terms: false,
        });
        setStep(1);
        setErrors({});
      } else {
        toast.error(res.data.message || "Registration failed!");
      }
    } catch (err) {
      console.error(err);
      toast.error("Error while saving user data.");
    }
  };
  const renderError = (field) =>
  errors[field] ? <div className="ribbon-alert">{errors[field]}</div> : null;
return (
  <div className="page">
    <div className="title">Confirm</div>
    <div className="field">
      <div className="label">Username</div>
      <input
        type="text"
        name="username"
        value={formData.username}
        onChange={handleChange}
        className={errors.username ? "is-invalid" : ""}
      />
      {renderError("username")}
    </div>
    <div className="field">
      <div className="label">Password</div>
      <input
        type="password"
        name="password"
        value={formData.password}
        onChange={handleChange}
        className={errors.password ? "is-invalid" : ""}
      />
      {renderError("password")}
    </div>
    <div className="field-terms">
      <label>
        <input
          type="checkbox"
          name="terms"
          checked={formData.terms}
          onChange={handleChange}
        />{" "}
        I agree with the terms.
      </label>
      {renderError("terms")}
    </div>
    <div className="field btns">
      <button type="button" onClick={prevStep}>Back</button>
      <button type="submit" onClick={handleSubmit}>Register</button>
    </div>
  </div>
);
};
export default Confirmation;
PHP endpoint processing multi-step form data
It is a usual PHP file which not need to describe if you are already familiar with how the PHP user registration works. It reads the form data posted by the front-end multi-step React form.
With this form data, it builds the database insert query to save the user-entered information to the backend.
This example has the server-side validation for a few fields. If the validation process catches any problem with the submitted data, then it composes an error response to the React frontend.
Mainly, it validates email format and password-strength (minimally by its length). Password strength checking has no limitations. Based on the application sensitivity we are free to add as much validation as possible which is good for a security point of view.
Note: The SQL script for the user database is in the downloadable source code attached with this tutorial in multi-step-form-validation-api/users.sql.
multi-step-form-validation-api/multi-step-form.php
<?php
header("Access-Control-Allow-Origin: *");
header("Access-Control-Allow-Headers: Content-Type");
header("Access-Control-Allow-Methods: POST");
header("Content-Type: application/json");
include 'db.php';
$data = json_decode(file_get_contents("php://input"), true);
$firstName = $data["first_name"] ?? "";
$lastName  = $data["last_name"] ?? "";
$email     = $data["email"] ?? "";
$phone     = $data["phone"] ?? "";
$dob       = $data["dob"] ?? "";
$gender    = $data["gender"] ?? "";
$username  = $data["username"] ?? "";
$password  = $data["password"] ?? "";
if (!$firstName || !$email || !$password) {
  echo json_encode(["success" => false, "message" => "Required fields missing"]);
  exit;
}
if (!filter_var($email, FILTER_VALIDATE_EMAIL)) {
  echo json_encode(["success" => false, "message" => "Invalid email"]);
  exit;
}
if (strlen($password) < 6) {
  echo json_encode(["success" => false, "message" => "Password too short"]);
  exit;
}
$hashedPassword = password_hash($password, PASSWORD_BCRYPT);
$stmt = $conn->prepare("INSERT INTO users (first_name, last_name, email, phone, dob, gender, username, password) VALUES (?, ?, ?, ?, ?, ?, ?, ?)");
$stmt->bind_param("ssssssss", $firstName, $lastName, $email, $phone, $dob, $gender, $username, $hashedPassword);
if ($stmt->execute()) {
  echo json_encode(["success" => true, "message" => "User registered successfully"]);
} else {
  echo json_encode(["success" => false, "message" => "DB insert failed"]);
}
?>
How to set up this application
The below steps help to set up this example to run in your environment.
- Download the source code into your React project directory.
- Copy the multi-step-form-validation-api into your PHP root.
- Create a database
multistep_form_validation_dband import the user.sql - Configure database details with db.php
- Configure the PHP endpoint URL in React in
src/config.js - Run
npm installand then,npm run dev. - Copy the dev server URL and run it to render the React Multi-step form.
Conclusion:
So, we have seen a simple React example to understand how to create and manage the state of a multi-step form. By splitting the mail and sub form components we had a structural code base that is more feasible for enhancements.
The navigation between steps gives a scope for verification before confirm the signup. And the progress bar indicates the state in progress at a quick glance.
Definitely, the PHP validation and database processing can have add-on features to make the backend more solid. If you have a requirement to create a multi-step form in React, share your specifications in the comments.