The Laravel framework simplifies importing Excel data into an application database. It is by the use of the elegant Laravel Excel package.
We have already seen Excel import-export with the spreadsheet library. This package is nothing but a Laravel-wrapped spreadsheet. This package supports various valuable features, as shown below.
- It handles batch-wise import processing.
- Export queueing for reaching optimum performance level.
- It makes importing-export with collections (Eg, array or object source) easy.
This example helps developers looking for code to handle data with import and export features.
Create a new Laravel project using this command.
composer create-project laravel/laravel laravel-import-excelThen, follow the below steps to integrate the Laravel Excel package and hook it from the app service.
What are the steps to Integrate the Laravel Excel Package?
- Install the Laravel Excel Package.
composer require maatwebsite/excel:^3.1.48 -w - Configure ‘providers’ and ‘aliases’ with the Laravel App configuration in the
config/app.php file.'providers' => [ /* * Package Service Providers... */ Maatwebsite\Excel\ExcelServiceProvider::class, ] 'aliases' => [ ... 'Excel' => Maatwebsite\Excel\Facades\Excel::class, ] - Publish the Laravel
Maatwebsite Excelpackage to the App vendor.php artisan vendor:publish --provider="Maatwebsite\Excel\ExcelServiceProvider" --tag=config
How do you hook the Laravel Excel package to import records into the database?
- Import the required database and link it to the app via the
.envfile. - Create a blade template to list database records with an import and export feature.
- Set route pointing import and export actions.
- Build the App controller to prepare the import request and handle the response and redirect.
- Add fillables in the User model to define the user fields.
- Create import and export service to define source data to be imported into a database.
- Keep the sample import template at
template/users.xlspath as given in the downloadable source code.
Database structure and configuration
Create a database for the “Laravel import” project and run this SQL script. This file has a structure with sample data to be listed on the landing page.
sql/database.sql
--
-- Table structure for table `users`
--

CREATE TABLE `users` (
  `id` int(11) NOT NULL,
  `name` varchar(255) NOT NULL,
  `email` varchar(255) NOT NULL,
  `password` varchar(255) NOT NULL,
  `phone` varchar(255) NOT NULL,
  `fax` varchar(255) NOT NULL,
  `zip` int(11) NOT NULL,
  `updated_at` timestamp NOT NULL DEFAULT current_timestamp() ON UPDATE current_timestamp(),
  `created_at` timestamp NOT NULL DEFAULT '0000-00-00 00:00:00'
) ENGINE=InnoDB DEFAULT CHARSET=utf8mb4 COLLATE=utf8mb4_unicode_ci;

--
-- Dumping data for table `users`
--

INSERT INTO `users` (`id`, `name`, `email`, `password`, `phone`, `fax`, `zip`, `updated_at`, `created_at`) VALUES
(1, 'Harry', 'harry@gmail.com', '$2y$12$cSmHAtbdGm8ljh6/U10LdO/wiwu6rouOPWZuUrLkNuIrP2mOcglKa', '123-456-7890', '456-986-4875', 77678, '2023-12-12 02:36:27', '2023-12-12 02:36:27');

--
-- Indexes for dumped tables
--

--
-- Indexes for table `users`
--
ALTER TABLE `users`
  ADD PRIMARY KEY (`id`);

--
-- AUTO_INCREMENT for dumped tables
--

--
-- AUTO_INCREMENT for table `users`
--
ALTER TABLE `users`
  MODIFY `id` int(11) NOT NULL AUTO_INCREMENT, AUTO_INCREMENT=2;
COMMIT;
This file is to configure the database settings. In a beginner’s tutorial, we have already seen how to connect with the database from a Laravel application.
.env
DB_CONNECTION=mysql
DB_HOST=127.0.0.1
DB_PORT=3306
DB_DATABASE=laravel_export_import
DB_USERNAME=USERNAME_HERE
DB_PASSWORD=PASSWORD_HERE
This environmental configuration includes mailing, database connections, logging, and other application settings. In a previous tutorial, we saw how to configure defaults for a mail-sending script in Laravel.
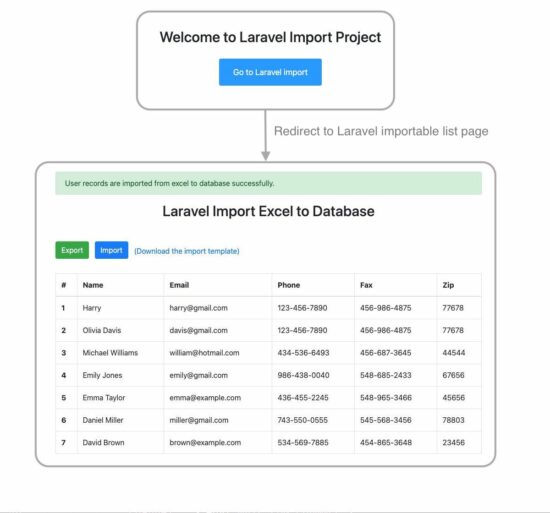
Blade template to show the import and export controls
This template file is created to show the import option. It also lists the imported records in a data table with an export option.
It supports both Excel and CSV import. This example has an Excel file with sample data. There is a link in the Laravel app UI to download this Excel sample.
When attempting to import a wrong source, the app will pass an error to the browser via this template.
resources/views/excel-csv-import.blade.php
<!DOCTYPE html>
<html>

<head>
  <meta name="csrf-token" content="{{ csrf_token() }}">
  <meta charset="utf-8">
  <meta name="viewport" content="width=device-width, initial-scale=1">

  <title>Laravel Import Excel to Database</title>
  <link rel="stylesheet" href="https://cdn.jsdelivr.net/npm/bootstrap@4.5.3/dist/css/bootstrap.min.css" integrity="sha384-TX8t27EcRE3e/ihU7zmQxVncDAy5uIKz4rEkgIXeMed4M0jlfIDPvg6uqKI2xXr2" crossorigin="anonymous">
</head>

<body>
  <div class="container mt-5">

    @if(session('status'))
    <div class="alert alert-success">
      {{ session('status') }}
    </div>
    @endif
    @if(session('error'))
    <div class="alert alert-danger">
      {!! session('error') !!}
    </div>
    @endif

    <div>
      <h2 class="text-center mb-5">Laravel Import Excel to Database</h2>

      <form id="excel-csv-import-form" method="POST" action="{{ url('import-excel-csv-file') }}" accept-charset="utf-8" enctype="multipart/form-data">
        @csrf
        <div class="mb-4">
          <a href="{{url('export-excel-csv-file')}}" class="btn btn-success mb-2">Export</a>
          <label for="fileInput" class="btn btn-primary mx-2">Import</label>
          <input type="file" id="fileInput" name="file" class="d-none" onchange="submitForn(this)">
          <a href="{{ url('download-import-template') }}" class="text-decoration-none">(Download the import template)</a>
        </div>
      </form>

      <table class="table table-bordered">
        <thead>
          <tr>
            <th scope="col">#</th>
            <th scope="col">Name</th>
            <th scope="col">Email</th>
            <th scope="col">Phone</th>
            <th scope="col">Fax</th>
            <th scope="col">Zip</th>
          </tr>
        </thead>
        <tbody>
          @if(count($users) > 0)
          @foreach($users as $user)
          <tr>
            <th scope="row">{{ $user->id }}</th>
            <td>{{ $user->name }}</td>
            <td>{{ $user->email }}</td>
            <td>{{ $user->phone }}</td>
            <td>{{ $user->fax }}</td>
            <td>{{ $user->zip }}</td>
          </tr>
          @endforeach
          @endif
        </tbody>
      </table>
    </div>
  </div>
</body>

<script>
  function submitForm(input) {
    document.getElementById('excel-csv-import-form').submit();
  }
</script>

</html>
Welcome template navigation to redirect users to the Excel import page
This example added a navigation control to the landing page. The Laravel welcome template code is below. It has a button redirecting users to the list with import and export actions.
resources/views/welcome.blade.php
<!DOCTYPE html>
<html lang="{{ str_replace('_', '-', app()->getLocale()) }}">

<head>
    <meta charset="utf-8">
    <meta name="viewport" content="width=device-width, initial-scale=1">

    <title>Laravel</title>
    <link rel="stylesheet" href="https://stackpath.bootstrapcdn.com/bootstrap/4.5.2/css/bootstrap.min.css">

    <!-- Fonts -->
    <link rel="preconnect" href="https://fonts.bunny.net">
    <link href="https://fonts.bunny.net/css?family=figtree:400,600&display=swap" rel="stylesheet" />

    <style>
        body {
            display: flex;
            align-items: center;
            height: 80vh;
        }

        .export-btn {
            padding: 15px 30px;
            font-size: 18px;
            background: #0099FF;
            margin-top: 20px;
        }
    </style>
</head>

<body>
    <div class="container text-center mt-5">
        <h2>Welcome to Laravel Project</h2>

        <a href="http://127.0.0.1:8000/excel-csv-file" class="text-white"><button class="btn text-white export-btn">Go to Laravel import</button></a>
    </div>
</body>

</html>
Web route pointing import export actions
This file shows the default rule to land on the Laravel welcome page. Below this, the import and export routing rules are created for this example.
There are four rules created, and their purposes are below.
excel-csv-file– It lands on a page that allows import and export and lists already imported records.import-excel-csv-file– It calls import action on the uploaded Excel file the user selects.download-import-template– This is to download a sample Excel template source.export-excel-csv-file– It exports the list of database results to an Excel format.
routes/web.php
<?php

use Illuminate\Support\Facades\Route;
use App\Http\Controllers\ExcelCSVController;
/*
|--------------------------------------------------------------------------
| Web Routes
|--------------------------------------------------------------------------
|
| Here is where you can register web routes for your application. These
| routes are loaded by the RouteServiceProvider and all of them will
| be assigned to the "web" middleware group. Make something great!
|
*/

Route::get('/', function () {
    return view('welcome');
});

Route::get('excel-csv-file', [ExcelCSVController::class, 'index']);
Route::post('import-excel-csv-file', [ExcelCSVController::class, 'importExcelCSV']);
Route::get('export-excel-csv-file', [ExcelCSVController::class, 'exportExcelCSV']);
Route::get('download-import-template', [ExcelCSVController::class, 'downloadImportTemplate']);
Build the App controller to prepare the import request
This PHP artisan command is used to create the ExcelCSVController class. This class instantiates the import service and hooks the Excel package function to import.
php artisan make:controller ExcelCSVController --resource
The importExcelCSV() function requests the file import when uploading the Excel template to the server. It captures exceptions, if any, and redirects the user with appropriate acknowledgments.
The exportExcelCSV() function sets the unique name for the Excel downloadable.
The downloadImportTemplate() function targets the path to download the sample Excel file. This sample is an import source that matches the database table structure.
app/Http/Controllers/ExcelCSVController.php
<?php

namespace App\Http\Controllers;

use Illuminate\Http\Request;
use App\Exports\UsersExport;
use App\Imports\UsersImport;
use Maatwebsite\Excel\Facades\Excel;
use App\Models\User;

class ExcelCSVController extends Controller
{
    public function index()
    {
        $users = User::get();
        return view('excel-csv-import', compact('users'));
    }

    public function importExcelCSV(Request $request)
    {
        try {
            Excel::import(new UsersImport, $request->file('file'));
        } catch (\Exception $e) {
            return redirect('excel-csv-file')->with('error', 'Invalid template. Click "Download the import template" to get a valid sample template.');
        }

        return redirect('excel-csv-file')->with('status', 'User records are imported from excel to database successfully.');
    }

    public function exportExcelCSV()
    {
        $filename = 'users-' . now()->format('Y-m-d_H:i') . '.xlsx';

        return Excel::download(new UsersExport, $filename);
    }

    public function downloadImportTemplate()
    {
        $path = base_path('/template/users.xlsx');;

        return response()->download($path, 'users.xlsx', [
            'Content-Type' => 'text/xlsx',
        ]);
    }
}
Add fillable to the User model to define columns to import
This file is to set the column names of the user entity. During the Excel import from the UserImport, this model is instantiated with the array of field:rowdata pairs.
<?php

namespace App\Models;

use Illuminate\Database\Eloquent\Factories\HasFactory;
use Illuminate\Foundation\Auth\User as Authenticatable;
use Illuminate\Notifications\Notifiable;
use Laravel\Sanctum\HasApiTokens;

class User extends Authenticatable
{
    use HasApiTokens, HasFactory, Notifiable;

    /**
     * The attributes that are mass assignable.
     *
     * @var array<int, string>
     */
    protected $fillable = [
        'name',
        'email',
        'password',
        'phone',
        'fax',
        'zip'
    ];
}
Import and export service that extends the Laravel Excel package classes
This section provides commands to create the import and export service classes quickly.
Laravel import
Run this command to a UsersImport class into the Laravel app path Imports/UsersImport.php.
php artisan make:import UsersImport --model=User
The UsersImport class consists of functions to return the source data array for the import.
In this example, it defines the starting position of the import needle. The Excel file source has the column names in the first record. So, this import skips the first and starts from the second record.
app/Imports/UsersImport.php
<?php

namespace App\Imports;

use App\Models\User;
use Illuminate\Support\Facades\Hash;
use Maatwebsite\Excel\Concerns\ToModel;
use Maatwebsite\Excel\Concerns\WithStartRow;

class UsersImport implements ToModel, WithStartRow

{
    /**
     * @param array $row
     *
     * @return \Illuminate\Database\Eloquent\Model|null
     */
    public function model(array $row)
    {

        return new User([
            'name'     => $row[0],
            'email'    => $row[1],
            'password' => Hash::make($row[2]),
            'phone' => $row[3],
            'fax' => $row[4],
            'zip' => $row[5]
        ]);
    }

    public function startRow(): int
    {
        return 2; // Skip the first row
    }
}
Laravel export
This command creates a UsersExport model in the path Exports/UsersExport.php.
php artisan make:export UsersExport --model=User
The collection() handle fetches the array of details from the database for exporting to Excel.
This Laravel Excel Export extends WithHeading to insert a column header to the output Excel.
app/Exports/UsersExport.php
<?php

namespace App\Exports;

use App\Models\User;
use Maatwebsite\Excel\Concerns\FromCollection;
use Maatwebsite\Excel\Concerns\WithHeadings;

class UsersExport implements FromCollection, WithHeadings
{

    public function collection()
    {
        return User::select('id', 'name', 'email', 'phone', 'fax', 'zip')->get();
    }

    public function headings(): array
    {
        // Define headers for the exported file
        return [
            'ID',
            'Name',
            'Email',
            'Phone',
            "Fax",
            'Zip'
        ];
    }
}
Conclusion
We have learned how to add Excel import and export features to a Laravel application.
This example proves how easy it is to use the Laravel Excel package. Learn more about this package to learn to use it effectively.
Since data handling is sensitive, you can restrict access with a login authentication.
Download