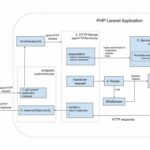
This tutorial guides you to create a drag n drop form builder in Laravel. This provides a basic example to demonstrate form building with limited field types.
It supports adding text fields, textarea, select box and button fields with a draggable menu list in a sidebar. This example application enables form building by using the most wanted drag-and-drop feature.
View demo
It also allows to drag n drop re-order the rendered form fields on the editor area. In a previous tutorial, we have seen a Trello-like task-card reordering.
Steps to create drag n drop form builder in Laravel
- Design the form builder UI with field-type menu.
- Enable and capture drag-and-drop events.
- Get form field HTML from the server by field type.
- Render field HTML to the form builder drop area.
- Handle field delete and add more select box options.
- Create Laravel web routes for form builder URLs.
If you are new to the Laravel application development, see the Laravel integration steps in the linked tutorial.
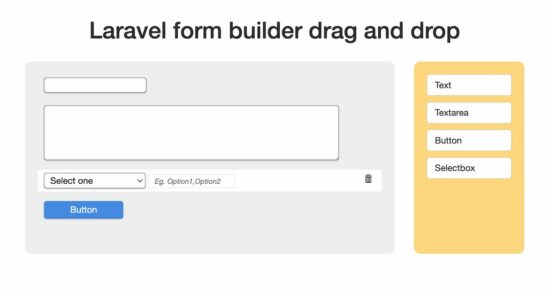
1. Design the form builder UI with field-type menu
This Laravel template file contains two column containers. The left column is the form editor and the right column is the form field menu.
In this Laravel template, the Bootstrap 5 grid places these two columns side by side.
The form field menu consists of the Bootstrap card elements. These cards represent the supported field types by the Laravel form builder.
This UI template includes a jQuery UI library to support the drag-and-drop feature. The field type columns are the draggable element and the form editor is the drop area.
resources/views/form.blade.php
<!DOCTYPE html>
<html>

<head>
  <meta charset="utf-8">
  <meta name="viewport" content="width=device-width, initial-scale=1">
  <title>Laravel Stripe integration tutorial</title>
  <link href="https://cdn.jsdelivr.net/npm/bootstrap@5.0.2/dist/css/bootstrap.min.css" rel="stylesheet" integrity="sha384-EVSTQN3/azprG1Anm3QDgpJLIm9Nao0Yz1ztcQTwFspd3yD65VohhpuuCOmLASjC" crossorigin="anonymous">
  <link href="//netdna.bootstrapcdn.com/bootstrap/3.0.0/css/bootstrap.min.css" rel="stylesheet">
  <link href="./css/form.css" rel="stylesheet" type="text/css" />
</head>

<body>
  <div class="container">

    <h1 class="row justify-content-center m-5">Laravel form builder drag and drop</h1>
    <div class="row justify-content-center">
      <div class="col-md-10">
        <!-- Form builder drop container -->
        <div class="row">
          <div class="col-sm-9">
            <div id="from-droparea"></div>
          </div>
          <!-- Form field menu -->
          <div class="col-sm-3">
            <div id="form-field-menu">
              <p class="drag"><a class="btn btn-default">Text</a></p>

              <p class="drag"><a class="btn btn-default">Textarea</a></p>

              <p class="drag"><a class="btn btn-default">Button</a></p>

              <p class="drag"><a class="btn btn-default">Selectbox </a></p>
            </div>
          </div>
        </div>
      </div>
    </div>
  </div>
  <script src="https://code.jquery.com/jquery-3.7.1.min.js" integrity="sha256-/JqT3SQfawRcv/BIHPThkBvs0OEvtFFmqPF/lYI/Cxo=" crossorigin="anonymous"></script>
  <script src="https://code.jquery.com/ui/1.13.1/jquery-ui.min.js" integrity="sha256-eTyxS0rkjpLEo16uXTS0uVCS4815lc40K2iVpWDvdSY=" crossorigin="anonymous"></script>
  <script src="./js/form-builder.js"></script>
</body>

</html>
2. Enable and capture drag-and-drop events
In this code, the snippet is a part of the form-builder.js file. It just shows the jQuery drag and drop feature initiation.
The form editor or the drop area child elements are the rendered form fields. Its child elements (.form-row) are referred to as sortable as shown below. It supports field reordering by moving the row HTML up and down.
public/js/form-builder.js (Initiates jQuery UI draggable)
$(document).ready(function() {
    $('.drag').draggable({
        appendTo: 'body',
        helper: 'clone'
    });

    $('#from-droparea').droppable({
        activeClass: 'active',
        hoverClass: 'hover',
        accept: ":not(.ui-sortable-helper)", // Reject clones generated by sortable
        drop: function(e, ui) {
        getFieldHTML($(this), ui);
        }
    }).sortable({
        items: '.form-row',
        sort: function() {
        $(this).removeClass("active");
        }
    });
});
3. Get form field HTML from the server by field type
This Laravel application controller class prepares the field HTML based on the request. The client-side script posts this data by dropping the field menu onto the form builder. The getFormFieldHTML() function receives the field type parameter.
It has a PHP switch with the supported field types. Each case gives the corresponding field HTML based on the type of input dropped by the end user.
In the controller, the loadForm() function shows the form builder view to the UI.
If the user drags a select box option, this controller function will show additional input to add more <option> tags.
Http/Controllers/FormBuildingController.php
<?php

namespace App\Http\Controllers;

use Illuminate\Http\Request;
use Illuminate\Support\Facades\Config;

class FormBuildingController extends Controller
{

    public function loadForm()
    {
        $product = Config::get('stripe.product');
        return view('form', compact('product'));
    }

    public function getFormFieldHTML(Request $request)
    {
        switch ($request->field_type) {
            case "Text":
                $output = "<input type='text' style='
                border: #232323 1px solid;
                border-radius: 4px;
                box-shadow: 0 1px 2px rgba(32,33,36,.28);' />";
                break;

            case "Textarea":
                $output = "<textarea type='text' cols='60' rows='4' style='
                border: #232323 1px solid;
                border-radius: 4px;
                box-shadow: 0 1px 2px rgba(32,33,36,.28);
                max-width: -webkit-fill-available;'></textarea>";
                break;

            case "Button":
                $output = "<button style='border: #4486da 1px solid;
                border-radius: 4px;
                box-shadow: 0 1px 2px rgba(32,33,36,.28);
                background: #4a91eb;
                color: #FFF;
                padding: 3px 40px;'>Button</button>";
                break;

            case "Selectbox":
                $output = "<select type='text' style='
                border: #232323 1px solid;
                border-radius: 4px;
                box-shadow: 0 1px 2px rgba(32,33,36,.28);
                padding: 3px 5px;
                width: 158px;'><option>Select one</options></select> <input class='add-more' placeholder='Eg. Option1,Option2'>";
                break;
        }

        return $output;
    }
}
?>

4. Render field HTML to the form builder drop area
This code is also part of the form-builder.js file created for this Laravel project. It contains the AJAX function that posts the request for the field HTML to the Laravel controller.
The AJAX will be called when the user drag and drop the field from the menu. It posts the field type to the PHP by getting the text from the draggable UI element.
On the AJAX callback function, it receives the field HTML from the PHP. With the HTML, this script constructs the form row. It appends a delete icon to each row to detach the row if the user clicks this icon.
public/js/form-builder.js (jQuery AJAX to get field HTML by type)
function getFieldHTML(uiContext, uiElement) {
    $.ajax({
        url: "form_field/get",
        data: {
            "field_type": uiElement.draggable.text()
        },
        context: uiContext
    }).done(function(fieldHTML) {
        var formRow = $('<div class="form-row">' + fieldHTML);
        formRow.append($('<button type="button" class="btn btn-xs remove"><span class="glyphicon glyphicon-trash"></span></button>'));
        $(this).append(formRow);
    });
}
5. Handle field delete and add more select box options
As we have added the controls for adding more select box options and deleting fields, this script registers the event listeners.
On focusing out the “add-more” input box, the below jQuery script splits the entered value by a comma. The resultant array is used to push the select box options to the UI.
The “delete” icon’s on-click event calls the jQuery detach() to remove the field from the UI.
public/js/form-builder.js (on-click, on-change event listeners)
$("body").on("blur", ".add-more", function() {
    var addMoreInput = $(this);
    // Split options into array
    var selectboxOptions = $(this).val().split(',');

    // Add the options to the selectbox
    $.each(selectboxOptions, function(index, optionCalue) {
        $(addMoreInput).parent().find("select").append("<option value='" + optionCalue + "'>" + optionCalue + "</option>")
    });
});

$("body").on("click", ".remove", function() {
    $(this).parent().detach();
});
By default the .add-more and .remove elements are hidden. On hovering the form field row, they are visible to enter input. The below CSS styles are added for this purpose.
.form-row .remove {
  display: none;
  margin-left: 20px;
  float: right;
}

.form-row:hover .remove {
  display: inline-block;
}

.add-more {
  border: #e3e0e0 1px solid;
  font-size: 0.8em;
  padding: 2px 10px;
  font-style: italic;
  display: none;
}

.form-row:hover .add-more {
  display: inline-block;
}
6. Create Laravel web routes for form builder URLs
There are two URL rules created for this Laravel form builder application. One is to render the form builder UI on the landing page.
The form_field/get URL is to reach the router function to return the field HTML code.
routes/web.php
<?php

use Illuminate\Support\Facades\Route;
use App\Http\Controllers\FormBuildingController;

/*
|--------------------------------------------------------------------------
| Web Routes
|--------------------------------------------------------------------------
|
| Here is where you can register web routes for your application. These
| routes are loaded by the RouteServiceProvider and all of them will
| be assigned to the "web" middleware group. Make something great!
|
*/

Route::get('/', [FormBuildingController::class, 'loadForm']);
Route::get('form_field/get', [FormBuildingController::class, 'getFormFieldHTML']);
?>