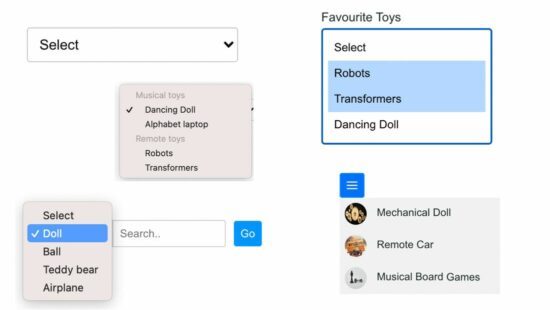
The <select> tag displays the HTML dropdown list in a form. It contains a list of selectable options. It collects user input via a HTML form.
This example shows a dropdown list of favourite toys in a form. The input for dropdown is validated using JavaScript. Then, the user input is read from the PHP script and processed. We have already seen how to create multilevel dropdown menu using HTML and CSS.
Quick Example
HTML dropdown shows a dropdown list and calls validation on submit. Then, prints the selected options in PHP.
<?php
if(!empty($_POST["toys"]) {
    echo "My Favourite toy is: " . $_POST["toys"];
}
?>
<form name="form-html" action=""
	onSubmit="return validateDropdown()">
	<label for="toys">Favorite Toys:</label>

	<!-- HTML Dropdown list -->
	<select name="toys" id="toy-id">
		<option value="">Select Toys</option>
		<option value="Mechanical Doll">Mechanical Doll</option>
		<option value="Remote Car">Remote Car</option>
		<option value="Musical Board Games">Musical Board Games</option>
	</select> <input type="submit" name="submit" value="Submit" />
</form>
<script>
//JavaScript dropdown validation
function validateDropdown() {
	var toy = document.getElementById("toy-id").value;
	if(toy == "") {
		return false;
	}
	Return true;
}
</script>
HTML <select> tag and attributes
The HTML <select> tag contains <option> tags to display the choices. The first option of a dropdown list is the default. Use selected attribute to make an option as a default on load.
It supports the HTML global and event attributes. The most common attributes used with the <select> tag are listed below.
| Attributes | Description |
|---|---|
| name | To name it to address on accessing in JavaScript or server-side. |
| multiple | To enable multiple option selection. |
| size | To specify the number of rows to be visible in a scrolling dropdown list. |
| autocomplete | To enable or disable the browser’s auto-filling assistance. Possible values are on, off. |
| autofocus | To focus dropdown on load. |
| disabled | To stop users from interacting with the dropdown list. |
| form | To set form owner reference id. With this, we need not keep the dropdown inside a form container. |
| required | Enable browser default validation to turn the dropdown as a mandatory field. |
Dropdown list options with groups
HTML dropdown list uses <optgroup> container to show grouped options. It helps to display options with classification. Example: Listing sub-categories grouped by categories.
Dropdown options grouping advantages
- It gives more clarity specifying the parent-child relationship.
- It reduces the overload of having the parent and child dropdown separately.
- It avoids confusion on dealing with a long-form list.
<optgroup> tag attributes
| Attributes | Description |
|---|---|
| label | used to a title or add description to the <optgroup>. |
| disabled | To stop users from selecting a particular group of options. |
Dropdown list example with <optgroup>
This example HTML code is used to display Favourite Toys in a dropdown menu with grouping. It encloses the toy options with a <optgroup> tag to show the related toys.
<div class="label">Favourite Toys</div>
<select name="toys" id="toy-id" class="select-input">
    <optgroup label="Musical toys">
        <option value="Dancing Doll">Dancing Doll</option>
        <option value="Alphabet laptop">Alphabet laptop</option>
    </optgroup>
    <optgroup label="Remote toys">
        <option value="Robots">Robots</option>
        <option value="Transformers">Transformers</option>
    </optgroup>
</select>
HTML dropdown on-change event handling
There are many ways to handle the on-change event on a dropdown list. The below list shows some of the ways.
- By calling JavaScript function via HTML onchange attribute.
- By mapping addEventListener() with the change event.
- By using element.onchange() function.
WCAG 2.0 techniques describe how to use on-change in a HTML dropdown with the onchange attribute.
This example code uses the onchange attribute in the <select> tag. It displays a list of languages in a HTML dropdown list.
The onchange event handler changes the dropdown field label language. The default language is English. It gives 3 options to switch languages to make the label multi-lingual.
<div class="label" id="language-label">Select language</div>
<select name="languages" id="language-id" onchange="onChangeEvent();"
    class="select-input">
    <option value="English">English</option>
    <option value="German">German</option>
    <option value="French">French</option>
</select>
On-change event handler in JavaScript
function onChangeEvent() {
	var selectOption = document.getElementById("language-id").value;
	var result = document.getElementById("language-label");
	if (selectOption == "English") {
		var english = document.getElementById("english").value;
		result.innerHTML = english;
	} else if (selectOption == "German") {
		var germen = document.getElementById("german").value;
		result.innerHTML = germen;
	} else if (selectOption == "French") {
		var french = document.getElementById("french").value;
		result.innerHTML = french;
	}

}
Display dropdown options from database
This code is to display the country list from the database using PHP and MySQL. The PHP code calls getAllCountry() method. It connects the database to fetch the countries.
The dropdown options are dynamic. It iterates the $countryResult array variable using PHP forEach.
<?php
require_once __DIR__ . '/lib/Country.php';
$countryModel = new Country();
$countryResult = $countryModel->getAllCountry();
if (! empty($countryResult)) {
    ?>
<div class="label">Select Country</div>
<select name="country" class="select-input">
    <option value="">Select</option>
                    <?php foreach($countryResult as $k=>$v){?>
                    <option
        value="<?php echo $countryResult[$k]["country_code"];?>"><?php echo $countryResult[$k]["country_code"]." - ".$countryResult[$k]["country_name"];?></option>
                    <?php }?>
                </select>
<?php }?>
Access dropdown field from PHP
This example shows how to access the dropdown field data posted via a form. It also handles HTML dropdown validation using JavaScript.
The HTML form contains two dropdowns. One of them is enabled with the multi-select using the ‘multiple’ attribute.
In PHP, it received the posted form data and prints the selected values. It gets an array of multi-selected values of the dropdown. It uses PHP implode before printing the selected values.
<form action="" name="dropdown-frm" method="post"
    onsubmit="return validateForm()">
    <div class="form-row">
        <div class="label">Animals</div>
        <select name="animals" id="animals-list" class="select-input">
            <option value="">Select</option>
            <option value="Ant">Ant</option>
            <option value="Bear">Bear</option>
            <option value="Cat">Cat</option>
            <option value="Dog">Dog</option>
            <option value="Elephant">Elephant</option>
        </select>
    </div>
    <div class="form-row">
        <div class="label">
            Favourite Toys <span class="error" id="toys-info"></span>
        </div>
        <select name="toys[]" id="toys-list" class="select-input"
            multiple>
            <option class="select-options" value="">Select</option>
            <option class="select-options" value="Robots">Robots</option>
            <option class="select-options" value="Transformers">Transformers</option>
            <option class="select-options" value="Dancing Doll">Dancing
                Doll</option>
        </select>
    </div>
    <div class="form-row">
        <input type="submit" name="submit" value="Submit"
            class="btn-submit">
    </div>
<-- Displays selected options from the dropdown posted via form -->
<?php if(!empty($toyResponse)){?>
<div class="form-row">
        <div class="success">
            <div class="field-value"><?php  echo "The selected values are, ";?></div>
                    <?php if(!empty($animalResponse)){?>
                        <div class="field-value"><?php echo "Animals : " . $animalResponse;?></div>
                        <?php }?>
                        <div class="field-value">
                    <?php
    if (! empty($toyResponse) && is_array($toyResponse)) {
        $multiSelectDropdownList = implode(", ", $toyResponse);
        echo "Favourite Toys : " . $multiSelectDropdownList;
    }
    ?>
                    </div>
        </div>
    </div>
<?php }?>
</form>
PHP Code
<?php
if (! empty($_POST)) {
    if (! empty($_POST["submit"])) {
        if (! empty($_POST["animals"])) {
            $animalResponse = $_POST["animals"];
        }
        if (! empty($_POST["toys"])) {
            $toyResponse = $_POST["toys"];
        }
    }
}
?>
JavaScript Validation
function validateForm() {
	var toys = document.getElementById("toys-list").value;
	document.getElementById("toys-info").innerHTML = "";
	if (toys == "") {
		document.getElementById("toys-info").innerHTML = "Select at least 1 option from the list";
		return false;
	}
	return true;
}
Search filter with dropdown list
On many websites, we may see search filters with a dropdown list. On the Amazon-like website, it has a dropdown list associated with a text field.
The below code HTML display a search box with a dropdown field. On submitting the form, it does the keyword search based on the selected option.
The JavaScript prepares the output to print the selected search criteria.
<select id="toyDropdown" class="form-input">
    <option value="">Select</option>
    <option value="Doll">Doll</option>
    <option value="Ball">Ball</option>
    <option value="Teddy bear">Teddy bear</option>
    <option value="Airplane">Airplane</option>
</select>
<input type="text" placeholder="Search.." class="form-search-input"
    id="searchInput">
<input type="button" value="Go" class="btn-submit margin-left"
    onclick="searchFilter()">
<div id="search-keyword"></div>
Search filter JavaScript
function searchFilter() {
	var result = "";
	var searchKeyword = document.getElementById("searchInput").value;
	var chosenOption = document.getElementById("toyDropdown").value;
	if (chosenOption != "") {
		document.getElementById("search-keyword").innerHTML = 'Search result of "'
				+ searchKeyword + '" in ' + chosenOption;
	} else {
		document.getElementById("search-keyword").innerHTML = 'Search result of "'
				+ searchKeyword + '"';
	}
}
HTML dropdown with text field
In a previous article, I have created a custom dropdown with checkboxes. This code will create a HTML dropdown field that contains a text field.
It uses the HTML <datalist> element to allow to select or enter data via the mapped input controls. It facilitates users with the following features.
- It helps users to enter data if they don’t find suitable options in the dropdown list.
- It provides auto-suggestion among the dropdown option while typing data in the text field.
We can also enable this feature with a normal <select> box by using the select2 library.
<div class="label">Add new or select a category:</div>
<input list="category-list" name="category-name" class="form-input" />
<datalist id="category-list">
    <option value="Toys">Toys</option>
    <option value="Gadjets">Gadjets</option>
</datalist>
Creating a custom dropdown list
Custom HTML dropdown is used to create dropdown effect on the UI.
The below code show how to apply the hover or click effect for displaying HTML dropdown element.
Hoverable HTML dropdown using CSS
This will show a hamburger icon in the front-end. It uses CSS to add the hover property to the menu icon.
On the mouse over event, it applies the appropriate styles to toggle the HTML dropdown to display.
<div class="dropdown">
    <button class="btn-submit">
        <img src="./images/menu.svg" class="vertical-middle">
    </button>
    <div class="dropdown-content">
        <div class="dropdown-list">
            <img src="./images/doll.PNG" class="dropdown-image"> <span
                class="margin-left">Mechanical Doll</span>
        </div>
        <div class="dropdown-list">
            <img src="./images/car.PNG" class="dropdown-image"> <span
                class="margin-left">Remote Car</span>
        </div>
        <div class="dropdown-list">
            <img src="./images/board-games.PNG" class="dropdown-image">
            <span class="margin-left">Musical Board Games</span>
        </div>
    </div>
</div>
Clickable dropdown list with JavaScript
This example code will create a Google-images-like zoom effect on clicking the image thumbnails.
On clicking the thumbnail, it dropped down the enlarged image view near the thumbnail.
<div class="first-img">
    <img class="thumbnail-img" src="./images/computer.jpg"
        onclick="showDropdownImage();">
</div>
<div class="second-img" id="second-img">
    <img class="large-image" src="./images/computer.jpg">
</div>
Clickable dropdown JavaScript
function showDropdownImage() {
	var currentElementValue = document.getElementsByClassName("thumbnail-img");
	var sub = document.getElementById("second-img");
	sub.style.display = "block";
}
HTML dropdown example: files, database, download
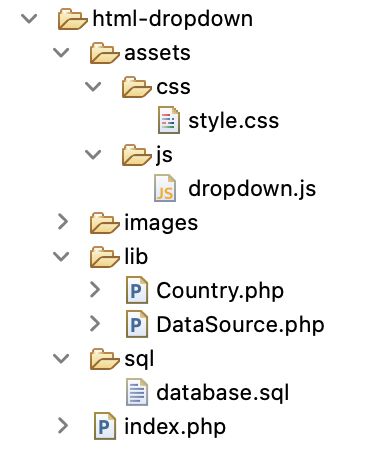
The below image shows the file structure of this example. It is for working the types of HTML dropdown and options.

Download the source code and import the below database script. I used the database to have the dynamic values to be populated into an HTML dropdown list.
--
-- Database: `blog_example`
--
--
-- Table structure for table `tbl_country`
--

CREATE TABLE `tbl_country` (
  `id` int(11) NOT NULL,
  `country_name` varchar(255) NOT NULL,
  `country_code` varchar(255) NOT NULL
) ENGINE=InnoDB DEFAULT CHARSET=utf8mb4;

--
-- Dumping data for table `tbl_country`
--

INSERT INTO `tbl_country` (`id`, `country_name`, `country_code`) VALUES
(1, 'Afghanistan', 'AF'),
(2, 'Albania', 'AL'),
(3, 'Algeria', 'DZ'),
(4, 'American Samoa', 'AS'),
(5, 'Andorra', 'AD'),
(6, 'Angola', 'AO'),
(7, 'Anguilla', 'AI'),
(8, 'Antarctica', 'AQ'),
(9, 'Antigua and Barbuda', 'AG'),
(10, 'Argentina', 'AR');

--
-- Indexes for dumped tables
--
--
-- Indexes for table `tbl_country`
--
ALTER TABLE `tbl_country`
  ADD PRIMARY KEY (`id`);

--
-- AUTO_INCREMENT for dumped tables
--

--
-- AUTO_INCREMENT for table `tbl_country`
--
ALTER TABLE `tbl_country`
  MODIFY `id` int(11) NOT NULL AUTO_INCREMENT, AUTO_INCREMENT=11;
Conclusion
We have learned basics about the HTML dropdown list using the <select> tag. The quick example at the beginning may save your time to get a simple example with a dropdown list.
We have created a custom dropdown to show a list of menu items. The custom dropdown is also used to zoom images from thumbnails.
I have given a list of dropdown-related examples. I hope the examples have covered all possible dropdown-based requirements.
I welcome your comments.


Easily and by far and away the best written tutorials on the web. Thank you so much, yet again.
Hi Rob,
Welcome and thank you so much for the support.