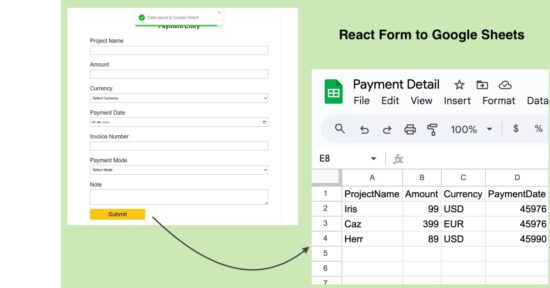
React form can be tied to a Google Sheets to store the submitted data. It maintains the form responses in an Excel format without database. This can be done by deploying a Google App Script for the target sheet.
In this tutorial, you will learn the steps to create a new Google App Script and deploy it for a Google Sheets.
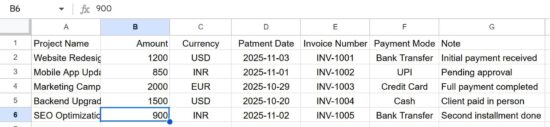
The Google Sheets will have columns relevant to the React form fields. The Google web app script URL parameters are in the same order as the column. In a previous tutorial, we saw how to connect Google Sheets via API from a PHP application.
Steps to get Google Sheets URL to post form data
There are 5 simple steps to get the Google Sheets web app URL by registering an app script for a target sheet. At the end of these 5 steps, it will generate a URL that has to be configured in the React frontend code.
In the frontend, this URL will have a form data bundle to process the data row insertion as coded in the app script.
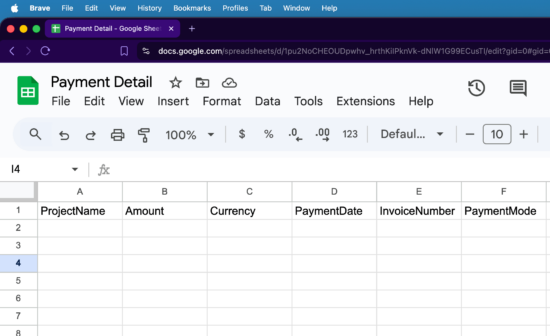
1. Create a Google sheet with the column relevant to the React form
2. Navigate Extension -> App Script to add JS script to build row to insert

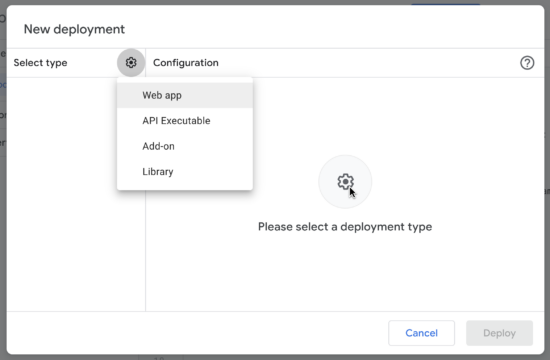
3. Choose Deploy -> New Deployment to configure web app
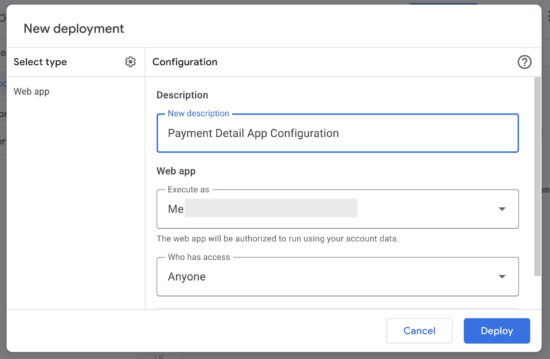
4. Set ownership configurations and authorize the app
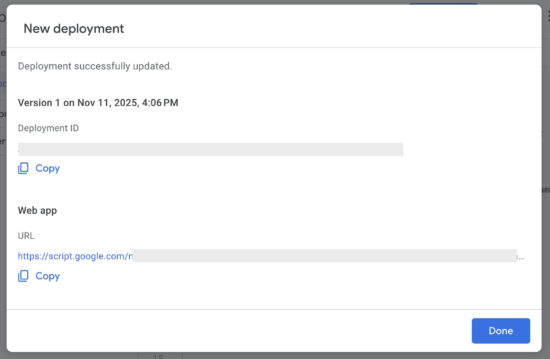
5. Click Deploy and copy the Google Sheets web app URL
React frontend form JSX with required handlers
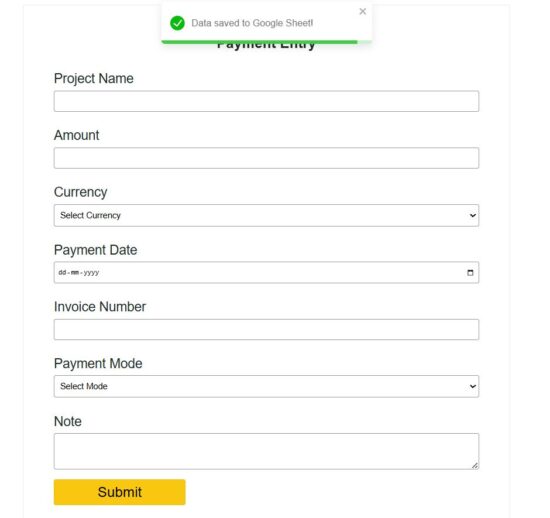
The ReactForm JSX component includes the form UI and hooks to process the form submit. This simple form collects payment details to store in the Google Sheets.
In the above steps we get the Google App script URL to target the sheet from the frontend. This URL is used in this JSX with the form’s handleSubmit function. This URL is added to the GOOGLE_SHEET_URL variable and used in the form action hook.
The URLSearchParams builds the argument list with the submitted React form data. Google Sheets URL will receive these arguments in key1=value1&key2=value2.. format.
Once the submitted data is added to the Google Sheets, the frontend will clear the form and show a success toast message to the user.
src/components/ReactForm.jsx
import { useState } from "react";
import axios from "axios";
import { ToastContainer, toast } from "react-toastify";
import "react-toastify/dist/ReactToastify.css";
import "../../public/assets/css/react-style.css";
import PaymentFormFields from "./PaymentFormFields";
const GOOGLE_SHEET_URL =
  "Paste your Google Apps Script Web App URL here";
const ReactForm = () => {
  const [formData, setFormData] = useState({
    projectName: "",
    amount: "",
    currency: "",
    paymentDate: "",
    invoiceNumber: "",
    paymentMode: "",
    note: "",
  });
  const handleChange = (e) => {
    const { name, value } = e.target;
    setFormData((prev) => ({ ...prev, [name]: value }));
  };
  const handleSubmit = async (e) => {
    e.preventDefault();
    try {
      const params = new URLSearchParams(formData).toString();
      const response = await axios.post(`${GOOGLE_SHEET_URL}?${params}`);
      if (response.data.status === "success") {
        toast.success("Data saved to Google Sheet!", { position: "top-center" });
        setFormData({
          projectName: "",
          amount: "",
          currency: "",
          paymentDate: "",
          invoiceNumber: "",
          paymentMode: "",
          note: "",
        });
      } else {
        toast.error("Failed to save data. Try again.", { position: "top-center" });
      }
    } catch (error) {
      console.error("Error:", error);
      toast.error("Something went wrong while submitting.", {
        position: "top-center",
      });
    }
  };
  return (
    <div className="form-wrapper">
      <h2 className="form-title">Payment Entry</h2>
      <form onSubmit={handleSubmit} className="payment-form">
        <PaymentFormFields formData={formData} handleChange={handleChange} />
        <button type="submit" className="submit-btn disabled={loading}">
          {loading ? "Processing..." : "Submit"}
        </button>
      </form>
      <ToastContainer />
    </div>
  );
};
export default ReactForm;
src/components/PaymentFormFields.jsx
const PaymentFormFields = ({ formData, handleChange }) => {
  return (
    <>
      <div className="form-group">
        <label className="form-label">Project Name</label>
        <input type="text" name="projectName" value={formData.projectName}
          onChange={handleChange}
          className="form-input"
          required
        />
      </div>
      <div className="form-group">
        <label className="form-label">Amount</label>
        <input type="number" name="amount" value={formData.amount}
          onChange={handleChange}
          className="form-input"
          required
        />
      </div>
      <div className="form-group">
        <label className="form-label">Currency</label>
        <select name="currency" value={formData.currency}
          onChange={handleChange}
          className="form-input"
          required
        >
          <option value="">Select Currency</option>
          <option value="USD">USD</option>
          <option value="INR">INR</option>
          <option value="EUR">EUR</option>
        </select>
      </div>
      <div className="form-group">
        <label className="form-label">Payment Date</label>
        <input type="date" name="paymentDate" value={formData.paymentDate}
          onChange={handleChange}
          className="form-input"
          required
        />
      </div>
      <div className="form-group">
        <label className="form-label">Invoice Number</label>
        <input type="text" name="invoiceNumber" value={formData.invoiceNumber}
          onChange={handleChange}
          className="form-input"
          required
        />
      </div>
      <div className="form-group">
        <label className="form-label">Payment Mode</label>
        <select name="paymentMode" value={formData.paymentMode}
          onChange={handleChange}
          className="form-input"
          required
        >
          <option value="">Select Mode</option>
          <option value="Cash">Cash</option>
          <option value="Bank Transfer">Bank Transfer</option>
          <option value="Credit Card">Credit Card</option>
          <option value="UPI">UPI</option>
        </select>
      </div>
      <div className="form-group">
        <label className="form-label">Note</label>
        <textarea name="note" value={formData.note}
          onChange={handleChange}
          className="form-input"
          rows="3"
        ></textarea>
      </div>
    </>
  );
};

export default PaymentFormFields;
Appending new row to the Google Sheets using the Web App Script
I gave the web app script in the downloadable source code added to this tutorial. This JS script is added to the Google Sheets App script extension.
This script will be executed when the form post action calls the web app URL. The doPost() function builds the Google Sheets row instance with the parameters posted from the form.
With the line sheet.appendRow(row); we can return the ContentService with a success response.
The formatOnly step is optional to maintain all the rows with the same styles as the sheet header has. For example, if you highlight any column with a bright background, that will be carried over to the next rows added by the app script.
google-sheet-app/app-script-target.js
function doPost(e) {
  if (!e || !e.parameter) {
    return ContentService
      .createTextOutput(JSON.stringify({ status: "error", message: "No parameters received" }))
      .setMimeType(ContentService.MimeType.JSON);
  }
  const sheet = SpreadsheetApp.getActiveSpreadsheet().getSheetByName("Sheet1");
  const row = [
    e.parameter.projectName || "",
    e.parameter.amount || "",
    e.parameter.currency || "",
    e.parameter.paymentDate || "",
    e.parameter.invoiceNumber || "",
    e.parameter.paymentMode || "",
    e.parameter.note || "",
  ];
  sheet.appendRow(row);
  const lastRow = sheet.getLastRow();
  const lastColumn = sheet.getLastColumn();
  const headerRange = sheet.getRange(1, 1, 1, lastColumn);
  const newRowRange = sheet.getRange(lastRow, 1, 1, lastColumn);
  headerRange.copyTo(newRowRange, { formatOnly: true });
  return ContentService
    .createTextOutput(JSON.stringify({ status: "success" }))
    .setMimeType(ContentService.MimeType.JSON);
}
Conclusion
By linking a React form to a Google Sheets via the Google Apps Script, form data is stored in excel format. This will be very useful to maintain form responses without a backend database. The App Script created for this tutorial provided a feature to keep the row column formatting with the newly added rows.
As an enhancement, we can extend this code to read Google sheets and show the latest records to the UI.
References