Inline edit is a feature that allows data manipulation from the list or view screen. This feature cut short the steps and navigation of an edit action.
It reduces the developers’ effort not to design more screens to edit dynamic data.
We can enable inline editing for any HMTL container tags. The ‘contenteditable’ attribute specified as ‘true’ makes an element’s content editable.
On editing the content, it requests PHP via AJAX to perform the backend edit operations.
The inline edit feature is famous and the most wanted in web development. There are plugins to enable this feature for your plugin.
We will see some of the popular plugins in the following section. Generally, I prefer to create a custom code instead of using plugins.
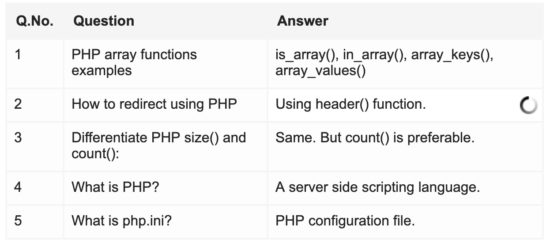
This output screenshot shows the inline-editable tabular data. The loader icon shown in a grid represents the in-progress action to the user.
In this example, the Question and Answer column data are editable. Q.No is just a serial number that doesn’t have the inline-edit option.
Let us create an example for enabling inline edit using custom code. It helps to manage FAQ data from the database.
In an older article, we have seen how to create inline CRUD via AJAX using PHP.
What is inside?
- Advantages of the inline-edit feature
- Existing jQuery plugins used for enabling inline-edit
- About jQuery AJAX inline-edit example
- File structure
- How to create inline-editable content with HTML
- jQuery script to request save inline-edit via AJAX
- PHP code to execute the edit database operation
- Database script
- jQuery AJAX inline-edit output
Advantages of the inline-edit feature
We have seen the significant advantages of this feature in the introductory part. Apart from that, we can say further as its merits as follows.
- It will allow the users to change their data when viewing it.
- It is suitable for application which doesn’t have a control panel for managing data.
- It gives a good user experience in some scenarios. Example: uploading profile photo/cover images in place of their tile.
- It will promote context-sensitive edit because it allows users to change the data instead of viewing the entire context.
- It will give a modern outlook by replacing the usual form with a stack of input fields.
Existing jQuery plugins used for enabling inline-edit
The x-editable plugin is for creating a content-editable section in your application. This plugin provides both popup and inline editing modes based on the configuration. It is compatible with Bootstrap, jQuery, and jQuery UI libraries.
jQuery inplace.js library allows inline editing with save and cancel buttons.
Inplace Rich Editor is for enabling editing rich tests. It allows changing the HTML formatted content within a container.
About jQuery AJAX inline-edit example
This example is the best one for beginners who are not familiar with the inline-edit job. It has a tabular list of data from the database. It shows frequently asked PHP interview questions.
The editable grid divisions’ on-change event calls AJAX to perform the database edit. This AJAX method sends the column’s name-value pair with a unique row ID.
PHP code receives these AJAX parameters and creates an UPDATE query based on them. In a previous tutorial, we have seen how to perform CRUD with PHP and MYSQL via AJAX.
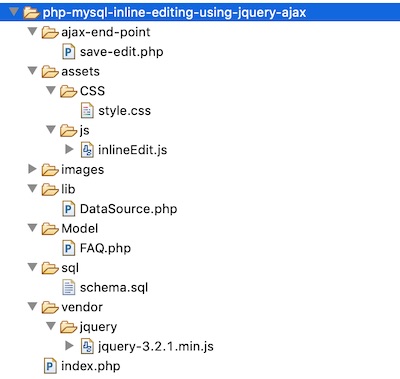
File structure
The below image shows the structure of the files created for this example. You can see the simplicity of this example in this file structure.
It has only 4 PHP files using which we have achieved the inline-edit implementation.
I have given the downloadable source, which has the working example. This folder contains CSS, Javascript, images, vendor files, and SQL, as shown below.
How to create inline-editable content with HTML
This section shows HTML code for displaying content editable grids to the user. This grid shows dynamic results from the database.
The grid is an HTML table with divisions enabled with ‘contenteditable’ attributes. This attribute makes each division editable while clicking on it.
Each grid box has the onChange event mapping to call inline-edit action via AJAX.
We can see the CSS, JavaScript, and other dependencies included in the head section of the below HTML.
The PHP code embedded with this HTML content reads the data from the database. It iterates the resultant array and displays the grid records in a loop.
<?php
namespace Phppot;

use Phppot\Model\FAQ;
?>
<html>
<head>
<title>PHP MySQL Inline Editing using jQuery Ajax</title>
<link href="./assets/CSS/style.css" type="text/css" rel="stylesheet" />
<script src="./vendor/jquery/jquery-3.2.1.min.js"></script>
<script src="./assets/js/inlineEdit.js"></script>
</head>
<body>
    <table class="tbl-qa">
        <thead>
            <tr>
                <th class="table-header" width="10%">Q.No.</th>
                <th class="table-header">Question</th>
                <th class="table-header">Answer</th>
            </tr>
        </thead>
        <tbody>
<?php
require_once ("Model/FAQ.php");
$faq = new FAQ();
$faqResult = $faq->getFAQ();

foreach ($faqResult as $k => $v) {
    ?>
			  <tr class="table-row">
                <td><?php echo $k+1; ?></td>
                <td contenteditable="true"
                    onBlur="saveToDatabase(this,'question','<?php echo $faqResult[$k]["id"]; ?>')"
                    onClick="showEdit(this);"><?php echo $faqResult[$k]["question"]; ?></td>
                <td contenteditable="true"
                    onBlur="saveToDatabase(this,'answer','<?php echo $faqResult[$k]["id"]; ?>')"
                    onClick="showEdit(this);"><?php echo $faqResult[$k]["answer"]; ?></td>
            </tr>
		<?php
}
?>
		  </tbody>
    </table>
</body>
</html>
I used minimal styles for the simple look and feel of this example. The styles are,
body {
    width: 610px;
    color: #232323;
    font-size: 0.95em;
    font-family: Arial;
}

.tbl-qa {
    width: 100%;
    background-color: #f5f5f5;
}

.tbl-qa th.table-header {
    padding: 5px;
    text-align: left;
    padding: 10px;
}

.tbl-qa .table-row td {
    padding: 8px 15px 10px 8px;
    background-color: #FDFDFD;
    vertical-align: top;
}
jQuery script to request save inline-edit via AJAX
There is no need for AJAX to implement inline editing. We can do it via page refresh on form submit also.
But, it will give professional output with AJAX. I used the jQuery library for AJAX, requesting PHP for the database update.
The saveToDatabase() method contains the jQuery AJAX script. On changing the table row content, it calls this method.
AJAX script requests database updates by posting the edited content. With this request, it sends the parameters column name and a unique id to the server.
The script will show a loader in the edited grid element during the server-side operation. It will represent that the async task is in progress.
The AJAX success callback will receive the server response and update the user interface accordingly.
In an old example code, we have seen how to insert a new record with inline edit.
function showEdit(editableObj) {
	$(editableObj).css("background", "#FFF");
}

function saveToDatabase(editableObj, column, id) {
	$(editableObj)
			.css("background", "#FFF url(./images/loaderIcon.gif) no-repeat center right 5px");
	$.ajax({
		url : "./ajax-end-point/save-edit.php",
		type : "POST",
		data : 'column=' + column + '&editval=' + editableObj.innerHTML
				+ '&id=' + id,
		success : function(data) {
			$(editableObj).css("background", "#FDFDFD");
		}
	});
}
PHP code to execute the edit database operation
PHP code called via AJAX receives the posted parameters. These parameters are for creating the UPDATE query to save the inline edit to the database.
PHP Model class FAQ.php contains functions to read and update the database records. The PHP code below calls this class’s editRecord() method.
<?php
namespace Phppot;

use Phppot\Model\FAQ;
$columnName = $_POST["column"];
$columnValue = $_POST["editval"];
$questionId = $_POST["id"];

require_once (__DIR__ . "./../Model/FAQ.php");
$faq = new FAQ();
$result = $faq->editRecord($columnName, $columnValue, $questionId);
?>
FAQ.php class
We can see the complete code for the FAQ class shown below. It has a constructor that invokes the DataSource library for the connection object.
<?php
namespace Phppot\Model;

use Phppot\Datasource;

class FAQ
{
    private $ds;

    function __construct()
    {
        require_once __DIR__ . './../lib/DataSource.php';
        $this->ds = new DataSource();
    }

    /**
     * to get the interview questions
     *
     * @return array result record
     */
    function getFAQ()
    {
        $query = "SELECT * from php_interview_questions";
        $result = $this->ds->select($query);
        return $result;
    }

    /**
     * to edit redorcbased on the question_id
     *
     * @param string $columnName
     * @param string $columnValue
     * @param string $questionId
     */
    function editRecord($columnName, $columnValue, $questionId)
    {
        $query = "UPDATE php_interview_questions set " . $columnName . " = ? WHERE  id = ?";

        $paramType = 'si';
        $paramValue = array(
            $columnValue,
            $questionId
        );
        $this->ds->execute($query, $paramType, $paramValue);
    }
}
DataSource class
This is a generic DataSource class. It includes all the methods used to perform the CRUD operations. I used prepared statements for executing the database operations.
It is in the free project download zip file available at the end of this article.
Database script
Import this database script into your development environment. This will help you to make this example work in your local.
This script contains the CREATE statement for the php_interview_questions database table used in this example. It also contains the primary key indexes and the AUTO_INCREMENT specification.
Also, I have provided the initial data for this table. It will help you to experiment with this code after setup.
CREATE TABLE `php_interview_questions` (
  `id` int(8) NOT NULL,
  `question` text NOT NULL,
  `answer` text NOT NULL,
  `row_order` int(8) NOT NULL
);

INSERT INTO `php_interview_questions` (`id`, `question`, `answer`, `row_order`) VALUES
(1, 'PHP array functions examples', 'is_array(), in_array(), array_keys(), array_values()', 3),
(2, 'How to redirect using PHP', 'Using header() function.', 4),
(3, 'Differentiate PHP size() and count():', 'Same. But count() is preferable.', 1),
(4, 'What is PHP?', 'A server side scripting language.', 0),
(5, 'What is php.ini?', 'PHP configuration file.', 2);

ALTER TABLE `php_interview_questions`
  ADD PRIMARY KEY (`id`);

ALTER TABLE `php_interview_questions`
  MODIFY `id` int(8) NOT NULL AUTO_INCREMENT, AUTO_INCREMENT=6;
Conclusion
We have seen detailed knowledge to implement inline edit in an HTML view. With this simplistic start, we can enhance the inline edit with more features.
We saw some third-party libraries exist to enable inline edit in an application. It will help to compare them with this custom example.
AJAX usage in this code will give a good user experience and professional output. Inline editing is a suitable scenario where AJAX will fit in place of its execution.
Hope you enjoy this article and have good learning on jQuery AJAX inline-edit with PHP MySQL.


WOW – worked FIRST TIME!!! (i edited the database connection credentials, and populated the db table; it just worked!!)
rarely does a library script work perfectly. BRAVO! my compliments
THANK YOU
Thank you Fred. These comments keeps me motivated. :-)