Do you know that the opening rate of emails by double opt-in confirmed subscribers is a staggering 40%? According to CampaignMonitor, email marketing generates $38 in ROI for every $1 spent.
Email marketing delivers the highest among any channel for marketing, even in comparison with channels like print, TV and social media.
Email marketing is the way to go. The primary mode to build your list is a double opt-in subscription form.
What is inside?
- Why do we need double opt-in?
- What is the role of secure hash?
- Double opt-in subscription form in PHP
- Sequence flow for double opt-in subscription
- Double opt-in Subscription form UI
- PHP AJAX for subscription form submission
- URL with a secure hash
- A PHP utility class for you
- Store subscription information in the database
- A database abstraction layer for you
- Send confirmation emails to users
- Subscription confirmation
- Conclusion
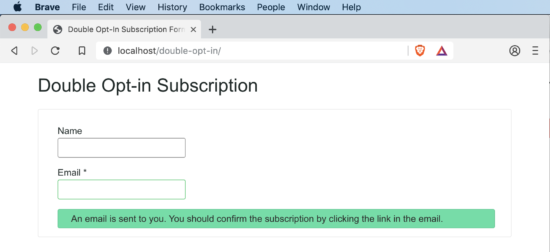
Use a double opt-in subscription form to signup for a newsletter, blog or a similar service. It has a two-step subscription process.
In the first step, the user will submit his name and email. Then the site will send an email to the user.
In the second step, the user will click the link in the received email. This will confirm his subscription to the site or service.
We call it the double opt-in because the users consent to the subscription twice. First by submitting the information and second by confirming to in by clicking the link in email.
Why do we need double opt-in?
It is the mechanism to verify whether the subscriber owns the input email. It would be best if you did this verification because there is a chance of misuse by submitting emails they do not own.
Double opt-in vs. single opt-in is well debated and results arrived at. Double opt-in wins hands-on in every critical aspect.
What is the role of a secure hash?
In the confirmation email received by the user, there will be a link. This is the second and most vital step in the opt-in process. The connection should be secure.
- It should be unique for every user and request.
- It should not be predictable.
- It should be immune to a brute-force attack.
Double opt-in subscription form in PHP
I will present you a step-by-step detail on how to build a double opt-in subscription form with a secure hash using PHP.
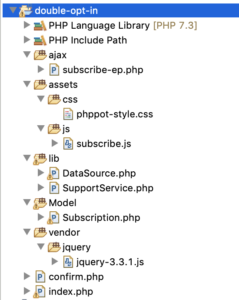
You will get a production-grade code you can use in real time on your live website. You can use this to manage your newsletter subscription.
I am releasing this code to you under MIT license. You can use it free even in commercial projects.
Sequence flow for double opt-in subscription
- Show a subscription form to the user.
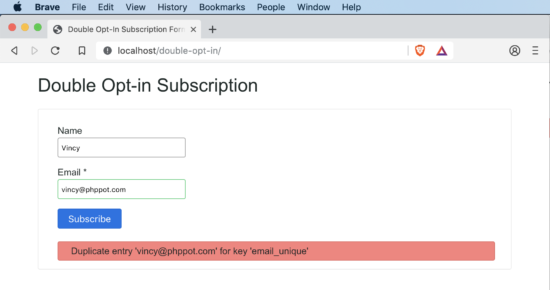
- On AJAX submit, insert a new record in the database.
- Send an email to the user with a secure hash link.
- On click the of the link, update the subscription status.
- At every step, there will be appropriate validations in place.
Double opt-in Subscription HTML form UI
This is where developers get it wrong. It would be best if you kept it simple and unobtrusive. For the high conversion, you must keep it minimal.
One field email is enough for the subscription. To address the user in a personal way, you need their name. That’s it. Do not ask for much information on a subscription form.
<!doctype html>
<html lang="en">

<head>
	<meta charset="utf-8">
	<meta name="viewport" content="width=device-width, initial-scale=1, shrink-to-fit=no">
	<meta name="author" content="Vincy">
	<link rel="stylesheet" type="text/css" href="assets/css/phppot-style.css">
	<title>Double Opt-In Subscription Form with Secure Hash using PHP</title>
</head>

<body>
	<div class="phppot-container">
		<h1>Double Opt-in Subscription</h1>
		<form class="phppot-form" action="" method="POST">
			<div class="phppot-row">
				<div class="label">Name</div>
				<input type="text" id="pp-name" name="pp-name" class="phppot-input">
			</div>
			<div class="phppot-row">
				<div class="label">
					Email *
					<div id="email-info" class="validation-message" data-required-message="required." data-validate-message="Invalid email."></div>
				</div>
				<input type="text" id="pp-email" name="pp-email" class="required email phppot-input" onfocusout="return validateEmail();">
			</div>
			<div class="phppot-row">
				<button type="Submit" id="phppot-btn-send">Subscribe</button>
				<div id="phppot-loader-icon">Sending ...</div>
				<div id="phppot-message"></div>
			</div>
		</form>
	</div>
	<script src="https://code.jquery.com/jquery-3.6.4.min.js" integrity="sha256-oP6HI9z1XaZNBrJURtCoUT5SUnxFr8s3BzRl+cbzUq8=" crossorigin="anonymous"></script>
	<script src="assets/js/subscribe.js"></script>
</body>
</body>

</html>
If you ask for much information, it will drive your users away. The same principle applies when you build a contact form. More or less, these two behave in a similar aspect.
You should leave the name field optional and only the email field as required. This will encourage users to submit the form and subscribe to the newsletter.
The form should be responsive. Any page or form you build should work on mobile, tablet, laptop and desktop devices. It would be best if you optimized to work on any viewport.
Google parses webpages in mobile mode for indexing in the search result. The desktop is an old story and gone are those days. It would be best if you always designed for mobile. Make it mobile-first!
PHP AJAX for subscription form submission
I have used AJAX to manage the submission. This will help the user to stay on the page after subscription. You can position this subscription form in a sidebar or the footer.
This is a classic example of where you should use AJAX. I have seen instances where people use AJAX in inappropriate places for the sake of using it.
Subscription AJAX endpoint
The AJAX endpoint has three significant steps:
- Verify the user input.
- Insert a record in the database.
- Send an email with a link for the subscription.
subscribe-ep.php is the AJAX endpoint. It starts with an if condition to check if the submission is via the POST method. It is always good to program for POST instead of GET by default.
<?php
use Phppot\Subscription;
use Phppot\SupportService;

/**
 * AJAX end point for subscribe action.
 * 1. validate the user input
 * 2. store the details in database
 * 3. send email with link that has secure hash for opt-in confirmation
 */
session_start();

// to ensure the request via POST
if ($_POST) {
    require_once __DIR__ . './../lib/SupportService.php';
    $supportService = new SupportService();

    // to Debug set as true
    $supportService->setDebug(false);

    // to check if its an ajax request, exit if not
    $supportService->validateAjaxRequest();

    require_once __DIR__ . './../Model/Subscription.php';
    $subscription = new Subscription();

    // get user input and sanitize
    if (isset($_POST["pp-email"])) {
        $userEmail = trim($_POST["pp-email"]);
        $userEmail = htmlspecialchars($userEmail);
        $subscription->setEmail($userEmail);
    } else {
        // server side fallback validation to check if email is empty
        $output = $supportService->createJsonInstance('Email is empty!');
        $supportService->endAction($output);
    }

    $memberName = "";
    if (isset($_POST["pp-name"])) {
        $memberName = htmlspecialchars($_POST["pp-name"]);
    }
    $subscription->setMemberName($memberName);

    // 1. get a 12 char length random string token
    $token = $supportService->getToken(12);

    // 2. make that random token to a secure hash
    $secureToken = $supportService->getSecureHash($token);

    // 3. convert that secure hash to a url string
    $urlSecureToken = $supportService->cleanUrl($secureToken);
    $subscription->setSubsriptionKey($urlSecureToken);
    $subscription->setSubsciptionSatus(0);

    $currentTime = date("Y-m-d H:i:s");
    $subscription->setCreateAt($currentTime);
    $result = $subscription->insert();

    // check if the insert is success
    // if success send email else send message to user
    $messageType = $supportService->getJsonValue($result, 'type');
    if ('error' != $messageType) {
        $result = $subscription->sendConfirmationMessage($userEmail, $urlSecureToken);
    }
    $supportService->endAction($result);
}
I have used the SupportService class to perform standard functions.
Input sanitisation is a must. When you collect information using a public website, you should be careful. You could get infected without your knowledge. There are many bots foraging around the Internet and they click on all links and buttons.
To sanitize, do not invent a new function. Use the function provided by PHP and that is safe to use.
URL with a secure hash
Generate a unique URL for each user subscription. Use this URL to confirm the user’s subscription in the second step. Remember, that’s why we call this double opt-in.
I have used a three-step process:
- Generate a random string token.
- Convert the token to a secure hash.
- Convert the secure hash to a safe URL.
I have used hex dec, bin2hex and openssl_random_pseudo_bytes to generate random bits, which form a random string.
Then, I used the PHP’s built-in password_hash function to make the random string a secure hash. Never try to do something on your own. Go with the PHP’s function and it does the job very well.
Before PHP 7, we could supply a user-generated salt. Now PHP 7 release has deprecated it. It is a good move because PHP can generate a better salt than you will. So stick to PHP 7 and use it without supplying salt.
The secure hash will contain all sorts of special characters. You can keep those special characters, but you must URL encode them. But I always wish to keep URLs clean and the encoded chars do not look nice.
So no harm in removing them. So I cleaned up those and left only the safe characters. Then as a secondary precaution, I also encode the resultant string.
Thus after going through a multi-step process, we get a random, hash-secure, safe, encoded URL token. Save the user-submitted information in the database record along with this token.
A PHP utility class for you
This is a utility class that I use in my projects. I am giving it away free for you all. It has functions I reuse pretty often and will be handy in situations. Every method has detailed comments that explain its purpose and usage method.
<?php
/**
 * Copyright (C) 2019 Phppot
 *
 * Distributed under MIT license with an exception that,
 * you don’t have to include the full MIT License in your code.
 * In essense, you can use it on commercial software, modify and distribute free.
 * Though not mandatory, you are requested to attribute this URL in your code or website.
 */
namespace Phppot;

class SupportService
{

    /**
     * Short circuit type function to stop the process flow on validation failure.
     */
    public function validateAjaxRequest()
    {
        // to check if its an ajax request, exit if not
        $http_request = $_SERVER['HTTP_X_REQUESTED_WITH'];
        if (! isset($http_request) && strtolower($http_request) != 'xmlhttprequest') {
            $output = $this->createJsonInstance('Not a valid AJAX request!');
            $this->endAction($output);
        }
    }

    /**
     * Last point in the AJAX work flow.
     * Clearing tokens, handles and resource cleanup can be done here.
     *
     * @param string $output
     * @param boolean $clearToken
     */
    public function endAction($output)
    {
        die($output);
    }

    public function setDebug($mode)
    {
        if ($mode == true) {
            ini_set('display_errors', 1);
            set_error_handler(function ($severity, $message, $file, $line) {
                if (error_reporting() & $severity) {
                    throw new \ErrorException($message, 0, $severity, $file, $line);
                }
            });
        }
    }

    /**
     * encodes a message string into a json object
     *
     * @param string $message
     * @param string $type
     * @return \JsonSerializable encoded json object
     */
    public function createJsonInstance($message, $type = 'error')
    {
        $messageArray = array(
            'type' => $type,
            'text' => $message
        );
        $jsonObj = json_encode($messageArray);
        return $jsonObj;
    }

    public function getJsonValue($json, $key)
    {
        $jsonArray = json_decode($json, true);
        return $jsonArray[$key];
    }

    /**
     * If you are using PHP, this is the best possible secure hash
     * do not try to implement somthing on your own
     *
     * @param string $text
     * @return string
     */
    public function getSecureHash($text)
    {
        $hashedText = password_hash($text, PASSWORD_DEFAULT);
        return $hashedText;
    }

    /**
     * generates a random token of the length passed
     *
     * @param int $length
     * @return string
     */
    public function getToken($length)
    {
        $token = "";
        $codeAlphabet = "ABCDEFGHIJKLMNOPQRSTUVWXYZ";
        $codeAlphabet .= "abcdefghijklmnopqrstuvwxyz";
        $codeAlphabet .= "0123456789";
        $max = strlen($codeAlphabet) - 1;
        for ($i = 0; $i < $length; $i ++) {
            $token .= $codeAlphabet[$this->cryptoRandSecure(0, $max)];
        }
        return $token;
    }

    public function cryptoRandSecure($min, $max)
    {
        $range = $max - $min;
        if ($range < 1) {
            return $min; // not so random...
        }
        $log = ceil(log($range, 2));
        $bytes = (int) ($log / 8) + 1; // length in bytes
        $bits = (int) $log + 1; // length in bits
        $filter = (int) (1 << $bits) - 1; // set all lower bits to 1
        do {
            $rnd = hexdec(bin2hex(openssl_random_pseudo_bytes($bytes)));
            $rnd = $rnd & $filter; // discard irrelevant bits
        } while ($rnd >= $range);
        return $min + $rnd;
    }

    /**
     * makes the passed string url safe and return encoded url
     *
     * @param string $str
     * @return string
     */
    public function cleanUrl($str, $isEncode = 'true')
    {
        $delimiter = "-";
        $str = str_replace(' ', $delimiter, $str); // Replaces all spaces with hyphens.
        $str = preg_replace('/[^A-Za-z0-9\-]/', '', $str); // allows only alphanumeric and -
        $str = trim($str, $delimiter); // remove delimiter from both ends
        $regexConseqChars = '/' . $delimiter . $delimiter . '+/';
        $str = preg_replace($regexConseqChars, $delimiter, $str); // remove consequtive delimiter
        $str = mb_strtolower($str, 'UTF-8'); // convert to all lower
        if ($isEncode) {
            $str = urldecode($str); // encode to url
        }
        return $str;
    }

    /**
     * to mitigate XSS attack
     */
    public function xssafe($data, $encoding = 'UTF-8')
    {
        return htmlspecialchars($data, ENT_QUOTES | ENT_HTML401, $encoding);
    }

    /**
     * convenient method to print XSS mitigated text
     *
     * @param string $data
     */
    public function xecho($data)
    {
        echo $this->xssafe($data);
    }
}
Store subscription information in the database
Insert a record to the database on submission of the subscription form. We get the user’s name and email and generate a secure hash token, current time, and subscription status.
<?php
namespace Phppot;

use Phppot\DataSource;

class Subscription
{

    private $ds;

    private $memberName;

    private $email;

    private $subsriptionKey;

    private $subsciptionSatus;

    private $createAt;

    private $supportService;

    function __construct()
    {
        require_once __DIR__ . './../lib/DataSource.php';
        $this->ds = new DataSource();

        require_once __DIR__ . './../lib/SupportService.php';
        $this->supportService = new SupportService();
    }

    public function getMemberName()
    {
        return $this->memberName;
    }

    public function getEmail()
    {
        return $this->email;
    }

    public function getSubsriptionKey()
    {
        return $this->subsriptionKey;
    }

    public function getSubsciptionSatus()
    {
        return $this->subsciptionSatus;
    }

    public function getCreateAt()
    {
        return $this->createAt;
    }

    public function setMemberName($memberName)
    {
        $this->memberName = $memberName;
    }

    public function setEmail($email)
    {
        $this->email = $email;
    }

    public function setSubsriptionKey($subsriptionKey)
    {
        $this->subsriptionKey = $subsriptionKey;
    }

    public function setSubsciptionSatus($subsciptionSatus)
    {
        $this->subsciptionSatus = $subsciptionSatus;
    }

    public function setCreateAt($createAt)
    {
        $this->createAt = $createAt;
    }

    /**
     * to get the member record based on the subscription_key
     *
     * @param string $subscriptionKey
     * @return array result record
     */
    public function getMember($subscriptionKey, $subscriptionStatus)
    {
        $query = 'SELECT * FROM tbl_subscription where subscription_key = ? and subscription_status = ?';
        $paramType = 'si';
        $paramValue = array(
            $subscriptionKey,
            $subscriptionStatus
        );
        $result = $this->ds->select($query, $paramType, $paramValue);
        return $result;
    }

    public function insert()
    {
        $query = 'INSERT INTO tbl_subscription (member_name, email, subscription_key, subscription_status, create_at) VALUES (?, ?, ?, ?, ?)';
        $paramType = 'sssis';
        $paramValue = array(
            $this->memberName,
            $this->email,
            $this->subsriptionKey,
            $this->subsciptionSatus,
            $this->createAt
        );
        $insertStatus = $this->ds->insert($query, $paramType, $paramValue);
        return $insertStatus;
    }

    public function updateStatus($subscriptionKey, $subscriptionStatus)
    {
        $query = 'UPDATE tbl_subscription SET subscription_status = ? WHERE subscription_key = ?';
        $paramType = 'is';
        $paramValue = array(
            $subscriptionStatus,
            $subscriptionKey
        );
        $this->ds->execute($query, $paramType, $paramValue);
    }

    /**
     * sends confirmation email, to keep it simple, I am just using the PHP's mail
     * I reccommend serious users to change it to PHPMailer and set
     * appropriate headers
     */
    public function sendConfirmationMessage($mailTo, $urlSecureToken)
    {
        // following is the opt-in url that will be sent in email to
        // the subscriber. Replace example.com with your server
        $confirmOptInUrl = 'http://example.com/confirm.php?q=' . $urlSecureToken;
        $message = '<p>Howdy!</p>
        <p>This is an automated message sent for subscription service.
You must confirm your request to subscribe to example.com site.</p>
        <p>Website Name: example</p>
        <p>Website URL: http://example.com</p>
        <p>Click the following link to confirm: ' . $confirmOptInUrl . '</p>';

        $isSent = mail($mailTo, 'Confirm your subscription', $message);

        if ($isSent) {
            $message = "An email is sent to you. You should confirm the subscription by clicking the link in the email.";
            $result = $this->supportService->createJsonInstance($message, 'message');
        } else {
            $result = $this->supportService->createJsonInstance('Error in sending confirmation email.', 'error');
        }
        return $result;
    }
}
The reason for storing the current time is to have an expiry for every link. We can set a predefined expiry for the double opt-in process.
For example, you can set one week as the expiry for a link from the moment you generate it. The user has to click and confirm before that expiry period.
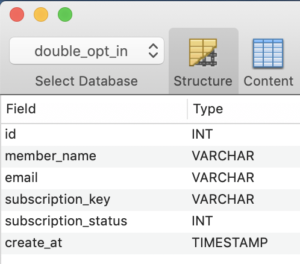
Subscription status is default stored as ‘0’ and, on the confirmation, changed to ‘1’.
A database abstraction layer for you
It is my PHP abstraction for minor projects. This works as a layer between the controller, business logic and the database. It has generic methods using which we can do the CRUD operations. I have bundled it with the free project download at this tutorial’s end.
Send confirmation emails to users.
After you insert the record, send an email will to the user to perform the double opt-in confirmation. The user will have a link in the email, which he has to click to confirm.
Keep the email simple. It is okay to have text instead of fancy HTML emails. PHP can generate any email and you can code complex email templates. But the spam engines may not like it.

If you wish to go with HTML emails, keep the HTML code ratio as little as possible. This is also one factor in which the spam engines flag the emails.
Then remember not to use the spam stop words. There are words like “free”, “win”, “cash”, “promo” and “income”. There is a long list and you can get it on the Internet by searching for “email spam filter word list”.
I have used PHP’s mail() function to send the email. I recommend you change it to PHPMailer to send SMTP-based emails if you plan to use this code in production.
Subscription confirmation
Create a public landing page and you may use .htaccess for a neat URL mapping. This URL should map with the URL sent to the user and the PHP file to process the request.
First, GET the token and verify the user against the database. Check,
- if such a token exists,
- it is not expired,
- the user is not already subscribed
- add more validation as you deem fit.
<?php
use Phppot\Subscription;
use Phppot\SupportService;

/**
 * For confirmation action.
 * 1. Get the secure has from url
 * 2. validate it against url
 * 3. update the subscription status in database accordingly.
 */
session_start();

// to ensure the request via POST
require_once __DIR__ . '/lib/SupportService.php';
$supportService = new SupportService();

// to Debug set as true
$supportService->setDebug(true);

$subscriptionKey = $_GET['q'];

require_once __DIR__ . '/Model/Subscription.php';
$subscription = new Subscription();
$result = $subscription->getMember($subscriptionKey, 0);

if (count($result) > 0) {
    // member found, go ahead and update status
    $subscription->updateStatus($subscriptionKey, 1);
    $message = $result[0]['member_name'] . ', your subscription is confirmed.';
    $messageType = 'success';
} else {
    // securiy precaution: do not reveal any information here
    // play subtle with the reported message
    $message = 'Invalid URL!';
    $messageType = 'error';
}
?>
<!doctype html>
<html lang="en">
<head>
<meta charset="utf-8">
<meta name="viewport"
	content="width=device-width, initial-scale=1, shrink-to-fit=no">
<meta name="author" content="Vincy">
<link rel="stylesheet" type="text/css"
	href="assets/css/phppot-style.css">
<title>Double Opt-In Subscription Confirmation</title>
</head>
<body>
	<div class="phppot-container">
		<h1>Double Opt-in Subscription Confirmation</h1>
		<div class="phppot-row">
			<div id="phppot-message" class="<?php echo $messageType; ?>"><?php echo $message;?></div>
		</div>
	</div>
</body>
</body>
</html>
If validation fails, do not reveal any information to the user. It would be best if you only said that it has failed.
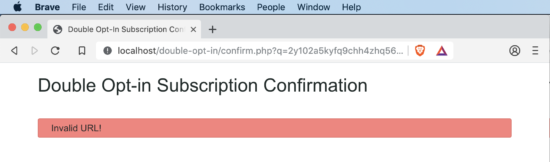
More important do not say, no such email found. This will allow finding who has subscribed to your service. Whenever a validation fails, the displayed message should not reveal internal information.
On validation success, update the subscription status. Then show a happy success message to the user.
Database script
This script has the user database table to store the user details to save their email, name, and secure subscription key.
--
-- Database: `double_opt_in`
--

-- --------------------------------------------------------

--
-- Table structure for table `tbl_subscription`
--

CREATE TABLE `tbl_subscription` (
  `id` int(11) NOT NULL,
  `member_name` varchar(255) DEFAULT NULL,
  `email` varchar(255) DEFAULT NULL,
  `subscription_key` varchar(255) DEFAULT NULL,
  `subscription_status` int(11) DEFAULT NULL,
  `create_at` timestamp NOT NULL DEFAULT current_timestamp()
) ENGINE=InnoDB DEFAULT CHARSET=utf8mb4 COLLATE=utf8mb4_general_ci;

--
-- Indexes for dumped tables
--

--
-- Indexes for table `tbl_subscription`
--
ALTER TABLE `tbl_subscription`
  ADD PRIMARY KEY (`id`);

--
-- AUTO_INCREMENT for dumped tables
--

--
-- AUTO_INCREMENT for table `tbl_subscription`
--
ALTER TABLE `tbl_subscription`
  MODIFY `id` int(11) NOT NULL AUTO_INCREMENT;
Conclusion
I have presented you with a production-grade double opt-in subscription form. I have followed the most secure hash generation method for confirmation URL emails. I am giving it to you under the MIT license. The intention is to be the most permissible. You can download it for free and change the code. You can even use it in your commercial projects. I have used the most secure code possible. You can use this in your live site to manage newsletter subscriptions. In the coming part, I will include unsubscribe and enhance it further. Leave your comments below with what sort of enhancements you are looking for.


OMG! OMG! Look at the level of detail. What a fantastic writeup. I am surprised at your focus on
1) input sanitization
2) security
3) structuring the code
4) focus on reusability
Code that are available in the Internet in the name of tutorial sites are junk. They are litter, vomited with only ad-revenue (pageviews) in focus.
Finding articles like these are getting diamonds from a mound of litter. Bravo! Send me a link, I wish to give you a donation. Really appreciate your work.
Most important thing is that you have shared it under MIT license. Thank you for your service. God bless.
Hi Jerry,
Thank you for the wonderful words. It made my day. These nice words keeps me motivated. Thank you.
Demo?
Saeed,
If a functionality that sends email or stores records in database, then it is being abused by users. In order to protect the site, I wish not deploy demo for functionality with email or DB access.
You can deploy it in couple of minutes in your system. If you face any issues in that let me know and I will help you out.
This is Amaaaazing!!! Thank you so much :) I asked you a question in one of my other replies to one of your tutorials about the password hashing, and this answers my question. Kudos to the Master :)
Thank you for the nice words Chris.
Congratulations nice job
Thank you
Thank you Zafer for the wishes.
God bless you more with wisdom.
Thank you David.
You helped me in my many projects even you don’t know :)
Waiting for unsubscribe! You are perfect Vincy :)
Thanks
Thank you Kemal. Sure I will add that as and when time permits.
Hi Vincy,
I’m using PHP 5.6.10. Can I run this script?
Yes Kemal. It will work in PHP 5.6 too.
Hey, Vincy. Thank you for your enormous work and your explanations of every step for this form.
Thanks again. Greetings.
Welcome Gaspar.
Simply superb Vincy! Liked the structure you followed and also the amount of details. Very educative indeed!
What about the reCaptcha implementation? Do you think it’s not important or may be it didn’t fall into the scope of your article. Just a bit curious.
My very best regards,
Jehan
Hi Jehan,
I have written Google reCaptcha as a separate article https://phppot.com/php/php-contact-form-with-google-recaptcha/ You can combine these two.
OUTSTANDING tutorial, easy to follow and looks to be very solid code.
Any chance you could guide me on how to place approval on signup? In other words user must confirm email and then admin approves login afterwards.
Love your site and is now on my weekly visit list:)
Hi Terry,
You should combine this code with https://phppot.com/php/user-registration-in-php-with-login-form-with-mysql-and-code-download/
Very nice clean code, thank you!
I am in the process of installing, and thinking about how I might myself add in an unsubscribe feature. Your code being so clean makes it easier to add code without breaking things… thank you
Welcome Jeff.
how add option for users to unsubscribe?
Hi Shijil,
Use a simple form and on submit, update the subscription_status to 0.
Very helpful resource, I was able to implement a double opt in subscription flawlessly in our site. Thanks for sharing.. Open Source Zinda-Baad!!
Welcome Suraj.
GOOG job and tutorial… very nice helpfull if I add filed to input phone number (whatsapp) and when user click link to confirm system will send notification via email and whatsapp too..
i have whatsapp API key to send message from waresponder.co.id … could you help me to implement this with your script.. thank’s for help me… wa.me/62823230269192
Hi Akhyar,
Sure, send me an email and we can take it forward.
I love your code
Thank you Azim.
Hi, i don’t know if you can help me, but… I tried to run this on wamp in a regular PC on worked fine, but when I imported it to a server on wamp it didn’t do anything, nothing at all, just showed the little message “Sending …”.
The only thing that changed from the pc to the server, is that I had installed IIS, and stopped the service and installed WAMP and runs normal in port 80, but does nothing. on the normal PC WAMP is also in port 80, and thought that it also should work, but no, it didn’t.
Hi Kevin,
If this works on your regular PC and doesn’t work on another server, then it is due to the environment, support software and related configuration. You need to check the Apache conf then PHP.ini and investigate in that direction.
What to say? Millions of thanks to you…
I’m a beginner of this things…
Really easy to understand your tutorial…
May GOD bless you in anything you do!!!
Thank you Ramlie.
Hi Vincy,
I’m trying to create the database and table ir order to hace your DataSource.php work but I can’t find the full structure details. Only the screenshot of the fields but not the full information… Would you consider add a sql model to your project in order to help creating a table in our own servers?
Thanks
Hi Pascal,
At the end of the article there is a Download button. You can download the complete project and it includes all the necessary files including the SQL structure.
Nice work Vincy, thank you so much for your good work you have helped a lot in my project at UN.
I uploaded this on live server,
sending email with confirmation works fine
Thank you Shokat.
Hi Vincy,
Nice code here thank you so much for sharing this,
I have managed to make the code work, I have a question though,
Will subscribers starts to receive automated emails?
Hi Yousuf,
Welcome. For the subscribers to receive automated emails you need to configure CRON jobs.