ReCaptcha is a popular Google service that secures an application from bot attacks or malicious access. The Google reCaptcha evolved along with versions v2, and v3. V3 is the recent one that gives an extraordinary result. It overcomes the user friction with the v2 “I am not a Robot” challenge.
This tutorial guides to learn how to add the Google reCAPTCHA v3 in a Laravel application. In a previous code, we have seen how to integrate this V3 version in a plain PHP application.
About the example
This example uses a Laravel package biscolab/laravel-recaptcha to add the Google reCAPTCHA v3 to an app. This article gives guidelines for integrating this in a few steps.
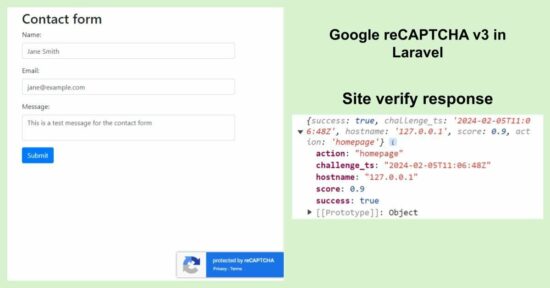
It performs the JavaScript fetch to call the reCaptcha API. It sets the callbacks to get the success or error response. In a successful response, it sends the Google reCaptcha Promise object as below. The callback set receives the error response as a catch.
{
  "success": bool,      // true if valid, false otherwise
  "score": number       // the score for the user request (possible range is 0.0 - 1.0)
  "action": string            // ** the action name for this request (important to verify)
  "challenge_ts": timestamp,  // ** timestamp of the challenge load (ISO format yyyy-MM-dd'T'HH:mm:ssZZ)
  "hostname": string,         // the hostname of the site where the reCAPTCHA is deployed and resolved
  "error-codes": [...]        // ** optional
}
How does the Google reCaptcha V3 work?
This reCaptcha version will not ask the site users to attend any challenge. Instead, it maintains a score for the site actions from 0.0 to 1.0 based on the risk analysis made by the reCaptcha V3 tool.
The site actions can be tracked by analytics provided by the Google reCaptcha admin console. It will improve the user experience and assure the site safety at the same time.
Steps to create a reCAPTCHA V3:
- Install the Laravel package to integrate Google reCaptcha v3.
- Get a API keys and configure to the package config file.
- Embed the reCAPTCHA V3 API script and element to the Laravel template file.
1. Install the Laravel package to integrate Google reCaptcha v3
Run this composer command to install the biscolab package to the Laravel application.
composer require biscolab/laravel-recaptchaPublish the package vendor to the Laravel app provider. It will create a recaptcha.php file in the app config folder
php artisan vendor:publish --provider="Biscolab\ReCaptcha\ReCaptchaServiceProvider"Set the Google reCaptcha V3 settings mainly api_site_key and api_secret_key and the version configurations. In this example, the version is set as v3 and the keys are from the Laravel .env file.
config/recaptcha.php
return [

    /**
     *
     * The site key
     * get site key @ www.google.com/recaptcha/admin
     *
     */
    'api_site_key' => env('GOOGLE_RECAPTCHA_PUBLIC_KEY', ''),

    /**
     *
     * The secret key
     * get secret key @ www.google.com/recaptcha/admin
     *
     */
    'api_secret_key' => env('GOOGLE_RECAPTCHA_SECRET', ''),

    /**
     *
     * ReCATCHA version
     * Supported: "v2", "invisible", "v3",
     *
     * get more info @ https://developers.google.com/recaptcha/docs/versions
     *
     */
    'version' => 'v3',
]
2. How to get Google reCaptcha API keys for V3
We have given the procedure for getting the Google reCaptcha API keys from the admin console. The steps in the linked article are also applicable here.
The below list contains the required settings to register your site with the Google reCaptcha to get the keys.
- Set the App name in the label.
- Check the score-based v3 from the reCaptcha type options.
- Provide the domain URL.
- Expand the reCaptcha keys dropdown menu to get the site key and the secret key.
Update .env
RECAPTCHA_SITE_KEY=your_site_key
RECAPTCHA_SECRET_KEY=your_secret_key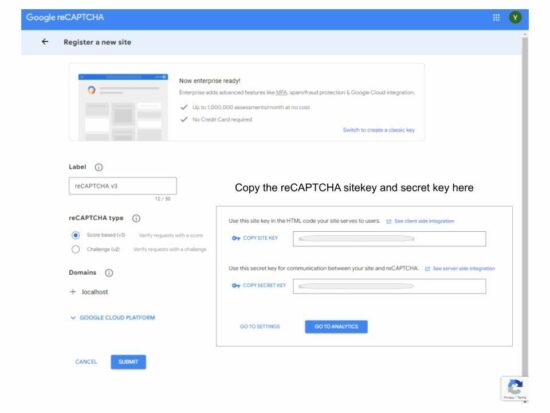
3. How to embed reCAPTCHA v3 to a contact form?
This example adds a contact form HTML in the Laravel welcome template.
The below code displays a contact form HTML integrated with the Google reCaptcha v3 on the landing page.
It has the Google reCaptcha JavaScript API loaded via the htmlScriptTagJsApi embed. This embed is set with the necessary callback functions to capture the response returned by the API.
- callback_then – It receives the reCaptcha v3 Promise object on a success case. In this case, the site action score will be higher towards the upper bound of 1.0.
- callback_catch – It receives the error response in case of any problem or risk identified on the reCaptcha site-verify request.
The Promise object or the error response can be seen in the Developer console. It ensures that the reCaptcha v3 integration is successful for the site action.
resources/views/welcome.blade.php
<!DOCTYPE html>
<html lang="en">
<head>
<title>How to Add Google reCAPTCHA v3 to form in Laravel</title>
<meta charset="utf-8">
<meta name="viewport" content="width=device-width, initial-scale=1">
<meta name="csrf-token" content="{{ csrf_token() }}">
<link rel="stylesheet" href="https://cdn.jsdelivr.net/npm/bootstrap@4.6.1/dist/css/bootstrap.min.css">
<script src="https://ajax.googleapis.com/ajax/libs/jquery/3.6.0/jquery.min.js"></script>
<script src="https://cdn.jsdelivr.net/npm/bootstrap@4.6.1/dist/js/bootstrap.min.js"></script>
<!-- Include script -->
<script type="text/javascript">
function callbackThen(response) {
// read Promise object
response.json().then(function(data) {
console.log(data);
if(data.success && data.score >= 0.6) {
console.log('valid recaptcha');
} else {
document.getElementById('contactForm').addEventListener('submit', function(event) {
event.preventDefault();
alert('recaptcha error');
});
}
});
}
function callbackCatch(error){
console.error('Error:', error)
}
</script>
{!! htmlScriptTagJsApi([
'callback_then' => 'callbackThen',
'callback_catch' => 'callbackCatch',
]) !!}
</head>
<body>
<div class="container">
<!-- Alert message (start) -->
@if(Session::has('message'))
<div class="alert alert-success">
{{ Session::get('message') }}
</div>
@endif
<!-- Alert message (end) -->
<h2>Contact form</h2>
<form action="{{ route('submit.form') }}" method="post" id="contactForm">
@csrf
<div class="form-group">
<label for="name">Name:</label>
<input type="name" class="form-control" id="email" placeholder="Enter name" name="name" value="{{ old('name') }}">
@if($errors->has('name'))
<small class="text-danger">{{ $errors->first('name') }}</small>
@endif
</div>
<div class="form-group">
<label for="email">Email:</label>
<input type="email" class="form-control" id="email" placeholder="Enter email" name="email" value="{{ old('email') }}">
@if($errors->has('email'))
<small class="text-danger">{{ $errors->first('email') }}</small>
@endif
</div>
<div class="form-group">
<label for="message">Message:</label>
<textarea class="form-control" id="message" placeholder="Enter message" name="message">{{ old('message') }}</textarea>
@if($errors->has('message'))
<small class="text-danger">{{ $errors->first('message') }}</small>
@endif
</div>
<button type="submit" class="btn btn-primary">Submit</button>
</form>
</div>
</body>
</html>
Laravel controller and routes to land and process form
The below controller loads the form and processes the form action via the submitContactForm() handler.
This handler uses the default validator service of Laravel to initiate a basic validation before processing the user data.
But, the strong security guarantee is the Google reCaptcha embedded in the Laravel contact form created for this example.
app/Http/Controllers/FormController.php
<?php

namespace App\Http\Controllers;

use Illuminate\Http\Request;
use Illuminate\Support\Facades\Validator;
use Session;

class FormController extends Controller
{
    public function index()
    {
        return view('welcome');
    }
    public function submitContactForm(Request $request)
    {

        $validator = Validator::make($request->all(), [
            'name' => 'required',
            'email' => 'required|email',
            'message' => 'required',
        ]);

        if ($validator->fails()) {
            return redirect()->Back()->withInput()->withErrors($validator);
        } else {
            Session::flash('message', 'Form submit Successfully.');
        }
        return redirect('/');
    }
}
Web routing
routes/web.php
<?php

use Illuminate\Support\Facades\Route;
use App\Http\Controllers\FormController;

/*
|--------------------------------------------------------------------------
| Web Routes
|--------------------------------------------------------------------------
|
| Here is where you can register web routes for your application. These
| routes are loaded by the RouteServiceProvider and all of them will
| be assigned to the "web" middleware group. Make something great!
|
*/

Route::get('/', function () {
    return view('welcome');
});

Route::get('/', [FormController::class, 'index']);
Route::post('submit/form', [FormController::class, 'submitContactForm'])->name('submit.form');