Build a working Laravel CAPTCHA form in minutes with validation and reload support.
A CAPTCHA helps protect a form from spam and automated submissions.
In Laravel, you can add a simple image CAPTCHA to a form and validate it when the user submits the page.
In this tutorial, I will show how to add a simple Laravel CAPTCHA using the mews/captcha package. You will create a form, display the CAPTCHA image, reload it, and validate the entered code.
This example uses a clean and minimal setup, so it is easy to understand and reuse.
A Laravel CAPTCHA is a validation method that uses an image-based code to prevent automated form submissions.
Quick Answer
You can add a simple CAPTCHA in Laravel by installing the `mews/captcha` package, showing the CAPTCHA image in a Blade form, and validating the entered code in the controller.
In this example, we will also add a reload button so users can refresh the CAPTCHA if they cannot read it.
Quick Steps to Add CAPTCHA in Laravel
To add a simple CAPTCHA in Laravel:
- Install the package
composer require mews/captcha - Create routes for form, submit, and reload
- Create a controller to handle validation
- Add CAPTCHA image in Blade form
- Validate using the captcha rule
- Add reload option using JavaScript
What you will build
In this example, you will build a simple Laravel form with CAPTCHA validation.
It includes:
- A form with a CAPTCHA image
- A reload button to refresh the CAPTCHA
- Validation to check the entered code
- Error message for invalid CAPTCHA
- Success message after form submission
Example Output
Below is the form with CAPTCHA and reload option.
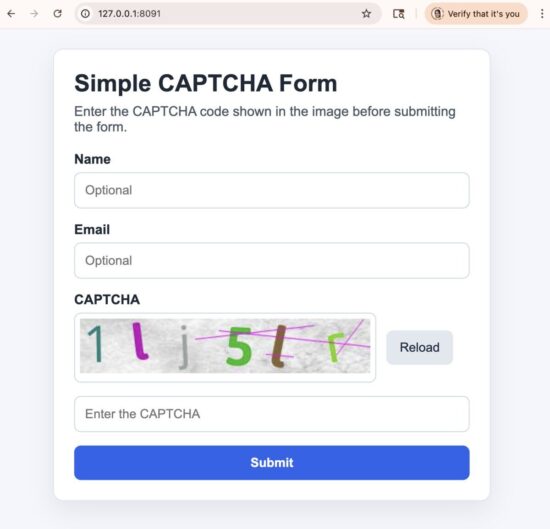
Laravel CAPTCHA form with reload button and validation input
If the entered CAPTCHA is incorrect, an error message is shown.
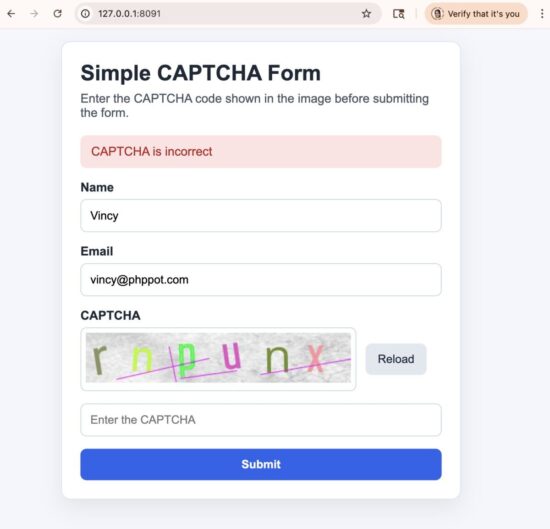
Laravel CAPTCHA validation error message example
On successful submission, a success message is displayed.
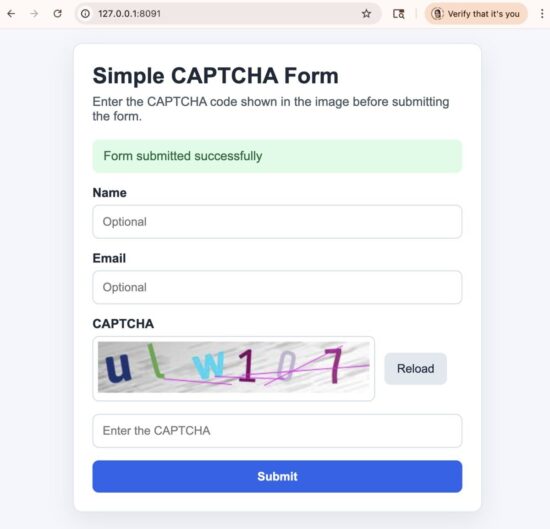
Laravel CAPTCHA success message after form submission
Step 1 – Install the Laravel CAPTCHA package
Install the CAPTCHA package using Composer.
composer require mews/captcha
This package generates a simple image CAPTCHA and provides validation support.
Step 2 – Configure CAPTCHA settings
Publish the CAPTCHA configuration file.
php artisan vendor:publish --provider="Mews\Captcha\CaptchaServiceProvider"
This creates the captcha.php config file in the config folder.
<?php

return [
    'disable' => env('CAPTCHA_DISABLE', false),

    'characters' => [
        'A', 'B', 'C', 'D', 'E', 'F', 'G', 'H', 'I', 'J', 'K', 'L', 'M', 'N', 'O', 'P', 'Q', 'R', 'S', 'T', 'U', 'V', 'W', 'X', 'Y', 'Z',
        'a', 'b', 'c', 'd', 'e', 'f', 'g', 'h', 'i', 'j', 'k', 'l', 'm', 'n', 'o', 'p', 'q', 'r', 's', 't', 'u', 'v', 'w', 'x', 'y', 'z',
        0, 1, 2, 3, 4, 5, 6, 7, 8, 9,
    ],

    'fontsDirectory' => dirname(__DIR__) . '/vendor/mews/captcha/assets/fonts',
    'bgsDirectory' => dirname(__DIR__) . '/vendor/mews/captcha/assets/backgrounds',

    'default' => [
        'length' => 6,
        'width' => 345,
        'height' => 65,
        'quality' => 90,
        'math' => false,
        'expire' => 60,
        'encrypt' => false,
    ],

    'flat' => [
        'length' => 6,
        'fontColors' => ['#2c3e50', '#c0392b', '#16a085', '#c0392b', '#8e44ad', '#303f9f', '#f57c00', '#795548'],
        'width' => 345,
        'height' => 65,
        'math' => false,
        'quality' => 100,
        'lines' => 6,
        'bgImage' => true,
        'bgColor' => '#28faef',
        'contrast' => 0,
    ],

    'mini' => [
        'length' => 3,
        'width' => 60,
        'height' => 32,
    ],

    'inverse' => [
        'length' => 5,
        'width' => 120,
        'height' => 36,
        'quality' => 90,
        'sensitive' => true,
        'angle' => 12,
        'sharpen' => 10,
        'blur' => 2,
        'invert' => false,
        'contrast' => -5,
    ],

    'math' => [
        'length' => 9,
        'width' => 120,
        'height' => 36,
        'quality' => 90,
        'math' => true,
    ],
];
You can use the default settings without any changes.
If needed, you can customize values like:
- length of CAPTCHA
- image width and height
- background and font colors
For example, to change the character length:
'length' => 5,
Most projects can use the default configuration without any changes.
Using different CAPTCHA styles
You can use different CAPTCHA styles defined in the configuration file, such as mini, inverse and more.
To use a specific style, pass its name to the captcha_img() function:
captcha_img('mini')
captcha_img('inverse')
Make sure to update the style in all places where captcha_img() is used.
In this example, it is used in:
- the form display
- the reload CAPTCHA method
Both should use the same style to avoid mismatch.
CAPTCHA style comparison
| Style | Length | Size (approx) | Special feature | Use case |
|---|---|---|---|---|
| default | 6 | Large | Standard image | General forms |
| flat | 6 | Large | Colored text and background | Modern UI forms |
| mini | 3 | Small | Compact size | Small layouts |
| inverse | 5 | Medium | Distortion and contrast | Better readability |
| math | 9 | Medium | Math-based CAPTCHA | Stronger bot protection |
Step 3 – Create routes
use App\Http\Controllers\CaptchaController;
Route::get('/', [CaptchaController::class, 'showForm'])->name('captcha.form');
Route::post('/submit', [CaptchaController::class, 'submit'])->name('captcha.submit');
Route::get('/reload-captcha', [CaptchaController::class, 'reloadCaptcha'])->name('captcha.reload');
These routes display the form, handle form submission, and reload the CAPTCHA image.
Step 4 – Create the controller
Create a controller to display the form, validate input, and generate the CAPTCHA image.
php artisan make:controller CaptchaController
<?php

namespace App\Http\Controllers;

use Illuminate\Http\Request;

class CaptchaController extends Controller
{
    public function showForm()
    {
        return view('captcha-form', [
            'captchaImage' => captcha_img(),
        ]);
    }

    public function submit(Request $request)
    {
        $request->validate([
            'name' => ['nullable', 'string', 'max:100'],
            'email' => ['nullable', 'email'],
            'captcha' => ['required', 'captcha'],
        ], [
            'captcha.required' => 'Enter the CAPTCHA',
            'captcha.captcha' => 'CAPTCHA is incorrect',
        ]);

        return redirect()
            ->route('captcha.form')
            ->with('success', 'Form submitted successfully');
    }

    public function reloadCaptcha()
    {
        return response()->json([
            'captcha' => captcha_img(),
        ]);
    }
}
The controller displays the form, validates the CAPTCHA input, and handles the reload request.
The CAPTCHA image is generated by the mews/captcha package and displayed in the form.
On form submit, the entered value is validated using Laravel’s captcha validation rule. If it does not match, a validation error is shown.
The reload action returns a new CAPTCHA image without refreshing the page.
You can also switch CAPTCHA styles using the configuration file.
You can also switch CAPTCHA styles using the configuration file by passing the style name to the captcha_img() function.
Step 5 – Build the Blade form
Create a Blade view to display the form, CAPTCHA image, and validation messages.
resources/views/captcha-form.blade.php
<!DOCTYPE html>
<html lang="en">
<head>
    <meta charset="UTF-8">
    <meta name="viewport" content="width=device-width, initial-scale=1.0">
    <title>Laravel CAPTCHA Form</title>
    <style>
        body {
            margin: 0;
            font-family: Arial, sans-serif;
            background: #f4f6fb;
            color: #1f2937;
        }

        .page {
            max-width: 520px;
            margin: 60px auto;
            padding: 24px;
        }

        .card {
            background: #ffffff;
            border: 1px solid #dbe3f0;
            border-radius: 12px;
            padding: 24px;
            box-shadow: 0 12px 30px rgba(15, 23, 42, 0.08);
        }

        h1 {
            margin: 0 0 8px;
            font-size: 28px;
        }

        p {
            margin: 0 0 20px;
            color: #4b5563;
        }

        label {
            display: block;
            margin-bottom: 6px;
            font-weight: 700;
        }

        input {
            width: 100%;
            box-sizing: border-box;
            padding: 12px;
            border: 1px solid #cbd5e1;
            border-radius: 8px;
            margin-bottom: 16px;
            font-size: 15px;
        }

        .captcha-row {
            display: flex;
            align-items: center;
            gap: 12px;
            margin-bottom: 16px;
        }

        .captcha-image {
            min-height: 46px;
            padding: 6px;
            border: 1px solid #cbd5e1;
            border-radius: 8px;
            background: #fff;
        }

        button {
            border: 0;
            border-radius: 8px;
            padding: 12px 16px;
            font-size: 15px;
            cursor: pointer;
        }

        .reload-button {
            background: #e2e8f0;
            color: #1e293b;
        }

        .submit-button {
            width: 100%;
            background: #2563eb;
            color: #fff;
            font-weight: 700;
        }

        .message {
            padding: 12px 14px;
            border-radius: 8px;
            margin-bottom: 16px;
        }

        .message.success {
            background: #dcfce7;
            color: #166534;
        }

        .message.error {
            background: #fee2e2;
            color: #b91c1c;
        }

        .field-error {
            margin-top: -10px;
            margin-bottom: 16px;
            color: #b91c1c;
            font-size: 14px;
        }
    </style>
</head>
<body>
    <div class="page">
        <div class="card">
            <h1>Simple CAPTCHA Form</h1>
            <p>Enter the CAPTCHA code shown in the image before submitting the form.</p>

            @if (session('success'))
                <div class="message success">{{ session('success') }}</div>
            @endif

            @if ($errors->has('captcha'))
                <div class="message error">{{ $errors->first('captcha') }}</div>
            @endif

            <form method="POST" action="{{ route('captcha.submit') }}">
                @csrf

                <label for="name">Name</label>
                <input
                    id="name"
                    type="text"
                    name="name"
                    value="{{ old('name') }}"
                    placeholder="Optional"
                >

                <label for="email">Email</label>
                <input
                    id="email"
                    type="text"
                    name="email"
                    value="{{ old('email') }}"
                    placeholder="Optional"
                >
                @error('email')
                    <div class="field-error">{{ $message }}</div>
                @enderror

                <label for="captcha">CAPTCHA</label>
                <div class="captcha-row">
                    <div class="captcha-image" id="captcha-image">{!! $captchaImage !!}</div>
                    <button class="reload-button" type="button" id="reload-captcha">Reload</button>
                </div>

                <input
                    id="captcha"
                    type="text"
                    name="captcha"
                    placeholder="Enter the CAPTCHA"
                    autocomplete="off"
                >

                <button class="submit-button" type="submit">Submit</button>
            </form>
        </div>
    </div>

    <script>
        document.getElementById('reload-captcha').addEventListener('click', async function () {
            const response = await fetch('{{ route('captcha.reload') }}', {
                headers: {
                    'X-Requested-With': 'XMLHttpRequest'
                }
            });

            const data = await response.json();
            document.getElementById('captcha-image').innerHTML = data.captcha;
            document.getElementById('captcha').value = '';
        });
    </script>
</body>
</html>
The form displays the CAPTCHA image and includes a reload option.
When the reload link is clicked, a new CAPTCHA image is loaded using a simple fetch request.
Validation errors and success messages are shown in the form after submit.
Tip: Improve user experience
For better user experience, you can display CAPTCHA only after a few failed login attempts instead of showing it on page load. This reduces friction for users.
This approach is best suited for login forms, where repeated failed attempts can indicate automated attacks. For general forms like contact or signup forms, it is better to show CAPTCHA by default.
Common Errors and Fixes
CAPTCHA image not showing
Check if the session is working properly. Clear cache and reload the page.
CAPTCHA always incorrect
Make sure the session value is stored correctly and compared using the same format.
Reload button not working
Check the route name and JavaScript fetch URL.
CSRF token mismatch
Make sure the @csrf directive is included in the form.
Page not loading after submit
Check route names and controller methods.
Developer FAQ
How to add CAPTCHA in Laravel?
You can use a package like mews/captcha to generate a simple image CAPTCHA and validate it in your Laravel form.
How to reload CAPTCHA in Laravel?
Create a route that returns a new CAPTCHA image using the captcha_img() function, and update the image on the page using a simple JavaScript fetch request.
Why is my CAPTCHA always incorrect?
Make sure the CAPTCHA input is validated using the captcha rule and the form is submitted correctly.
Can I use this CAPTCHA in production?
This is suitable for basic protection. For stronger security, you can use Google reCAPTCHA.
Where is the CAPTCHA value stored?
The CAPTCHA value is handled internally by the package and validated using Laravel’s validation rule.
Do I need to install any package for this CAPTCHA?
Yes, this example uses the mews/captcha package, which can be installed using Composer.
Conclusion
In this tutorial, we created a simple CAPTCHA form in Laravel using a clean and minimal approach.
We generated the CAPTCHA image, validated user input, and added a reload option.
This example is easy to understand and can be reused in your Laravel projects.
You can also learn how to integrate Google reCAPTCHA in Laravel.
Download Source Code
Download only the required Laravel files using the link below.
These files are ready to plug into your Laravel project.
Requirements:
- Laravel project installed
- Composer available
After downloading, copy the files into your Laravel project and install the required package.
If you need stronger protection against bots, you can implement Google reCAPTCHA v3.