This article gives a working example script to learn how to upload files to Google Drive via JavaScript.
Creating a JavaScript solution to the Drive file upload process is very simple. It uses gapi library to implement this feature on the client side.
In a recently posted tutorial, we created an example code for achieving Google Drive upload in PHP.
Prerequisites
It needs two libraries loaded to achieve JavaScript via Google Drive upload.
- Google sign-in library for identity verification.
- Google API client library for JavaScript-based API access.
Added to that, create the API app and get the credentials.
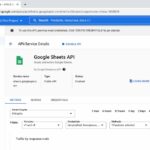
- Enable the Google Drive API.
- Get the API key and Web client id from the Google developer console.
Go to the Google developer console and click “Create Credentials” to set the API key and web client id. We have seen how to get the Google API keys from the developer console in previous articles.
Steps to upload files to Google Drive with JavaScript
These are the steps to implement uploading files from an application to Google Drive using JavaScript.
- Authorize by proving the identity via Google sign-in API (GSI) library challenge.
- Get the access token.
- Prepare the upload request by specifying the Google drive directory target (optional).
- Hit Google Drive V3 endpoint to post file content and metadata via JavaScript FormData.

Example code for uploading files to Drive
The below code shows the landing page interface in HTML and the JavaScript asset created for uploading the files to Google Drive.
HTML code to display controls for requesting authorization and upload
When landing on the home page, it displays an Authorize button in the UI. On clicking this button, it shows the Google sign-in overlay dialog to proceed with the authorization request.
In this step, the user must prove their identity to have access to upload to the Drive directory.
index.php
<!DOCTYPE html>
<html>
<head>
<title>Google Drive upload using JavaScript</title>
<meta charset="utf-8" />
<meta name="viewport" content="width=device-width, initial-scale=1" />
<link rel="stylesheet" type="text/css" href="css/style.css" />
<link rel="stylesheet" type="text/css" href="css/form.css" />
<style>
#content {
    display: none;
}
</style>
</head>
<body>
    <!--Add HTML buttons to sign in and sign out-->
    <div class="phppot-container">

        <h1>Google Drive upload using JavaScript</h1>
        <div>
            <div class="row">
                <input type="button" id="authorize_button"
                    onclick="handleAuthClick()" value="Authorize"> <input
                    type="button" id="signout_button"
                    onclick="handleSignoutClick()" value="Sign Out">

            </div>
        </div>
        <div id="content" class="success message"><?php if(isset($message)) { echo $message; } ?></div>
    </div>
    <script type="text/javascript" src="./js/gapi-upload.js"></script>
    <script async defer src="https://apis.google.com/js/api.js"
        onload="gapiLoaded()"></script>
    <script async defer src="https://accounts.google.com/gsi/client"
        onload="gisLoaded()"></script>
</body>
</html>
JavaScript to handle user authorization and file upload sequence
This JavaScript code initializes the gapi and gsi on a callback of loading these Google JavaScript libraries.
It also contains the handlers to trigger API requests for the following actions.
- Google authorization with identity proof.
- Upload files with the access token.
- Refresh gapi upload action once authorized.
- Signout.
This JavaScript code requires the authorization credentials to be configured. Set the CLIENT_ID and API_KEY in this script before running this example.
In this example, it sets the Google Drive folder id to upload the file via JavaScript. This configuration is optional. If no target is needed, remove the parameter from the file meta array.
js/gapi-upload.js
// TODO: Set the below credentials
const CLIENT_ID = 'SET-YOUR-CLIENT-ID';
const API_KEY = 'SET-YOUR-API-KEY';

// Discovery URL for APIs used by the quickstart
const DISCOVERY_DOC = 'https://www.googleapis.com/discovery/v1/apis/drive/v3/rest';

// Set API access scope before proceeding authorization request
const SCOPES = 'https://www.googleapis.com/auth/drive.file';
let tokenClient;
let gapiInited = false;
let gisInited = false;

document.getElementById('authorize_button').style.visibility = 'hidden';
document.getElementById('signout_button').style.visibility = 'hidden';

/**
 * Callback after api.js is loaded.
 */
function gapiLoaded() {
	gapi.load('client', initializeGapiClient);
}

/**
 * Callback after the API client is loaded. Loads the
 * discovery doc to initialize the API.
 */
async function initializeGapiClient() {
	await gapi.client.init({
		apiKey: API_KEY,
		discoveryDocs: [DISCOVERY_DOC],
	});
	gapiInited = true;
	maybeEnableButtons();
}

/**
 * Callback after Google Identity Services are loaded.
 */
function gisLoaded() {
	tokenClient = google.accounts.oauth2.initTokenClient({
		client_id: CLIENT_ID,
		scope: SCOPES,
		callback: '', // defined later
	});
	gisInited = true;
	maybeEnableButtons();
}

/**
 * Enables user interaction after all libraries are loaded.
 */
function maybeEnableButtons() {
	if (gapiInited && gisInited) {
		document.getElementById('authorize_button').style.visibility = 'visible';
	}
}

/**
 *  Sign in the user upon button click.
 */
function handleAuthClick() {
	tokenClient.callback = async (resp) => {
		if (resp.error !== undefined) {
			throw (resp);
		}
		document.getElementById('signout_button').style.visibility = 'visible';
		document.getElementById('authorize_button').value = 'Refresh';
		await uploadFile();

	};

	if (gapi.client.getToken() === null) {
		// Prompt the user to select a Google Account and ask for consent to share their data
		// when establishing a new session.
		tokenClient.requestAccessToken({ prompt: 'consent' });
	} else {
		// Skip display of account chooser and consent dialog for an existing session.
		tokenClient.requestAccessToken({ prompt: '' });
	}
}

/**
 *  Sign out the user upon button click.
 */
function handleSignoutClick() {
	const token = gapi.client.getToken();
	if (token !== null) {
		google.accounts.oauth2.revoke(token.access_token);
		gapi.client.setToken('');
		document.getElementById('content').style.display = 'none';
		document.getElementById('content').innerHTML = '';
		document.getElementById('authorize_button').value = 'Authorize';
		document.getElementById('signout_button').style.visibility = 'hidden';
	}
}

/**
 * Upload file to Google Drive.
 */
async function uploadFile() {
	var fileContent = 'Hello World'; // As a sample, upload a text file.
	var file = new Blob([fileContent], { type: 'text/plain' });
	var metadata = {
		'name': 'sample-file-via-js', // Filename at Google Drive
		'mimeType': 'text/plain', // mimeType at Google Drive
		// TODO [Optional]: Set the below credentials
		// Note: remove this parameter, if no target is needed
		'parents': ['SET-GOOGLE-DRIVE-FOLDER-ID'], // Folder ID at Google Drive which is optional
	};

	var accessToken = gapi.auth.getToken().access_token; // Here gapi is used for retrieving the access token.
	var form = new FormData();
	form.append('metadata', new Blob([JSON.stringify(metadata)], { type: 'application/json' }));
	form.append('file', file);

	var xhr = new XMLHttpRequest();
	xhr.open('post', 'https://www.googleapis.com/upload/drive/v3/files?uploadType=multipart&fields=id');
	xhr.setRequestHeader('Authorization', 'Bearer ' + accessToken);
	xhr.responseType = 'json';
	xhr.onload = () => {
		document.getElementById('content').innerHTML = "File uploaded successfully. The Google Drive file id is <b>" + xhr.response.id + "</b>";
		document.getElementById('content').style.display = 'block';
	};
	xhr.send(form);
}
Google Drive JavaScript Upload Response
Once authorized, the JavaScript calls the uploadFile() function to hit the Google Drive V3 API to post the file binary.
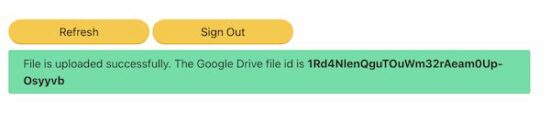
The below screenshot shows the uploaded Google Drive file id in the success message.
After sign-in, the landing page UI will display the signout option. It also shows a Refresh button to trigger upload action again in case of any issues on uploading.


Thank you for sharing. It works for text files.
Is it possible to upload an image to google drive?
Hi DT,
I will soon write another article to upload images to Google drive. It is very much possible. Thanks.