We will see three different ways of capturing webpage screenshots using JavaScript. These three methods give solutions to take screenshots with and without using libraries.
- I am using the html2canvas JavaScript library.
- I am using plain HTML5 with JavaScript.
- Using WebRTC’s getDisplayMedia method.
1) Using the html2canvas JavaScript library
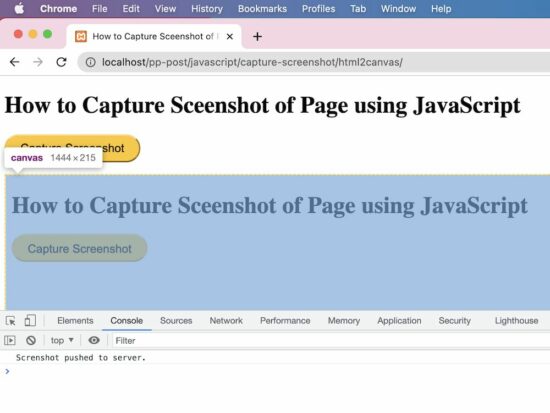
This method uses the popular JS library html2canvas to capture a screenshot from a webpage.
This script implements the below steps to capture a screenshot from the page HTML.
- It initializes the html2canvas library class and supplies the body HTML to it.
- It sets the target to append the output screenshot to the HTML body.
- Generates canvas element and appends to the HTML.
- It gets the image source data URL from the canvas object.
- Push the source URL to the PHP via AJAX to save the screenshot to the server.
capture-screenshot/index.html
Quick example
<!DOCTYPE html>
<html>
<head>
<title>How to Capture Screenshot of Page using JavaScript</title>
<link rel='stylesheet' href='form.css' type='text/css' />
</head>
<body>
    <div class="phppot-container">
        <h1>How to Capture Screenshot of Page using JavaScript</h1>
        <p>
            <button id="capture-screenshot">Capture Screenshot</button>
        </p>
    </div>

    <script
    src="https://ajax.googleapis.com/ajax/libs/jquery/3.2.1/jquery.min.js"></script>
    <script type="text/javascript"
    src="https://html2canvas.hertzen.com/dist/html2canvas.min.js"></script>
    <script type="text/javascript">
        $('#capture-screenshot').click(function() {
            const screenshotTarget = document.body;
            html2canvas(screenshotTarget).then(canvas => {
            	// to image as png use below line
                // const base64image = canvas.toDataURL("image/png");
            	// show the image in window use below line
                // window.location.href = base64image;

            	// screenshot appended to the body as canvas
                document.body.appendChild(canvas);
                dataURL = canvas.toDataURL();
                // to print the screenshot in console use below line
                // console.log(dataURL);

                // following line is optional and it is to save the screenshot
                // on the server side. It initiates an ajax call
                pushScreenshotToServer(dataURL);
            });
        });

        function pushScreenshotToServer(dataURL) {
            $.ajax({
                url: "push-screenshot.php",
                type: "POST",
                data: {
                    image: dataURL
                },
                dataType: "html",
                success: function() {
                	console.log('Screenshot pushed to server.');
                }
            });
        }
    </script>
</body>
</html>
We have already used this library in codes generating canvas elements with dynamic data. For example, we used html2canvas for creating invoice PDFs from HTML using JavaScript.
Push the screenshot to PHP to save
This PHP script reads the screenshot binaries posted via AJAX. It prepares the screenshot properties in JSON format.
capture-screenshot/push-screenshot.php
<?php
if (isset($_POST['image'])) {
    // should have read and write permission to the disk to write the JSON file
    $screenshotJson = fopen("screenshot.json", "a") or die("Unable to open screenshot.json file.");
    $existingContent = file_get_contents('screenshot.json');
    $contentArray = json_decode($existingContent, true);
    $screenshotImage = array(
        'imageURL' => $_POST['image']
    );
    $contentArray[] = $screenshotImage;
    $fullData = json_encode($contentArray);
    file_put_contents('screenshot.json', $fullData);
    fclose($screenshotJson);
}
?>
This will output a “screenshot.json” file with the image data URL and store it in the application.
2) Using plain HTML5 with JavaScript
This JavaScript code includes two functions. One is to generate an image object URL, and the other is to take screenshots by preparing the blob object from the page.
It prepares a blob object URL representing the output screenshot image captured from the page. It takes screenshots by clicking the “Capture Screenshot” button in the UI.
It controls the style properties and scroll coordinates of the node pushed to the screenshot object. This stops users from having the mouse controls on the BLOB object.
In a previous example, we have seen how to create a blob and store it in the MySQL database.
This code will show the captured screenshot on a new page. The new page will have the generated blob URL as a blob:http://localhost/0212cfc1-02ab-417c-b92f-9a7fe613808c
html5-javascript/index.html
function takeScreenshot() {
	var screenshot = document.documentElement
		.cloneNode(true);
	screenshot.style.pointerEvents = 'none';
	screenshot.style.overflow = 'hidden';
	screenshot.style.webkitUserSelect = 'none';
	screenshot.style.mozUserSelect = 'none';
	screenshot.style.msUserSelect = 'none';
	screenshot.style.oUserSelect = 'none';
	screenshot.style.userSelect = 'none';
	screenshot.dataset.scrollX = window.scrollX;
	screenshot.dataset.scrollY = window.scrollY;
	var blob = new Blob([screenshot.outerHTML], {
		type: 'text/html'
	});
	return blob;
}

function generate() {
	window.URL = window.URL || window.webkitURL;
	window.open(window.URL
		.createObjectURL(takeScreenshot()));
}
3) Using WebRTC’s getDisplayMedia method
This method uses the JavaScript MediaServices class to capture the screenshot from the page content.
This example uses the getDisplayMedia() of this class to return the media stream of the current page content.
Note: It needs to grant permission to get the whole or part of the page content on the display.
It prepares an image source to draw into the canvas with the reference of its context. After writing the media stream object into the context, this script converts the canvas into a data URL.
This data URL is used to see the page screenshot captured on a new page.
It should be closed after reading the media stream object to a screenshot element object. The JS MediaStreamTrack.stop() is used to close the track if unnecessary.
This JavaScript forEach iterates the MediaStream object array to get the track instance to stop.
webrtc-get-display-media/index.html
<!DOCTYPE html>
<html>
<head>
<title>How to Capture Sceenshot of Page using JavaScript</title>
<link rel='stylesheet' href='form.css' type='text/css' />
</head>
<body>
    <div class="phppot-container">
        <p>This uses the WebRTC standard to take screenshot. WebRTC
            is popular and has support in all major modern browsers. It
            is used for audio, video communication.</p>
        <p>getDisplayMedia() is part of WebRTC and is used for
            screen sharing. Video is rendered and then page screenshot
            is captured from the video.</p>
        <p>
        <p>
            <button id="capture-screenshot"
                onclick="captureScreenshot();">Capture
                Screenshot</button>
        </p>
    </div>
    <script>
    const captureScreenshot = async () => {
        const canvas = document.createElement("canvas");
        const context = canvas.getContext("2d");
        const screenshot = document.createElement("screenshot");

        try {
            const captureStream = await navigator.mediaDevices.getDisplayMedia();
            screenshot.srcObject = captureStream;
            context.drawImage(screenshot, 0, 0, window.width, window.height);
            const frame = canvas.toDataURL("image/png");
            captureStream.getTracks().forEach(track => track.stop());
            window.location.href = frame;
        } catch (err) {
            console.error("Error: " + err);
        }
    };
    </script>
</body>
</html>